
Hubble 23.3
Hubble Desktop and Web
User Guide for
Designer Express
Capability

Document Information. . . . . . . . . . . . . . . . . . . . . . . . . . . . . . . . . . . . . . . . . . i
Notices . . . . . . . . . . . . . . . . . . . . . . . . . . . . . . . . . . . . . . . . . . . . . . . . . . . . . . . . . . i
Copyright . . . . . . . . . . . . . . . . . . . . . . . . . . . . . . . . . . . . . . . . . . . . . . . . . . . . . i
Disclaimer . . . . . . . . . . . . . . . . . . . . . . . . . . . . . . . . . . . . . . . . . . . . . . . . . . . . . i
Version History . . . . . . . . . . . . . . . . . . . . . . . . . . . . . . . . . . . . . . . . . . . . . . . . . . . i
Customer Support . . . . . . . . . . . . . . . . . . . . . . . . . . . . . . . . . . . . . . . . . . . . . . . . . i
Conventions Used . . . . . . . . . . . . . . . . . . . . . . . . . . . . . . . . . . . . . . . . . . . . . . . . .ii
Chapter 1 - Foundation. . . . . . . . . . . . . . . . . . . . . . . . . . . . . . . . . . . . . . . . . . 1
Introduction . . . . . . . . . . . . . . . . . . . . . . . . . . . . . . . . . . . . . . . . . . . . . . . . . . . . 1
Hubble User Types . . . . . . . . . . . . . . . . . . . . . . . . . . . . . . . . . . . . . . . . . . . . . 1
Knowledge Required for Designer Users . . . . . . . . . . . . . . . . . . . . . . . . . . . 2
Available Features . . . . . . . . . . . . . . . . . . . . . . . . . . . . . . . . . . . . . . . . . . . . . 2
Setup in Administrator . . . . . . . . . . . . . . . . . . . . . . . . . . . . . . . . . . . . . . . . . . . . 5
Licensing . . . . . . . . . . . . . . . . . . . . . . . . . . . . . . . . . . . . . . . . . . . . . . . . . . . . . 5
Data Source Profile . . . . . . . . . . . . . . . . . . . . . . . . . . . . . . . . . . . . . . . . . . . . 8
Capabilities . . . . . . . . . . . . . . . . . . . . . . . . . . . . . . . . . . . . . . . . . . . . . . . . . . 14
Backup and Restore Functionality . . . . . . . . . . . . . . . . . . . . . . . . . . . . . . . 14
Importing and Exporting in Administrator . . . . . . . . . . . . . . . . . . . . . . . . 14
Chapter 2 - Designing a Template . . . . . . . . . . . . . . . . . . . . . . . . . . . . . . . 15
Technical Requirements/Recommendations . . . . . . . . . . . . . . . . . . . . . . . . . 15
Performance . . . . . . . . . . . . . . . . . . . . . . . . . . . . . . . . . . . . . . . . . . . . . . . . 15
Requirements - Custom Template Tables or Database Views . . . . . . . . . 17
Incorporating a new Database View into DX . . . . . . . . . . . . . . . . . . . . . . . 19
Primary Keys . . . . . . . . . . . . . . . . . . . . . . . . . . . . . . . . . . . . . . . . . . . . . . . . 20
Support . . . . . . . . . . . . . . . . . . . . . . . . . . . . . . . . . . . . . . . . . . . . . . . . . . . . . 23
Template Design Considerations . . . . . . . . . . . . . . . . . . . . . . . . . . . . . . . . . . . 24
Defining the reporting requirements . . . . . . . . . . . . . . . . . . . . . . . . . . . . . 24
Know your data . . . . . . . . . . . . . . . . . . . . . . . . . . . . . . . . . . . . . . . . . . . . . . 25
Building your Template/Report . . . . . . . . . . . . . . . . . . . . . . . . . . . . . . . . . 27
Create a New Template . . . . . . . . . . . . . . . . . . . . . . . . . . . . . . . . . . . . . . . . . . 27
Process Overview . . . . . . . . . . . . . . . . . . . . . . . . . . . . . . . . . . . . . . . . . . . . 27

Adding Tables to a Template . . . . . . . . . . . . . . . . . . . . . . . . . . . . . . . . . . . 28
Create and add Virtual Views . . . . . . . . . . . . . . . . . . . . . . . . . . . . . . . . . . . 30
Understanding Joins - what does it mean to join two tables? . . . . . . . . . 39
Defining the Suggested Master Table Joins . . . . . . . . . . . . . . . . . . . . . . . . 40
Defining Table Joins . . . . . . . . . . . . . . . . . . . . . . . . . . . . . . . . . . . . . . . . . . . 41
Table Options . . . . . . . . . . . . . . . . . . . . . . . . . . . . . . . . . . . . . . . . . . . . . . . . 50
Report Options . . . . . . . . . . . . . . . . . . . . . . . . . . . . . . . . . . . . . . . . . . . . . . 60
Double Counting Resolver (DCR) . . . . . . . . . . . . . . . . . . . . . . . . . . . . . . . . 62
Define Amount and Quantity Columns . . . . . . . . . . . . . . . . . . . . . . . . . . . 63
Review and Edit the Table and Join Selections . . . . . . . . . . . . . . . . . . . . . 68
Report Layout . . . . . . . . . . . . . . . . . . . . . . . . . . . . . . . . . . . . . . . . . . . . . . . 70
Publish . . . . . . . . . . . . . . . . . . . . . . . . . . . . . . . . . . . . . . . . . . . . . . . . . . . . . 76
Security . . . . . . . . . . . . . . . . . . . . . . . . . . . . . . . . . . . . . . . . . . . . . . . . . . . . . 76
Appendix . . . . . . . . . . . . . . . . . . . . . . . . . . . . . . . . . . . . . . . . . . . . . . . . . . . . . 77
Amount Columns and Decimal Shifting Rules . . . . . . . . . . . . . . . . . . . . . . . . 77
Currency Decimal Shifting . . . . . . . . . . . . . . . . . . . . . . . . . . . . . . . . . . . . . . 77
Default Number of Decimals Rules . . . . . . . . . . . . . . . . . . . . . . . . . . . . . . 78

Document Information | Notices
Page i
Document Information
Notices
Copyright
Hubble® is a brand name of the insightsoftware.com Group. insightsoftware.com is a registered
trademark of insightsoftware.com Limited. Hubble is a registered trademark of insightsoftware.com
International Unlimited.
Other product and company names mentioned herein may be the trademarks of their respective
owners. The insightsoftware.com Group is the owner or licensee of all intellectual property rights in this
document, which are protected by copyright laws around the world. All such rights are reserved.
The information contained in this document represents the current view of insightsoftware.com on the
issues discussed as of the date of publication. This document is for informational purposes only.
insightsoftware.com makes no representation, guarantee or warranty, expressed or implied, that the
content of this document is accurate, complete or up to date.
Disclaimer
This guide is designed to help you to use the Hubble applications effectively and efficiently. All data
shown in graphics are provided as examples only. The example companies and calculations herein are
fictitious. No association with any real company or organization is intended or should be inferred.
Version History
Customer Support
For more information regarding our products, please contact us at https://insightsoftware.com/hubble/.
For product support including Training, Documentation and Customer Support, visit our Hubble
Community at https://help.insightsoftware.com/.
DATE REVISION
SOFTWARE
VERSION
COMMENTS
13th August 2023 1.0 23.3 Initial issue for 23.3.
Document Information | Conventions Used
Page ii
Conventions Used
The icons below are used in Hubble documentation to indicate type of user, experience, deployment
and the ERP system applicable to the document.
ICON USER TYPE ICON
EXPERIENCE/
DEPLOYMENT
ICON ERP TYPE
Viewer
Viewer users can consume content
and contribute to planning.
Desktop Experience JD Edwards
Power
Power users can consume or create
content, administer and contribute
to planning.
Web Experience Oracle
Designer
Designer users can consume, create
and extend content, as well as build,
administer and contribute to
planning.
On-Premise
Deployment (for
Web Experience)
Budgeting/Planning
Users with this capability can do
real-time budgeting and forecasting.
Cloud Deployment
(for Web Experience)
Administrator
Administrator users administer the
Hubble Product.
Foundation | Introduction
Page 1
Chapter 1: Foundation
Introduction
Hubble® is an integrated suite of performance management apps. It offers reporting, analytics and
planning in a single, real-time solution that fully understands your ERP. Hubble is built on a simple idea -
that things should be easy. Hubble integrates your critical business systems so end users at all levels of
the organization have access to live data - extraordinarily fast. With this type of visibility, everyone can
easily understand, manage and predict the business. Redundant processes disappear, and a high-
performance business can emerge.
Designer users can create customizable content using JD Edwards and Oracle E-Business Suite (EBS)
data. Designer Express, also referred to as DX, enables Designer users to create new templates, through
a simple user interface, over standard and custom ERP tables, virtual views and database views. In these
templates, multiple joins can be created to multiple tables. Once a custom template is created, users can
create reports from the template using standard Hubble functionality.
It is essential that Designer users who are developing custom reports are advanced users with an in-
depth knowledge of ERP tables, fields and table joins.
Hubble User Types
Power Users - Can create ad hoc inquiries and reports using all features related to the report build
process; can publish reports to Viewer users.
Viewer Users - Have access to published reports through a controlled interface; can drill down through
the data and can make selections as published by a Power user. Minimal training required.
Designer Users - Have ability to create custom templates and have in-depth knowledge of ERP
structures, table joins and data, plus advanced knowledge of Hubble. Power and Viewer users are then
able to access these custom templates.
In addition to the above users, you will need to have an Administrator who is responsible for managing
user accounts, database connections, and inquiry permissions. Unlike the user types listed above, an
Administrator may not need to run inquiries, and so does not need a corresponding account with your
ERP system.
Templates created by Designer users will be referred to as either custom templates,
or simply as templates, throughout this document.

Foundation | Introduction
Page 2
Knowledge Required for Designer Users
The table below shows the knowledge required for Designer Users.
Available Features
Designer Users have many options in Designer Express, including the following:
● Users can create new templates based on multiple fact tables, virtual views or database views.
● There is no ‘double-counting’ of rows in calculated totals.
● Several join types can be used: inner, left outer, and right outer.
● Ability to create unions between tables that have identical fields.
● Option to select either inline or outline views.
● Can combine data regardless of the table relationship: one: one, one: many, many: one or many:
many.
● Formatting options are used to define how to display repeating rows.
● Automatically resolving joins between numeric columns and string columns.
● Can join to the same table multiple times. This can be done only if the table has no amounts
defined, for example:
○ PER_PEOPLE_F – EBS
○ F0101 – Address Book – JD Edwards
● Suggested Master Table joins are given based on the tables that being chosen, such as the F0006,
F0101 and F4101 – JD Edwards only.
● There is full language support, except for amount columns – JD Edwards only.
● Currency-based decimal shifting is supported – JD Edwards only.
● There is automatic language support – EBS only.
USER USER CAPABILITIES
ERP KNOWLEDGE
REQUIRED
HUBBLE KNOWLEDGE
REQUIRED
Designer Create custom
templates
In-depth knowledge of ERP
table structures, table
joins, and ERP data
required
Yes - advanced knowledge
Power Create reports from
custom templates
Helpful but not required Yes - anywhere from basic
to advanced knowledge
Viewer Run reports No No

Foundation | Introduction
Page 3
● Ability to leverage standard reporting capabilities once a template has been saved, i.e.:
○ Descriptions
○ Hierarchies created manually (not imported)
○ Default Calculations
○ User-Defined Captions
○ Show SQL
○ Export to Excel/PDF
○ QBE, or Query by Example (other than for value columns if subtotaling is enabled)
○ Fixed value selectors
○ RIO, or Reusable Inquiry Objects (objects can be shared between custom reports and
templates)
● Ability to use segment definitions such as the chart of account flex fields - EBS.
● Organization Security is applied automatically in custom reports for those tables that Hubble
already maps to in our Standard Templates - EBS.
● Designer users have the ability to set column definitions as a report override or a customer
default, the latter being applied to all custom reports.
● Also within the Column Definitions, Designers have the ability to manually define a table or fixed
list lookup in order provide filter validation, Query Assist support, and Code & Description
feature support to end users - EBS.
● When joining to the same table multiple times, Designers can re-label the tables so that the end
user can easily distinguish them.
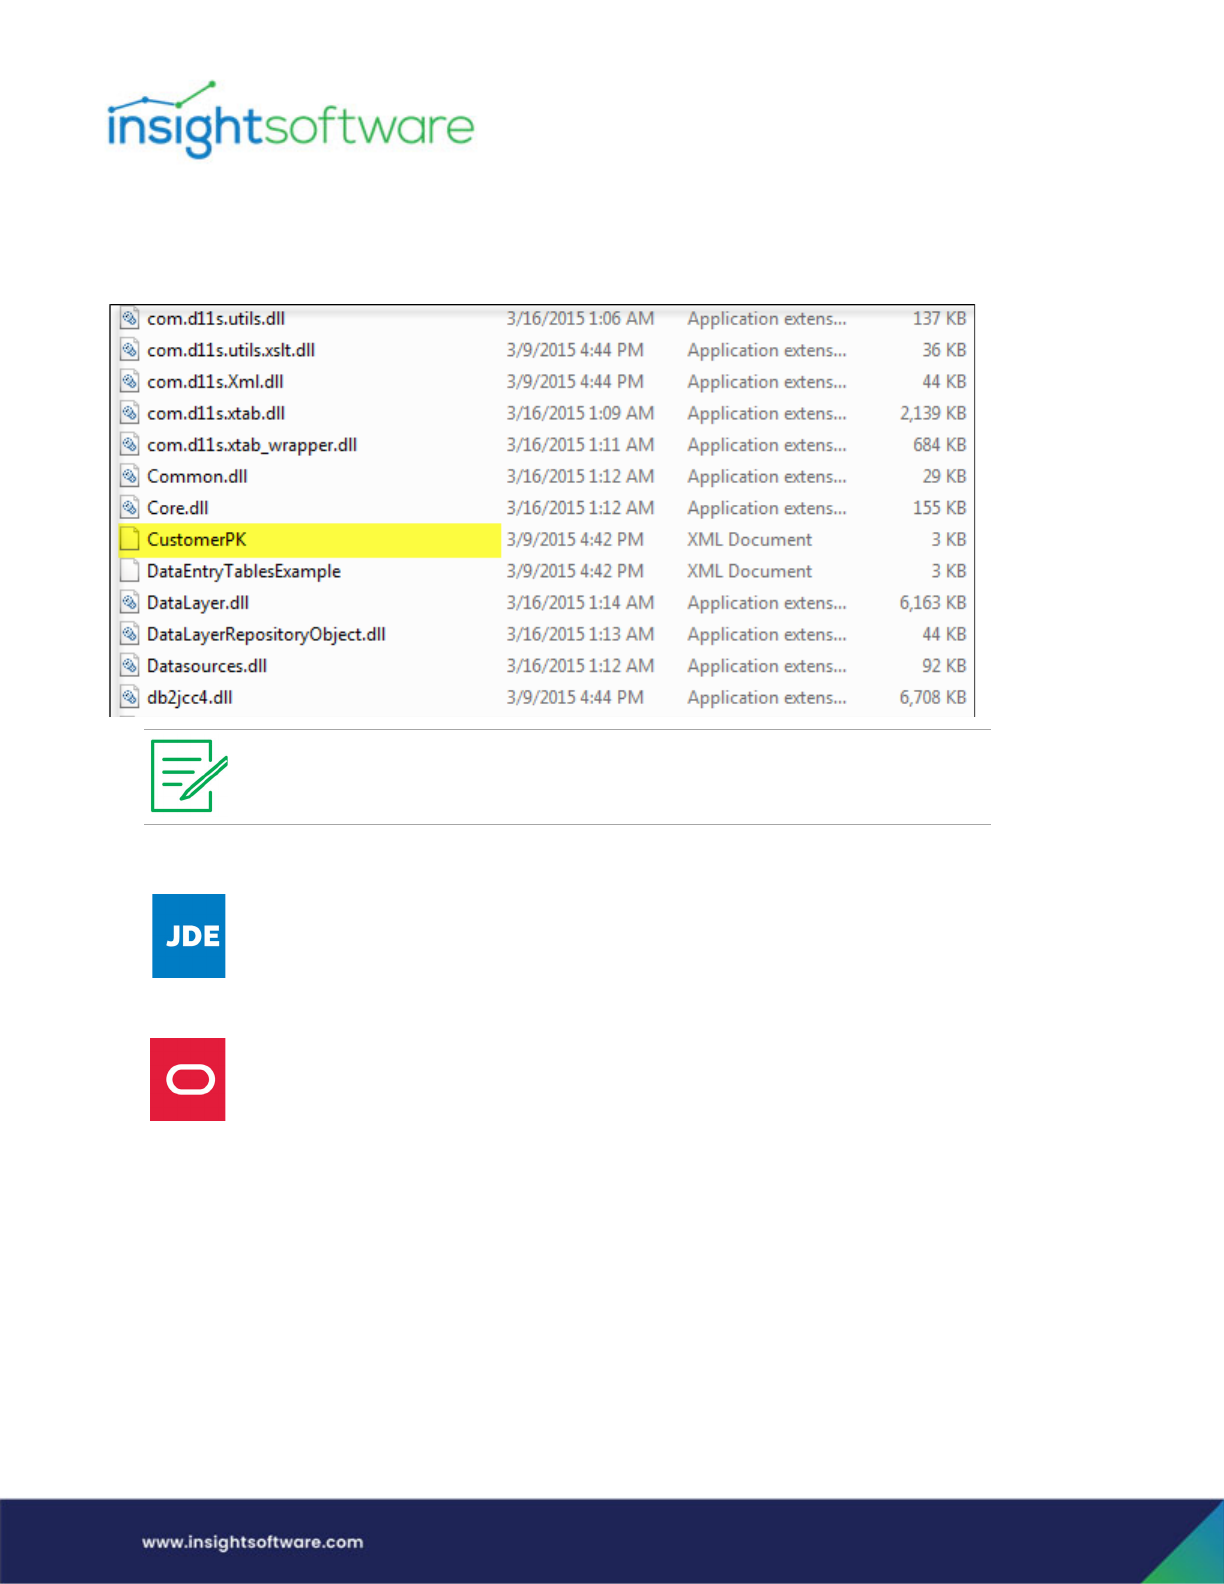
● Ability to define a primary (unique) key in the CustomerPK file located in the install directory.
● Designers can choose which table in a custom report is the 'first' table in the query to which all
other tables are joined.
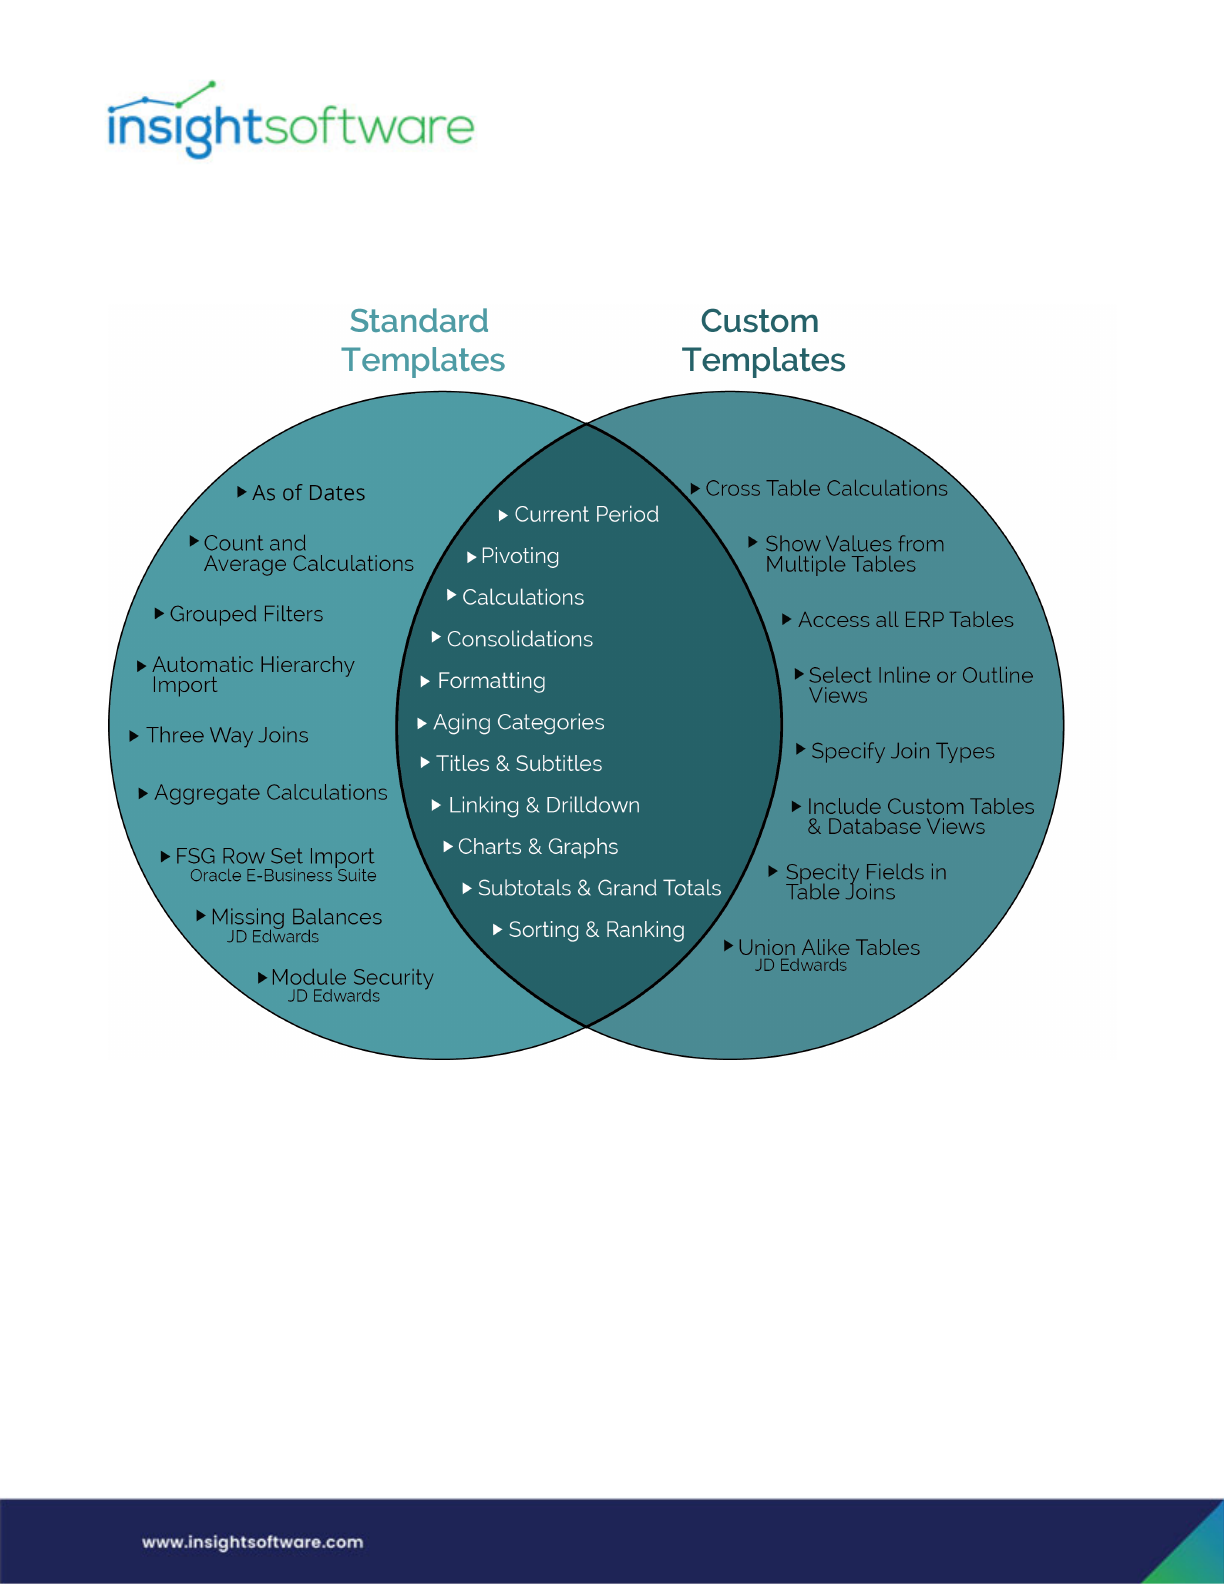
The figure below shows the features available in our standard templates and Designer-created
templates. If you are tasked with creating an inquiry, and are unsure whether a custom or standard
inquiry is more appropriate, this chart may help you decide.
Foundation | Introduction
Page 4
Many other custom reporting tools require specialized technical skills like a background in coding or
SQL. Designer Express takes the technical complexity out of the process with a simple point-and-click
experience. Ultimately, it enables you to create a report/template in minutes, not days.
Standard Templates are:
● Shipped with the product.
● Contain a fixed set of tables.
● Cannot add new tables.
● Cannot access custom tables.
Foundation | Setup in Administrator
Page 5
● Often include business logic, i.e.:
○ Predefined period grouping (ITD, YTD, etc.)
○ Alternate Joins.
○ Reconciliation style templates that union tables and show orphan.
○ Joins that require adjustments to a field for joining (PO Number in AP to PO number in
Purchasing).
Custom Templates are:
● Not shipped with the product.
● Created at your site.
● Can access any ERP tables.
● Can access custom tables and tables outside ERP.
● Do not include ‘built in’ logic to handle module specific situations.
Setup in Administrator
Licensing
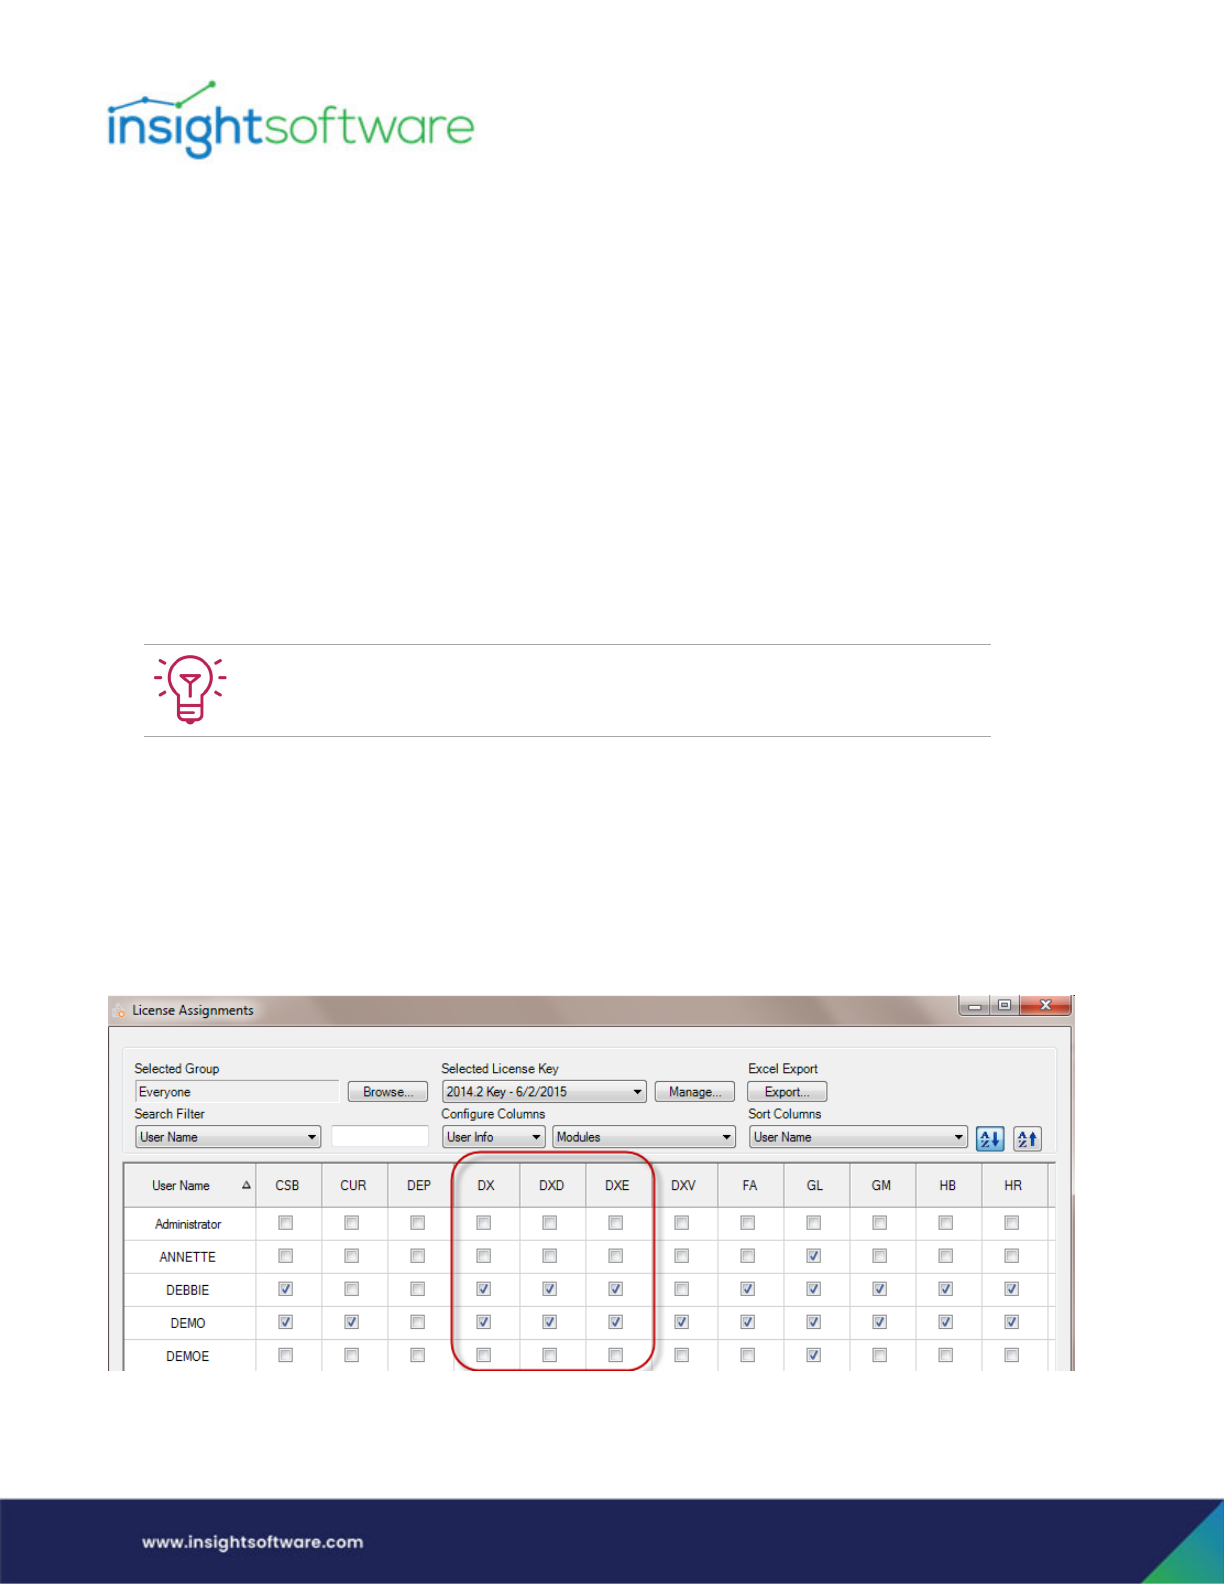
The license key being used must include a license for the Designer Express module. Then the
appropriate license(s) must be assigned to the Designer users who will be using this feature via License
Assignments.
When first creating custom inquiries, we recommend a training workshop where one
of our Product Specialists can take you through the process of building your first
templates.
Foundation | Setup in Administrator
Page 6
There are three types of license keys related to Designer Express:
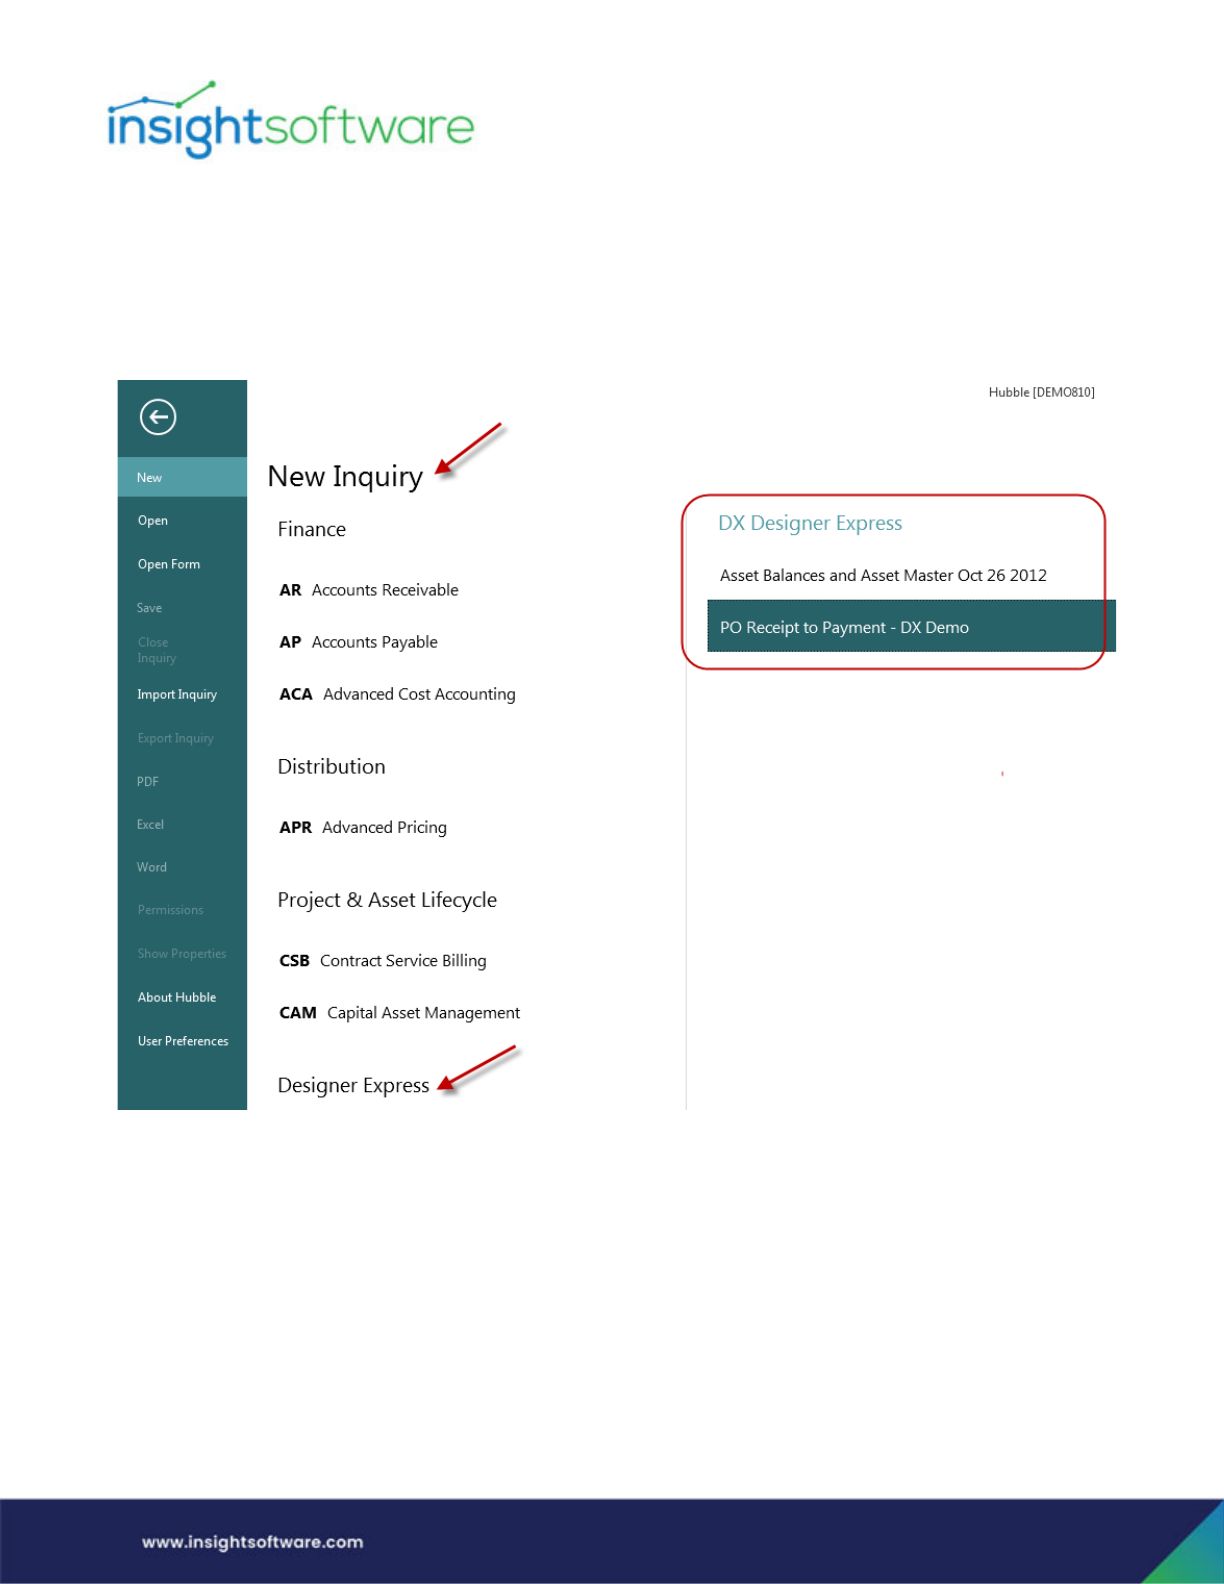
1. Designer Express (DX) - This license is for users who can access and create inquiries based on the
templates created by users with a DXD license. When creating a new inquiry, users with this
license will see the Designer Express category under New Inquiry within the Backstage view. All
Designer-created templates are listed here.

Foundation | Setup in Administrator
Page 7
2. Designer Express Designer (DXD) - This license is for advanced users who create new templates
using Designer Express. Users with this license must also have a DX license as well as a
Configurator license (CFG) in order to be able to create new templates. With these 3 licenses,
users will see the Designer Express category under New Inquiry within the Backstage view. All
Designer-created templates are listed here, as well as New Template, which is used to create a
template from scratch.
3. Designer Express Data Entry (DXE) - This license is for users of Strategic Planning. This
functionality enables end users to design a budget or forecasting input form using any table in JD
Edwards incorporated with user-defined data collection columns that hold key driver information
for robust modeling.

Foundation | Setup in Administrator
Page 8
Designer Express and Scheduler
Reports that are created in Designer Express can be run automatically using Scheduler.
● Scheduler Admin/User: The person creating the task in Scheduler needs an SCH license but does
not need any other license unless they are also going to be set as the Run-As user.
● Run-As User: If this user is a Power user, then they would need a DX license as well as the
appropriate module license in order to run the report. If this user is an Viewer user, then they
would only need a CON license, and can be set up as a Run-As user in release 2013.1 and above.
Data Source Profile
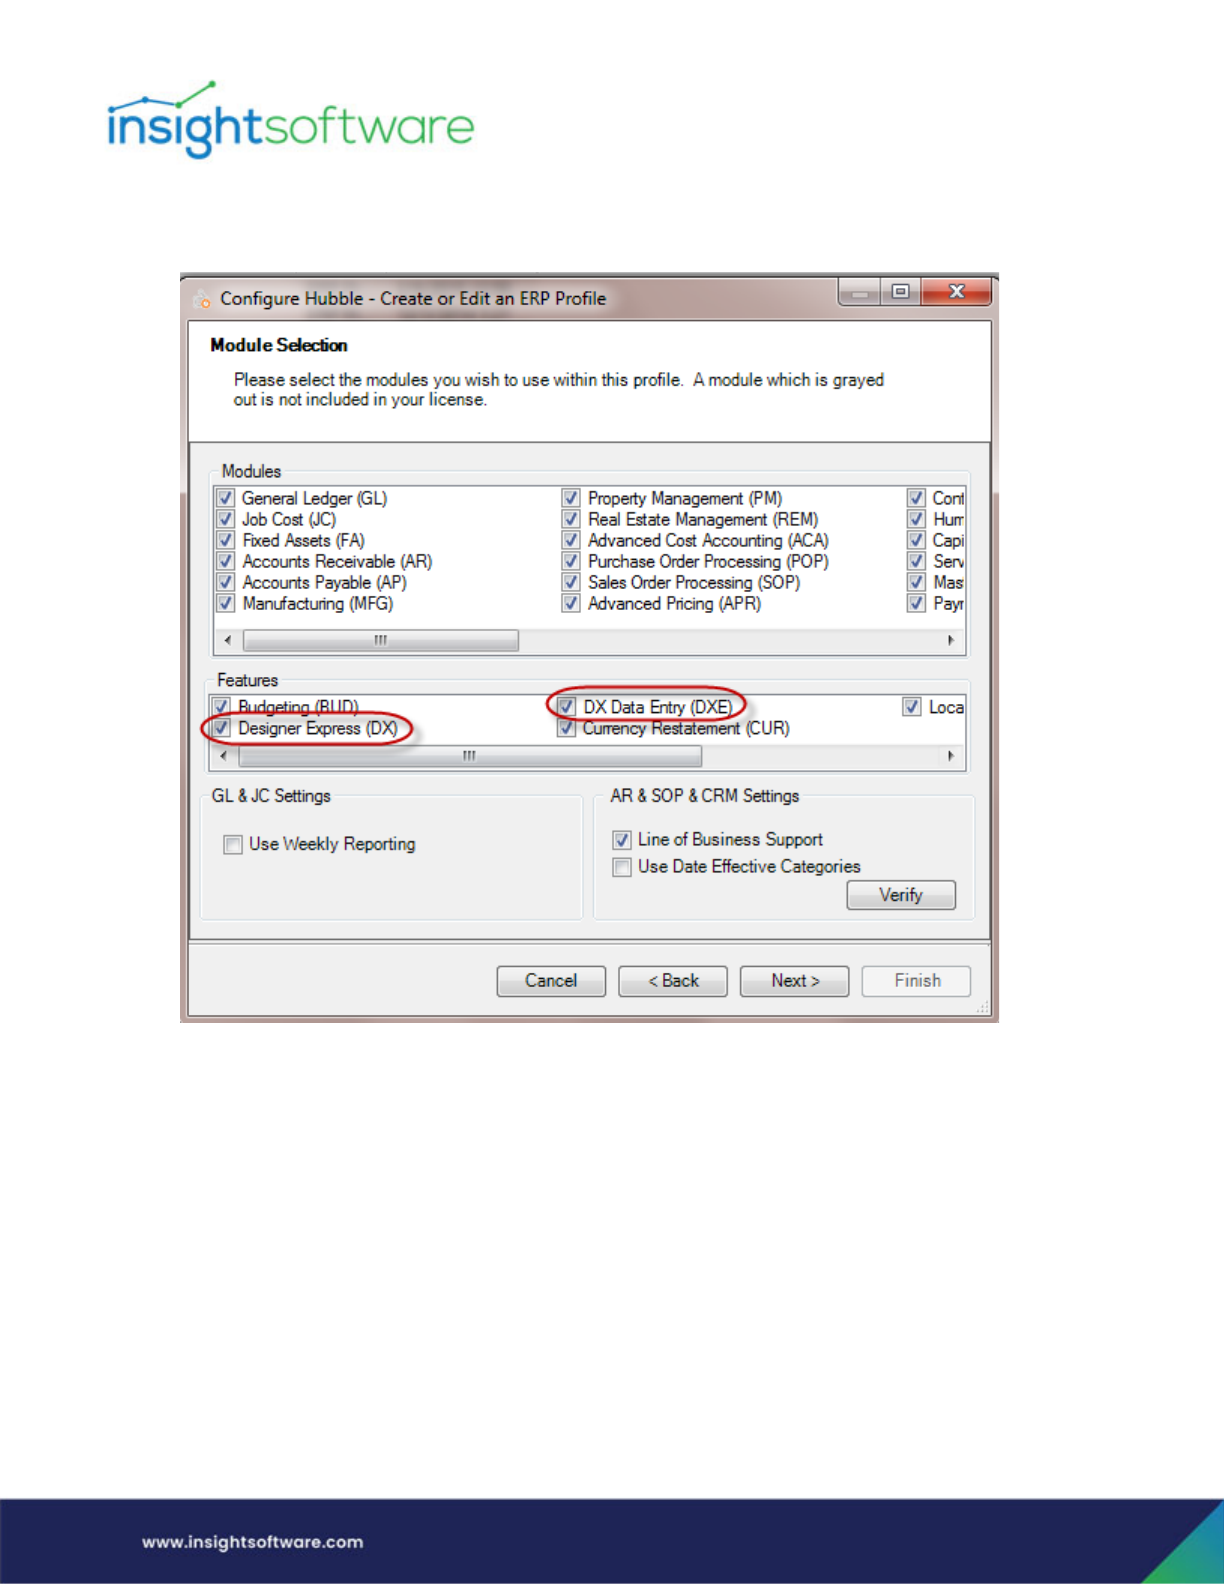
Existing Profiles in Administrator must be updated to incorporate additional information for creating
custom templates. The first addition is in the Module Selection step as shown below, where Designer
Express must be selected if this feature is to be available in this profile.
To update the profile:
1. Expand the Data Sources node in the left panel in Administrator.
2. Select the Profiles node under Data Sources.
3. Right-click on the specific Profile and select Edit to launch the profile wizard.
Foundation | Setup in Administrator
Page 9
4. In the Module Selection screen, select the Designer Express (DX) and/or DX Data Entry (DXE)
feature, depending on which you are using:
Foundation | Setup in Administrator
Page 10
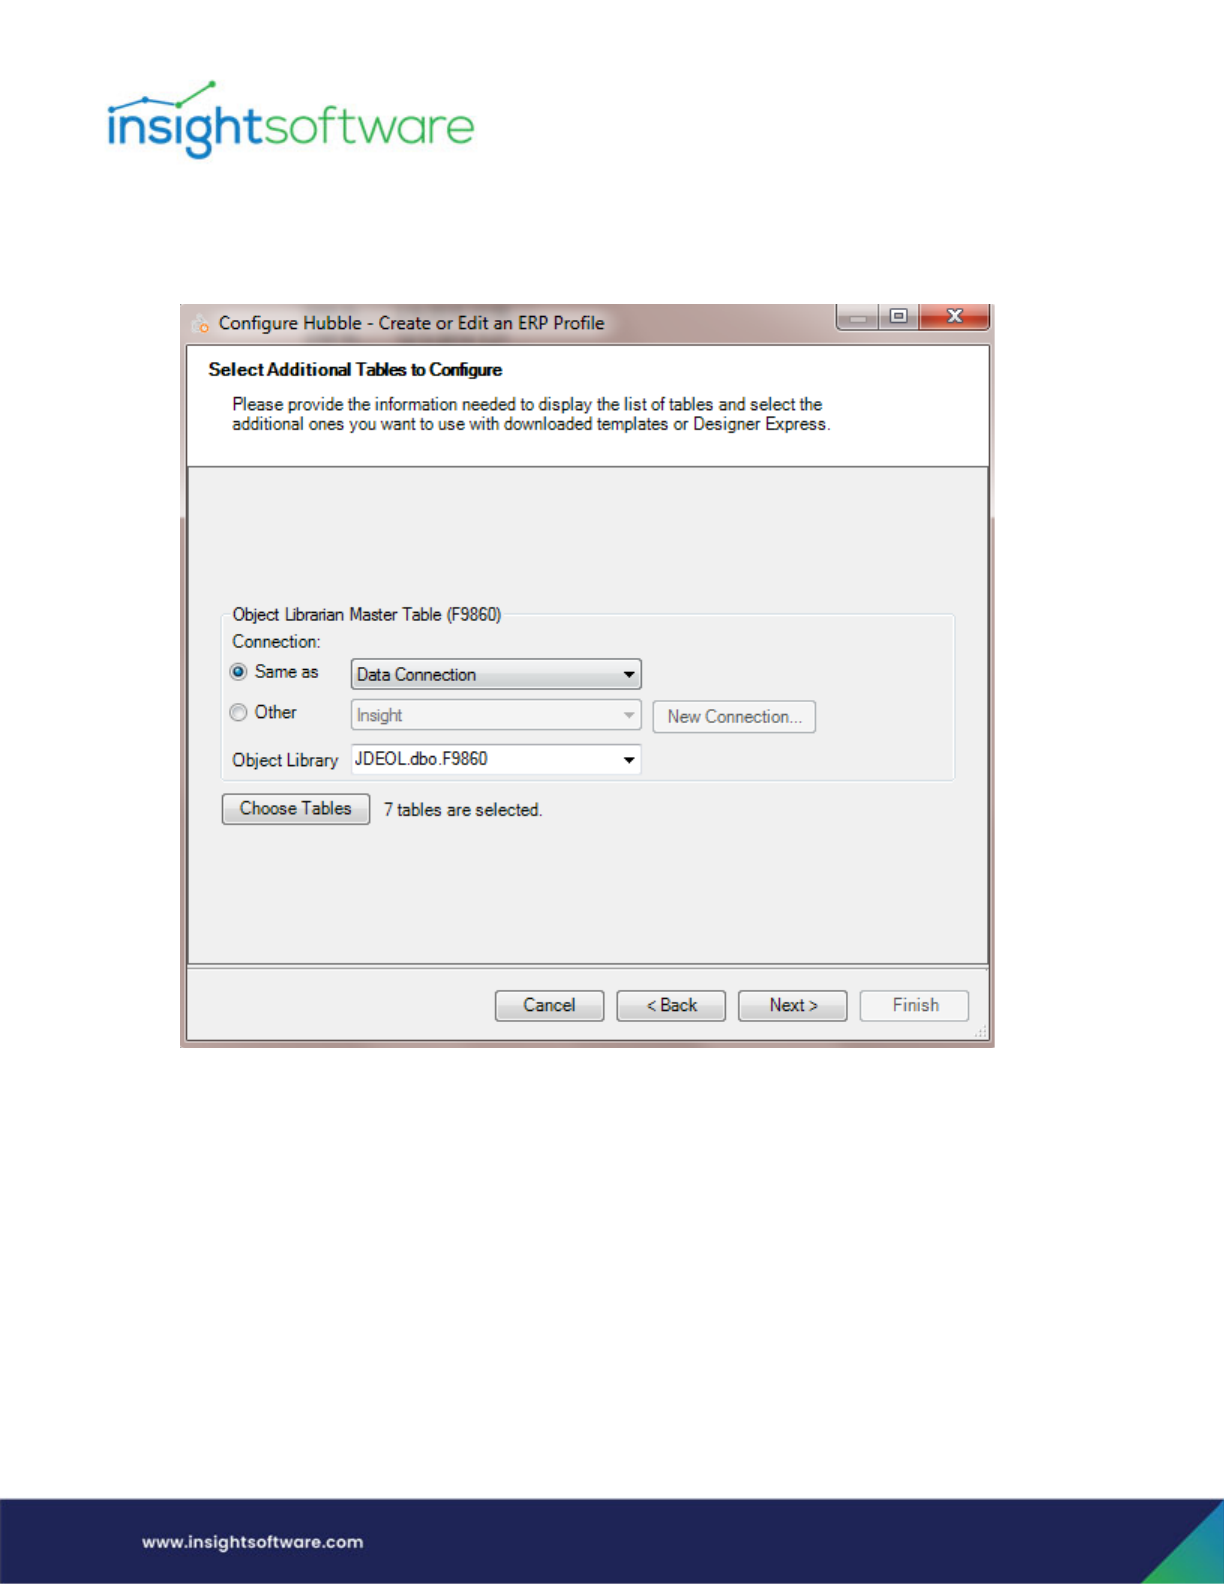
5. In the Select Additional Tables to Configure screen, define the specific information needed for
this feature. (If using a JD Edwards Profile, the Object Librarian Master Table (F9860)/(F9801 for
JD Edwards World) is where all objects are stored.)
a. Connection (displays only for JD Edwards Profile) – Set how to connect to the F9860 table,
whether it is the same Hubble Connection as that being used to connect to your ERP data, or
whether it is a different Connection.
b. Object Library (displays only for JD Edwards Profile) – Define where the Object Library
Master Table (F9801 in World, F9860 in E1) resides. This table is used as a master list of all
available tables in your ERP system. This table must be accessible in order to use create
custom templates.
c. Choose Tables – Define any tables or views you want to use in order to create custom
templates. For tables, you only need to add those that are not currently within the standard
templates.
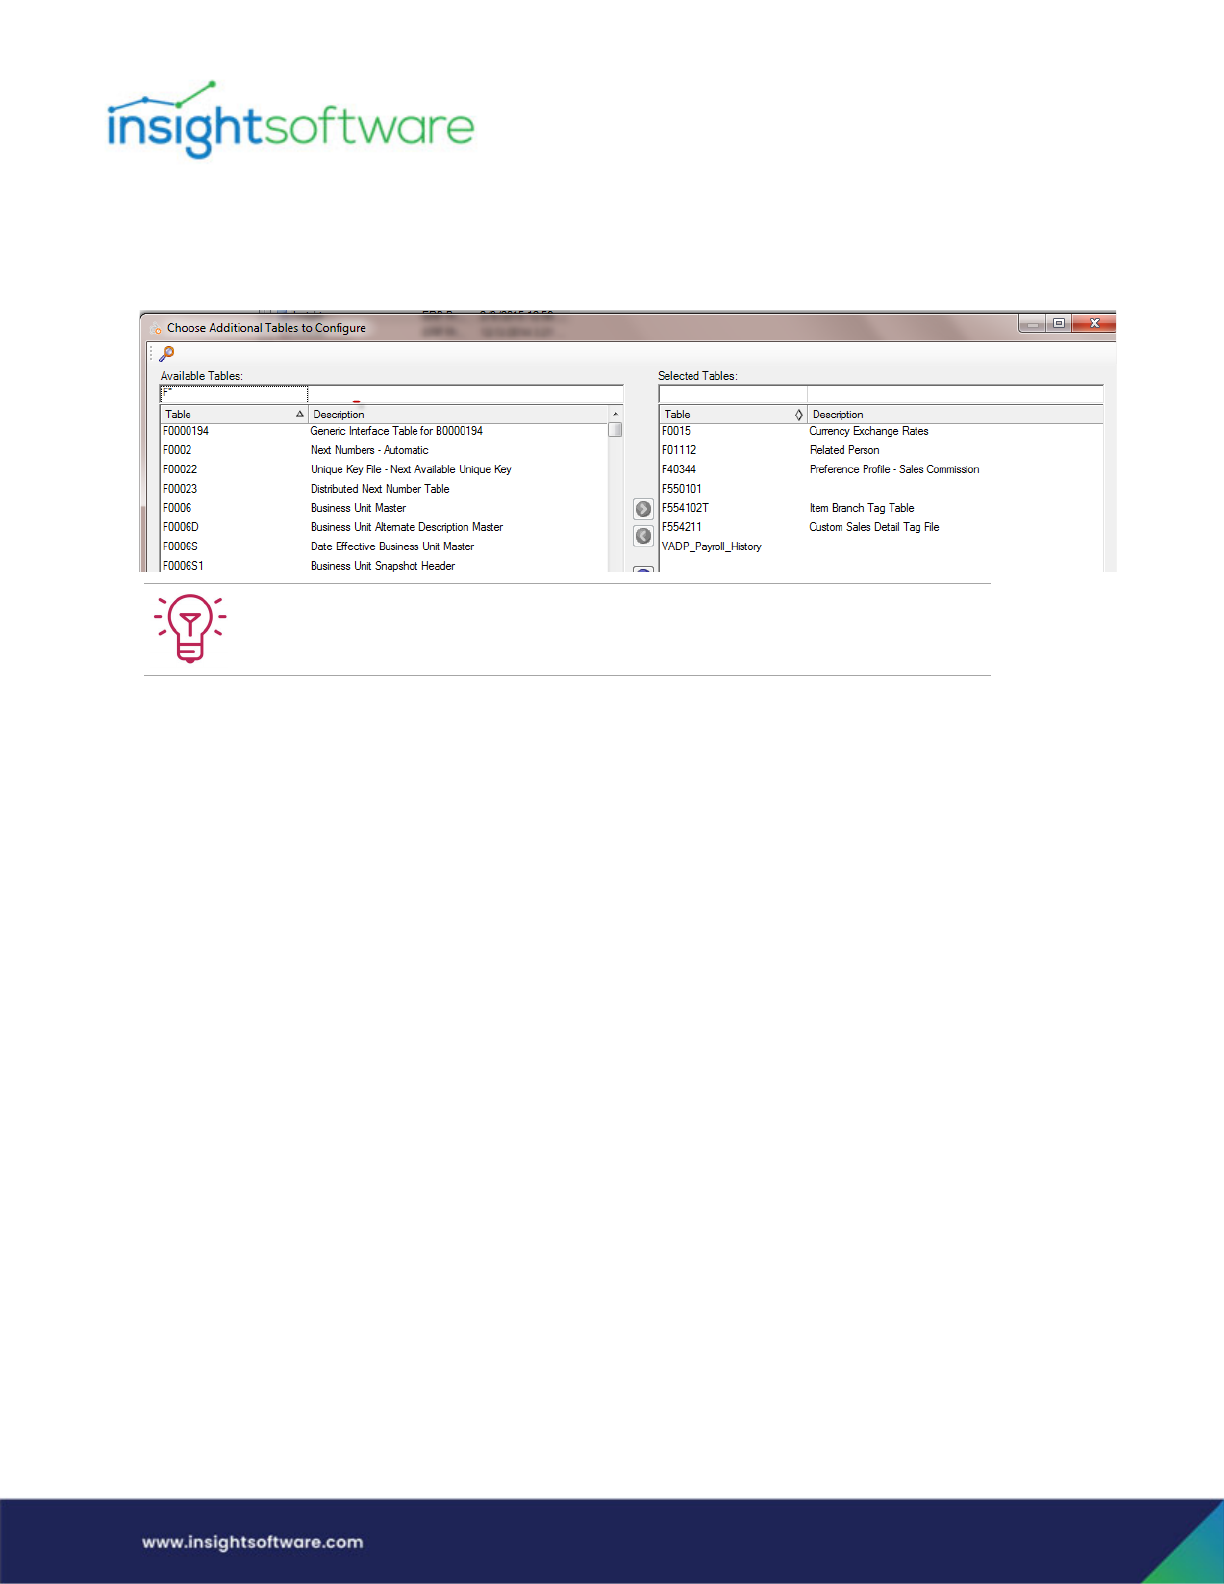
i. All available tables are listed in the left panel. To select tables, move them to the right
panel either by using the arrows or double-clicking on the specific table in the left panel.
Foundation | Setup in Administrator
Page 11
Optionally, use the QBE to find any table in order to move it to the right panel. All tables
in the right panel will be available within Designer Express.
ii. Click OK once all selections have been made.
6. Click Next.
It is strongly recommended to only add the tables you need and not to add in all
tables.
Foundation | Setup in Administrator
Page 12
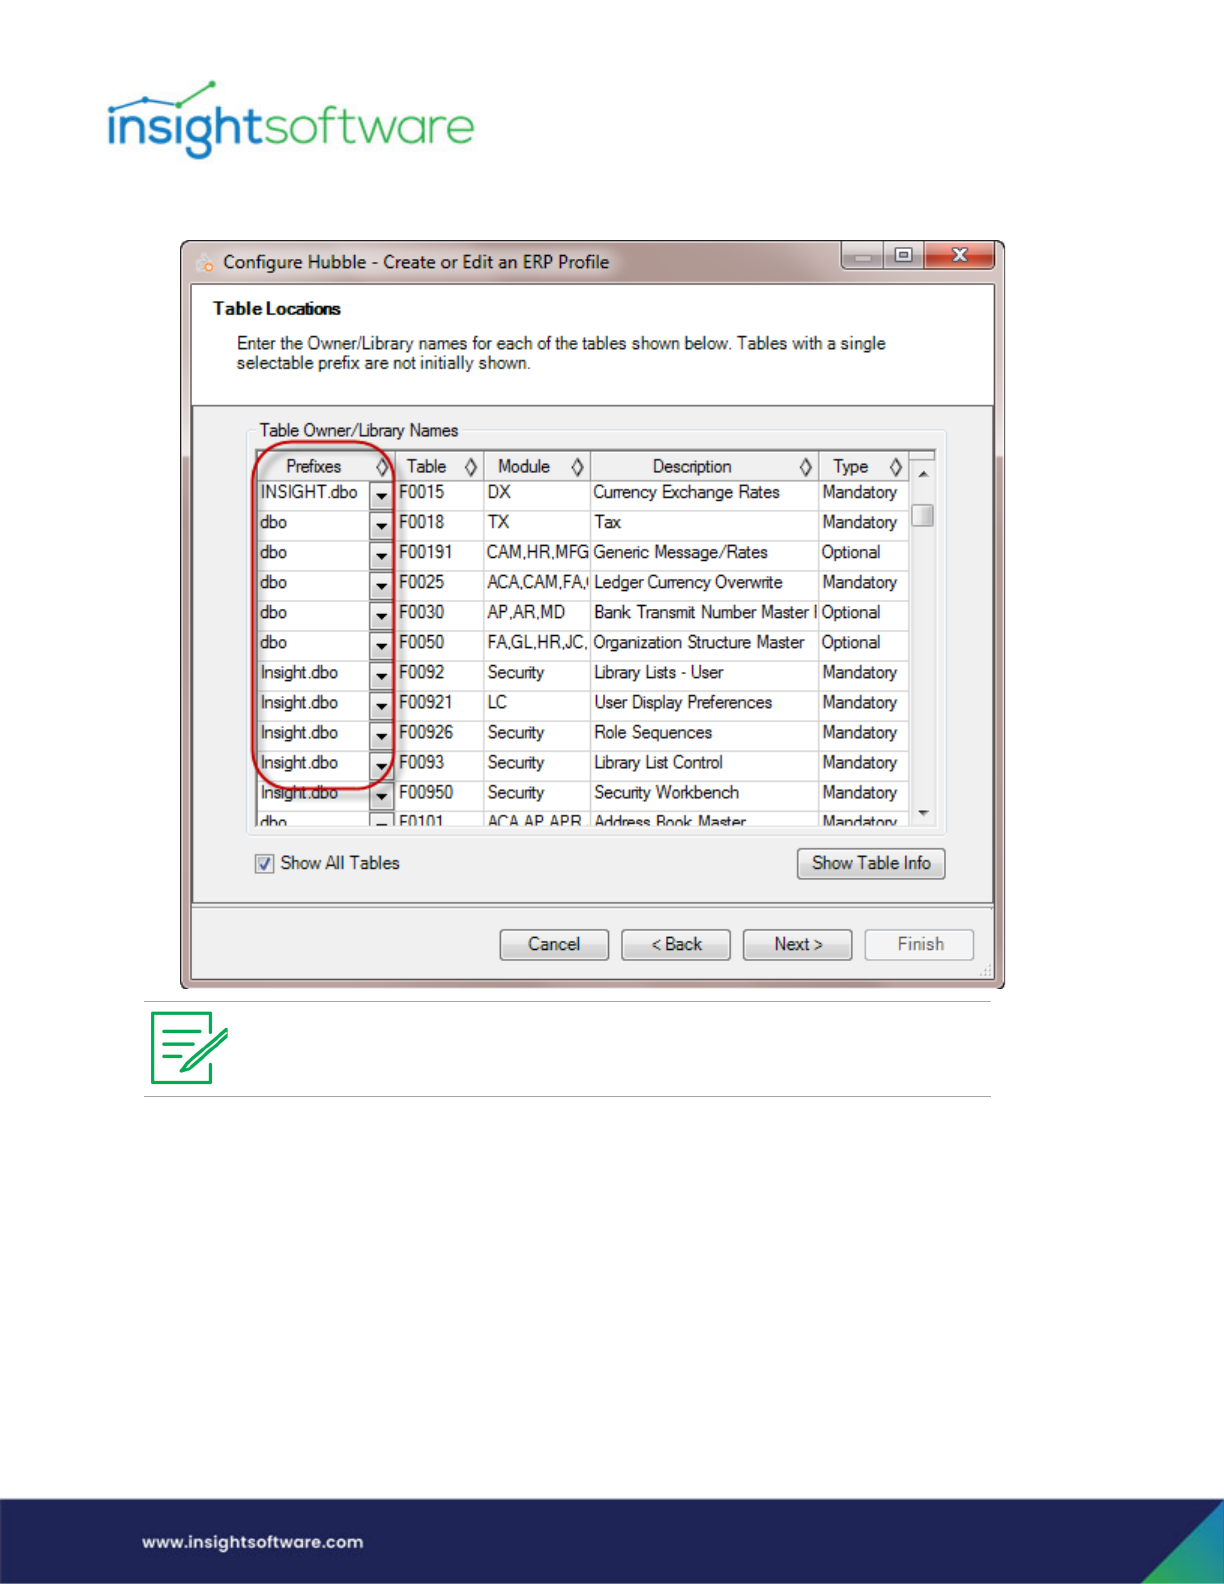
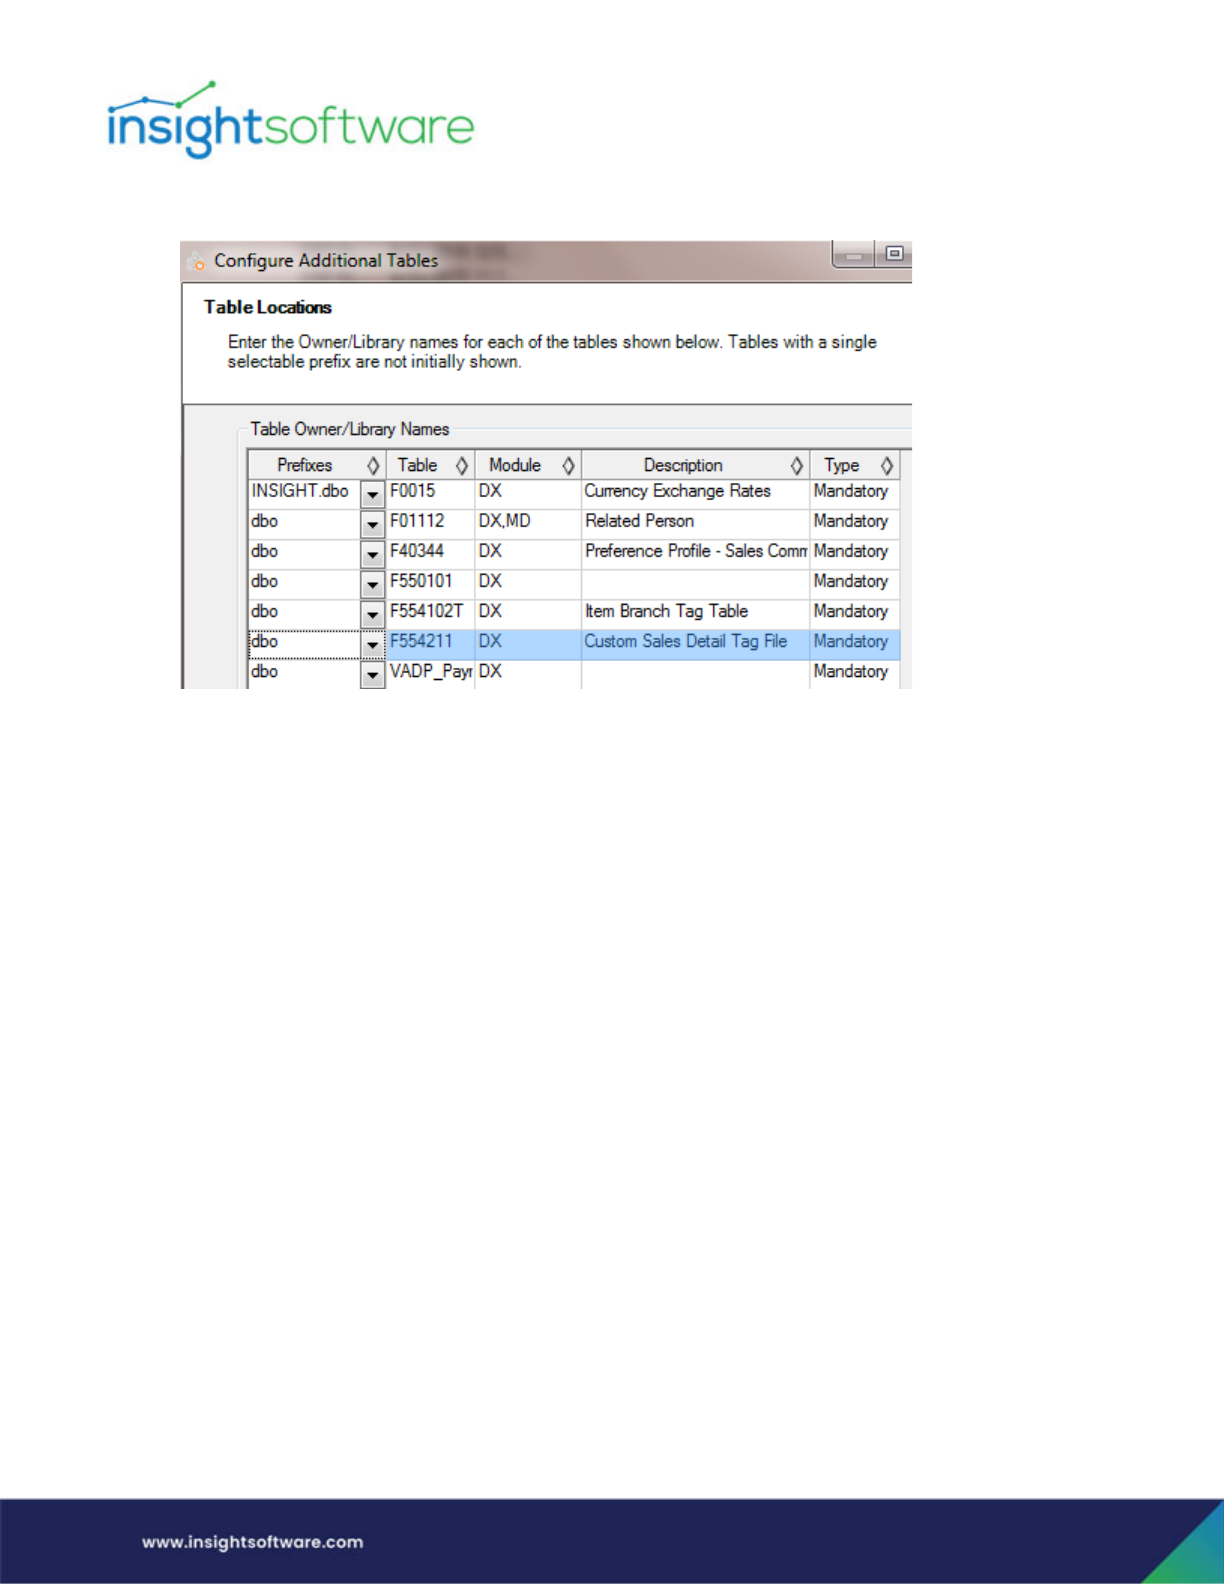
7. Once the tables are chosen, define the table locations in the profile in the Prefixes column.
8. Click Next.
DX is added to the module list for each table previously selected for use in DX.
Foundation | Setup in Administrator
Page 13
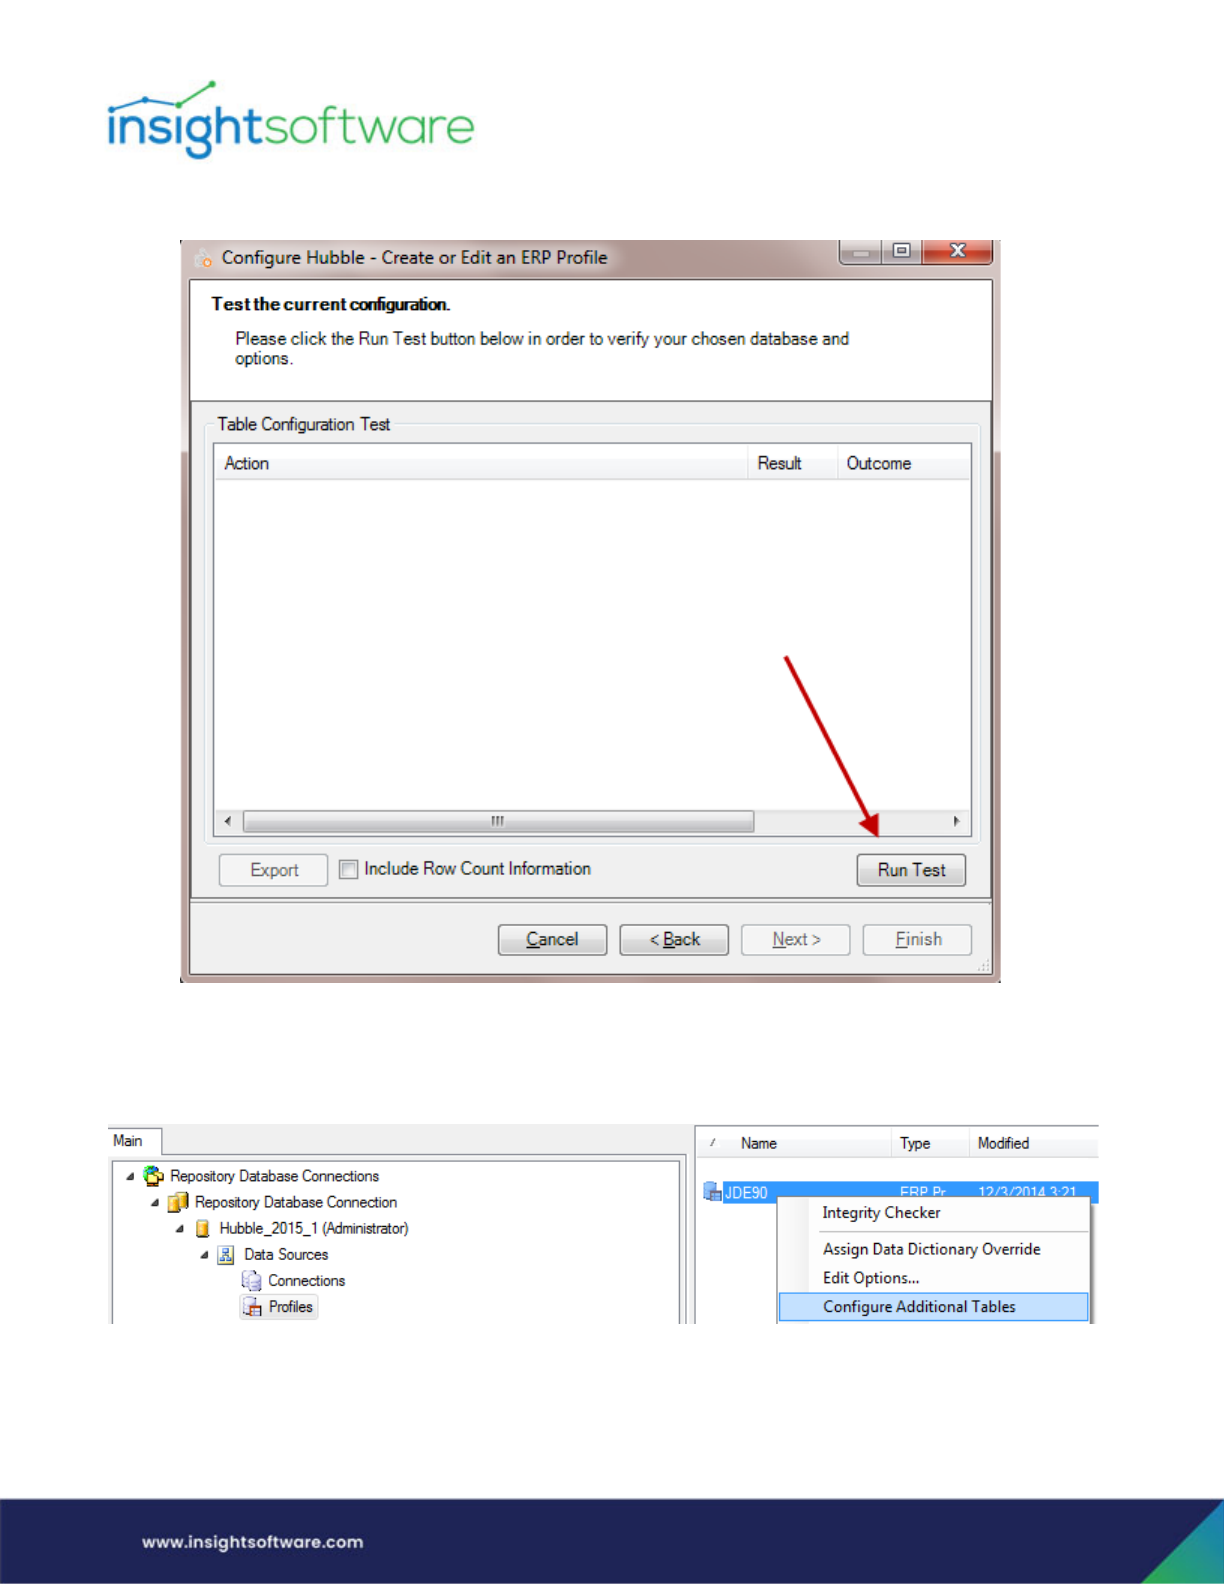
9. Click Run Test to verify the chosen database and options:
10. Once the status comes back as “Success”, click Next and then Finish.
Another way to access the setup within the Profile wizard is to right-click on the appropriate profile and
select Configure Additional Tables.

Foundation | Setup in Administrator
Page 14
Capabilities
Capabilities are used to manage users’ access to functionality within Hubble such as being able to export
data, build Hierarchies and Time Series, and other functional elements where you may wish to restrict
capabilities to trained or authorized users. Some of these capabilities are relevant to Designer Express,
for the example the Designer Express (DX) column properties, Enable Virtual Views, and Enable
Variables in Virtual Views Advanced Capabilities.
Refer to the Administration & Configuration Guide for information on how to configure capabilities.
Backup and Restore Functionality
When using the backup and restore functions in Administrator, this does include the custom reports/
templates and their associated designer objects.
Importing and Exporting in Administrator
Designer-created reports can be imported and exported in Administrator in the same way that standard
reports are imported and exported in Administrator. The measures (amounts or quantities) defined for
custom tables are stored at the report level, so when you import/export the report, the Amount
Metadata is within the rdf file for the measures the user has changed when the custom template was
created. (For the measures defined in the Hubble Default or Customer Common libraries, those are
retained in those libraries, not in the rdf file.)
Designing a Template | Technical Requirements/Recommendations
Page 15
Chapter 2: Designing a Template
Technical Requirements/Recommendations
Performance
It is highly recommended that any table configured to be used with Designer-created templates should
have the proper indexes created according to your ERP requirements. If indexing is not performed,
performance issues may result. It is the responsibility of the Designer to ensure that proper indexing has
been established for each table configured for these custom templates.
Virtual Views
A Designer user can build inquiries using any JD Edwards or EBS standard or custom tables on your data
connection. Virtual Views may also be used. These are created “on the fly” using Designer Express. This
enables users to make use of more advanced functions which may not be available with the standard
tables. For example, 3 way join (Fact constellation schema), substring joins, NULL joins, Unions etc.
The very nature of a Virtual View means that a user can specify columns which are not necessarily static
columns within a database table. For example, they might perform a calculation on a column, or join a
column with another column. For this reason, Virtual Views behave, as default, more as a non-ERP table
rather than an ERP table. This allows the flexibility that a Virtual View should have.
A user can add a Virtual View to a report, join it with other Virtual Views and tables, and run reports
from this. This Virtual View will behave as any other table in terms of joining with other tables, selecting
columns and filters, and running reports.
We recommend the following steps:
1. Capture the report’s SQL in Hubble.
2. Have your IT Department run the SQL through a query analyzer tool to verify all the
proper indexes have been set up on your database to maximize the report’s
performance.
3. If an index needs to be built:
a. Run the report with limited data selection over a static environment, such as
Test or PY.
b. Build your index(es).
c. Re-run the same report over the static environment with the new index(es) to
verify and test performance.
d. Duplicate the process in Production.

Designing a Template | Technical Requirements/Recommendations
Page 16
Database Views
It is also possible to incorporate database views, as well as ERP database tables, in the same custom
inquiry. However, this requires lengthy processes to create these views and add them to Hubble,
Using views creates significant additional flexibility. For example:
● All tables and views used by Hubble must be accessible using the same database connection that
the product uses to query the ERP data.
● Views can be used to provide indirect access to data tables in other database connections, such
as other ERP instances or tables (e.g. Security or UDC tables – JD Edwards only.)
● Views can include complex business logic including database functions and subqueries.
● The tables and views must have uppercase or case-insensitive names. Within the columns of
those tables and views, Hubble will only support data types that it already supports for EBS:
character types, number types and dates. There are some additional limits within those
categories. Binary object and XML data types, for example, are not supported.
○ ‘create table Foo’ will actually create a table called FOO. This will work.
○ ‘create table “Foo” ’ will create a table called Foo – note the double quotes around the name.
This won’t work with EBS.
○ ‘create table “FOO” ’ will create FOO which will work.
All tables and views used with Designer-based templates, whether they are being incorporated via a
database view or not, must comply with the requirements, which are discussed below, as far as naming
conventions, columns, location, and unique rows.
Accessing the JD Edwards UDC Tables in Designer Express
To gain access to the JD Edwards UDC tables (F0004 and F0005) to create custom templates, in your JD
Edwards Data Database you can create a database view over these tables and incorporate these views in
your custom template.
Why is this needed? Database views are used to provide indirect access to data tables on other database
connections. The UDC tables are generally located in a different database, such as the Control Table
Database; by creating a view over them, you are gaining access to them when creating a template based
on data from your JD Edwards Data Database.
1. When a view is being created to resolve a function or join issue, then only the
required fields and tables should be included with the required IDs to complete the
join. The remaining tables should be added in Designer Express.
2. Hubble is very good at aggregating data so the view should be at the lowest level of
detail. This will make it easier to add further tables in Designer Express while still
getting the benefit from drill-down and summary information.

Designing a Template | Technical Requirements/Recommendations
Page 17
Requirements - Custom Template Tables or Database Views
In order to be included in a custom template, the table or view must comply with the following
requirements. (These requirements apply whether you are accessing a table or database view.)
For JD Edwards System Users
Naming conventions for DX tables or views:
● The name must not be “dtproperties” or start with “DWTEMP”.
● The same prefix must be used for all the columns in the table/view.
● The name must not contain the "/" or "_" characters.
● The name must not be longer than 10 characters.
● The name must be either all uppercase or case-insensitive.
● The name must start with a letter (A-Z) and be followed by letters and numbers (0-9).
Column naming conventions and data types:
● All column names in the same table must start with the same two-character prefix. The two
characters should both be uppercase letters.
● The remainder of the column name (i.e. all except the first two letters) must exist within the
FRDTAI column of the F9210 table (e.g. "MCU" or "AN01"). There is no need for the table or view
itself to be stored in the Object Library Master File (F9860 or F9801).
● The column name must be either all uppercase or case-insensitive.
● The data type of the column must correspond with the correct type for the column extension
used. (For example, a column called "DXMCU" will be treated as a JD Edwards business unit type
and should be a 12 character string.)
Location:
● The table or view must be accessible from the JD Edwards Data Connection as specified in
Administrator in the Profile.
Lookup tables:
● Where a column contains a data type that is known to JD Edwards but does not exist in the JD
Edwards Master Table (for example a company code from another JD Edwards instance), a
custom lookup table should be included with the main data table to allow for the use of the
"Visual Assist" and "Code & Description" features within the custom inquiry.
For EBS System Users
Database account permissions:
● The Hubble database account must be granted permission to query the tables and views.

Designing a Template | Technical Requirements/Recommendations
Page 18
View names:
● Must be in uppercase.
● Should begin with 2 letters to identify it as custom, normally “XX_” or “HUB_”: XX_<name>.
● Should end with “_V”: <name>_V.
● Must not start with “DWTemp”.
● Must not be longer than 30 characters.
● Can contain only alphanumeric characters from your database character set and the underscore
(_), dollar sign ($), and pound sign (#). Oracle strongly discourages the use of $ and #.
● Must not contain space characters.
Column names:
● Must be in uppercase.
● Must not be longer than 30 characters.
● Can contain only alphanumeric characters from your database character set and the underscore
(_), dollar sign ($), and pound sign (#). Oracle strongly discourages you from using $ and #.
● Must not contain space characters.
Locations:
● The view must be accessible from the EBS data connection (as specified in the Hubble EBS
profile). It is best practice to store views under the APPS schema, although this is not essential.
● If a view is saved in the Hubble schema, it will need to be recreated when upgrading to a new
schema.
● If the views are stored in the Hubble schema, this schema will need to be given the appropriate
grants in order to be able to read the relevant tables and views, e.g. GRANT SELECT ON
APPS.FND_RESPONSIBILITIY_VL to <HUBBLE_SCHEMA>.
● The creation of new views and the granting of access to the underlying objects is normally done
with the assistance of a DBA.
Lookup tables:
● Lookups can be added using fixed list or can be picked up from a table or view.
SQL examples for Oracle Databases:
● You can find detailed information on specific syntaxes on the following websites:
○ Grant/Revoke Syntax: http://www.techonthenet.com/oracle/grant_revoke.php
○ View Create/Drop Syntax: http://www.techonthenet.com/oracle/views.php
All System Users: Primary Keys
Hubble must be able to identify those columns that together uniquely identify a single row. During the
configuration process, it will attempt to do this automatically by looking for unique indexes or primary
Designing a Template | Technical Requirements/Recommendations
Page 19
keys on each table or view. Where unique indexes or primary keys are not present, it is possible to
manually specify the columns that uniquely identify a single row by specifying them in the Hubble
configuration file CustomerPK.xml.
This is required to allow the Double Counter Resolver (DCR) to function. This feature automatically
ensures a value is not added multiple times when a many-to-one join causes a value to be duplicated.
See Primary Keys for more information on Primary Keys.
Incorporating a new Database View into DX
Once you have created a new database view, you need to incorporate it into Designer Express. Say, for
example, you have created a database view named CRP4111. The following steps show you how to
incorporate it into Designer Express.
1. Expand the Data Sources node in the left panel in Administrator.
2. Select the Profiles node under Data Sources.
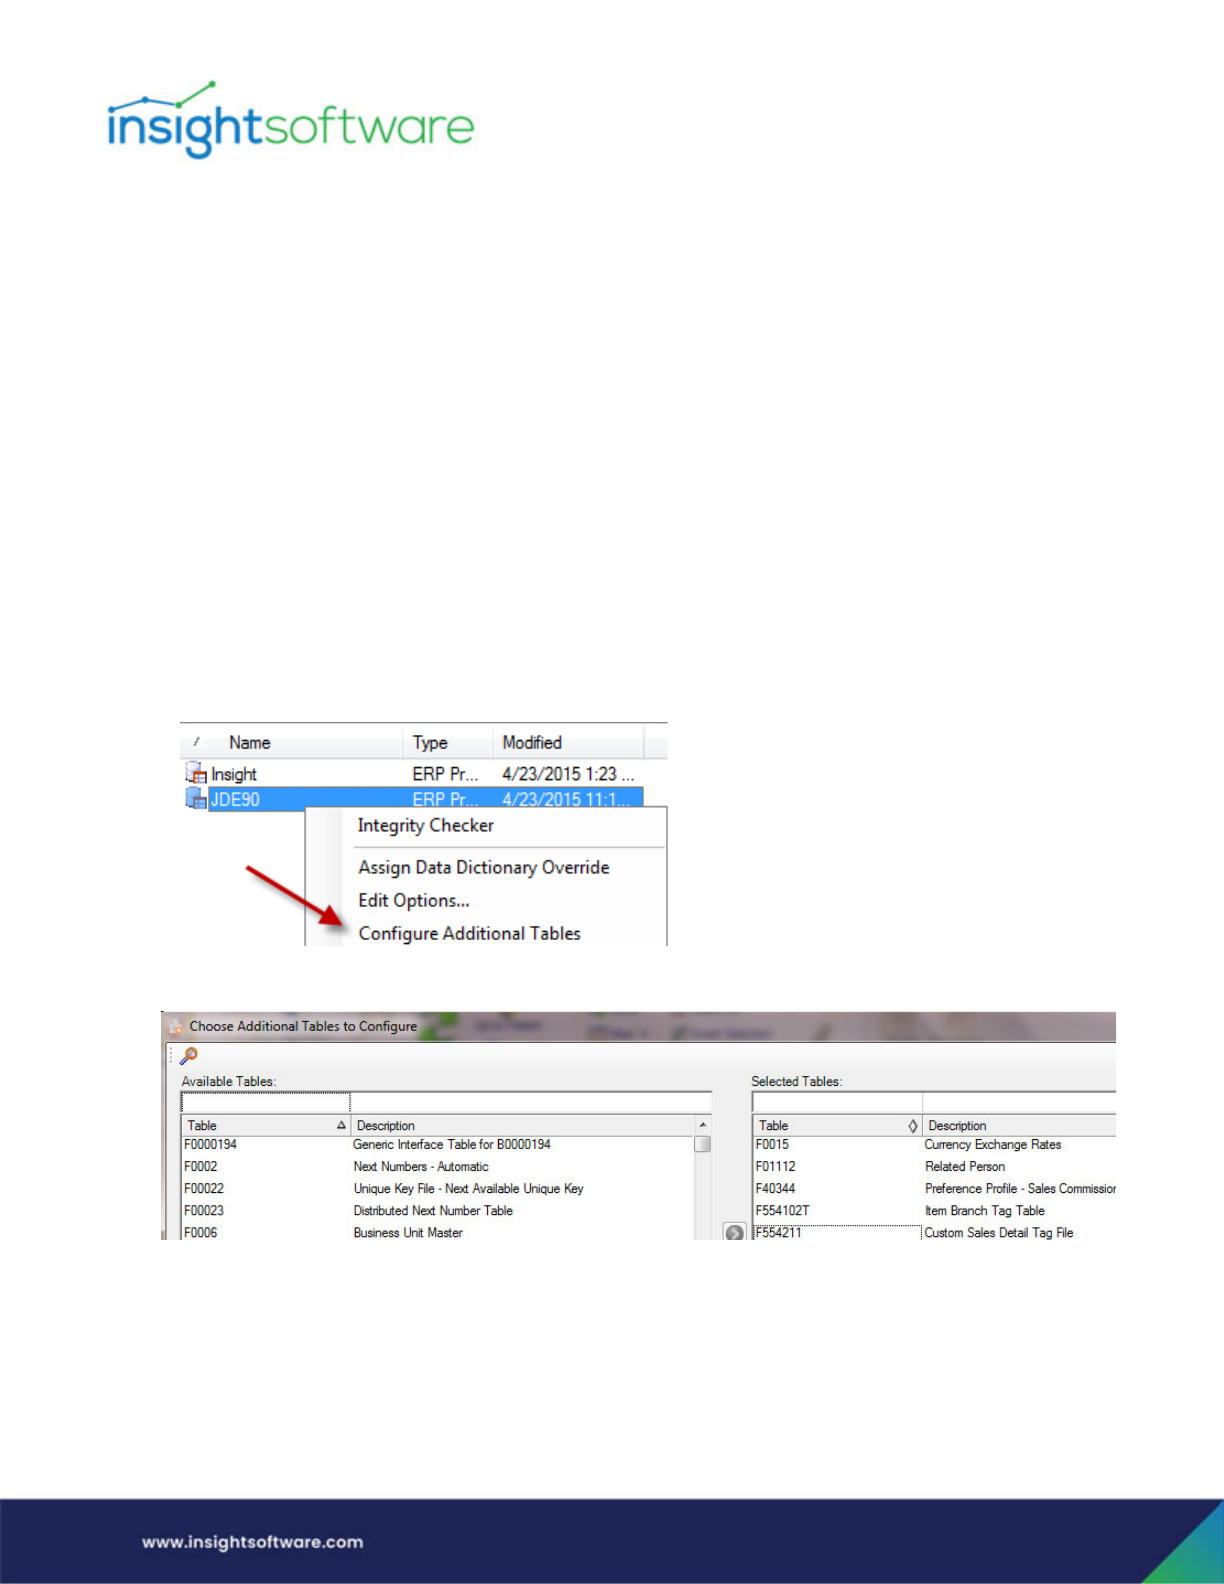
3. Right-click on the profile in which the view was created. Select Configure Additional Tables.
4. Search for your newly-created view under Available Tables and include it as a Selected Table.
Designing a Template | Technical Requirements/Recommendations
Page 20
5. In the Table Locations screen, ensure that the new view has the proper prefix defined.
6. Run through the profile and complete it as normal.
7. You must have a DXD license assigned to your Hubble user to create custom templates. Once
logged in, generate a new template by going to the Backstage view, clicking on New, clicking on
Designer Express, and selecting New Template.
8. You may now add the newly created view in Designer Express and build joins and define
amounts, etc. as you normally would.
Primary Keys
Primary (unique) keys are required for tables being used in custom reports. Primary key indexes must be
defined according to your ERP requirements for each table in your ERP Data Database if you plan to
configure them for use in Designer Express. Primary keys are used to identify duplicated values as well as
understand the data relationship between tables.
In Inline view, primary keys are used to create a unique identifier for each table in the join in order to
avoid double counting.
In Outline view, primary keys are used for determining data relationships.
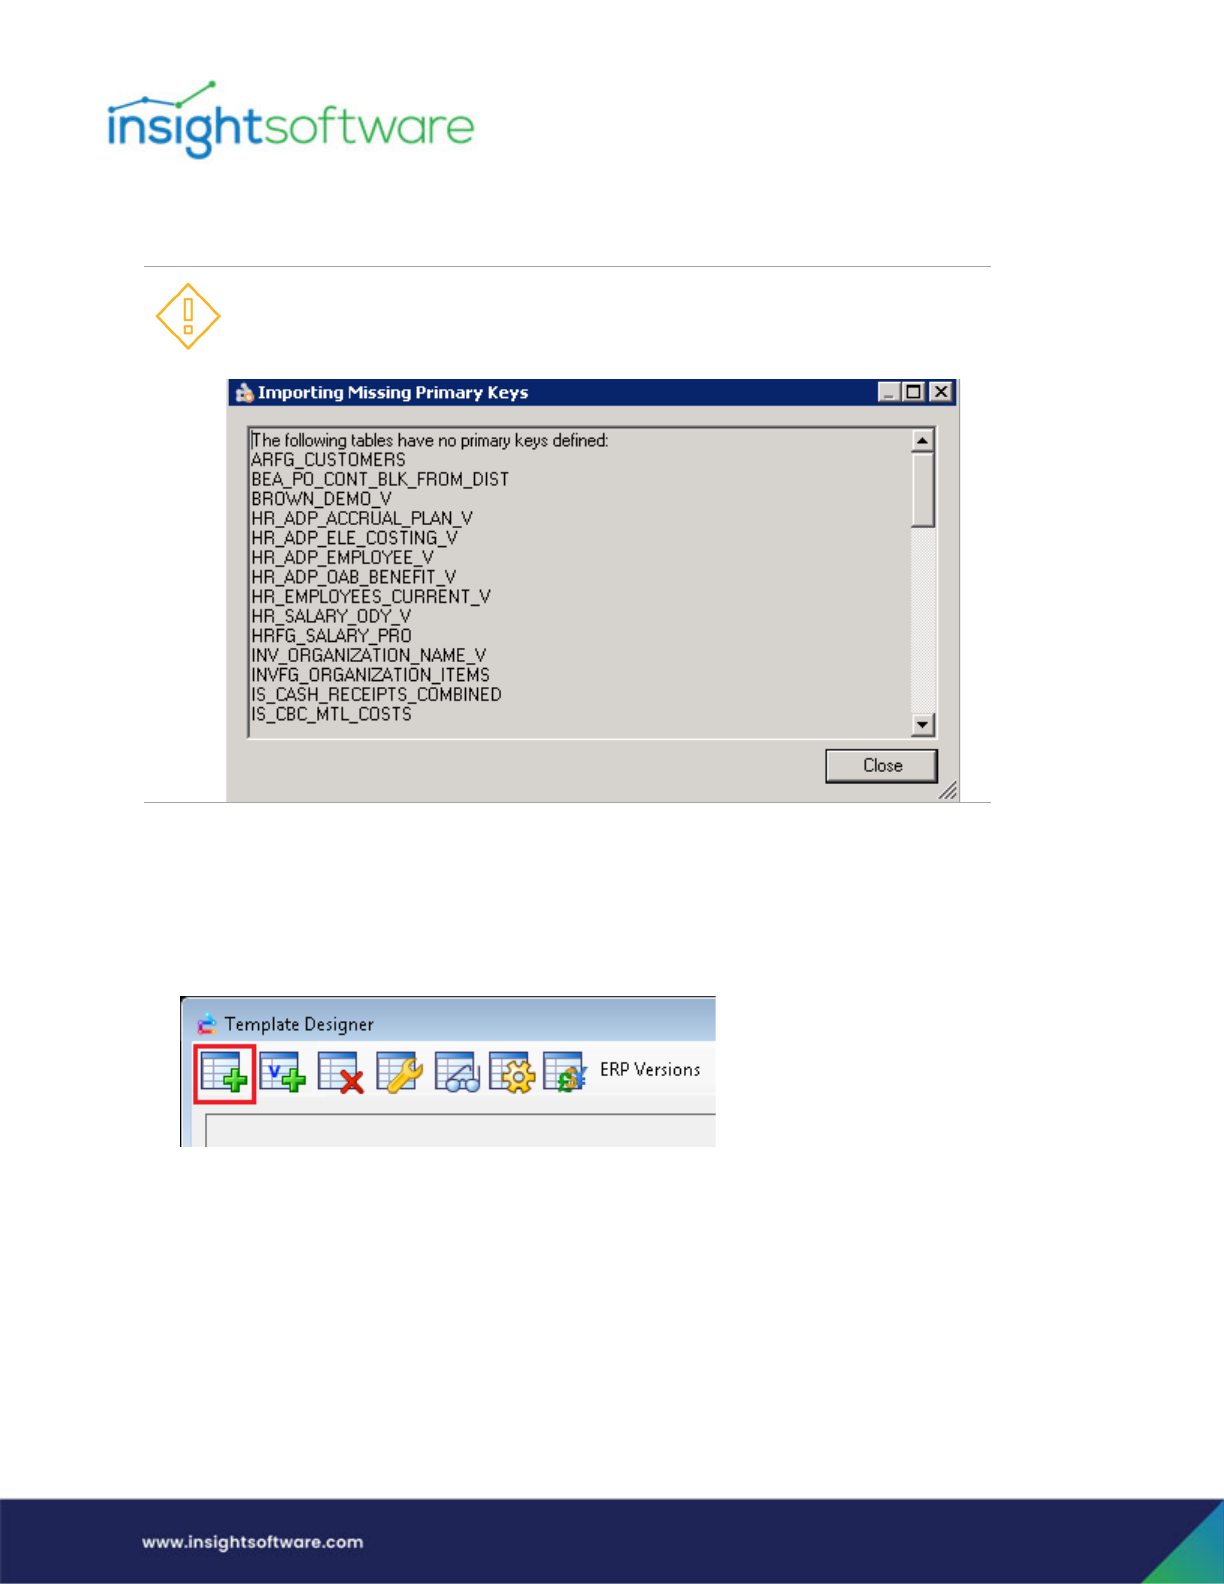
When a Primary Key is not defined for a table - Primary keys are defined and stored in the database. If a
primary key has not been defined for a table, Hubble uses an XML import step (called Missing Primary
Keys) in the Profile Wizard to define what the primary keys are and then stores this information in the
repository. This import step is a routine that automatically runs at the end of the Profile Wizard for all
the tables to which Hubble maps.
Designing a Template | Technical Requirements/Recommendations
Page 21
There is a second xml file called CustomerPK.xml which you can use to define your own primary keys
(e.g. F55... tables). This file, located within the install directory, includes instructions so that
administrators understand how to use it.
A line can be added to this file as shown in the following examples.
To edit this file, we recommend opening it with an XML Editor like Microsoft Visual
Studio® or XML Notepad in order to ensure the syntax is correct.
Add the following line of code to the CustomerPK.xml file for JD Edwards.
<PKDef Table="F12345" Cols="XXCol1,XXCol2" />
This line sets the primary keys of F12345 to XXCol1 and XXCol2 if the database cannot
automatically detect the primary keys of F12345.
Add the following line of code to the CustomerPK.xml file for EBS.
<PKDef Table="AP_INVOICES_ALL" Cols="INVOICE_ID" />
This line will set the primary keys of AP_INVOICES_ALL to INVOICE_ID if the database
cannot automatically detect the primary keys of AP_INVOICES_ALL.)
Designing a Template | Technical Requirements/Recommendations
Page 22
There are several version tags in the CustomerPk.xml. The PKDef tags must be placed within the tag
corresponding to the ERP version or in the AllVersion tag to affect all versions of the ERP.
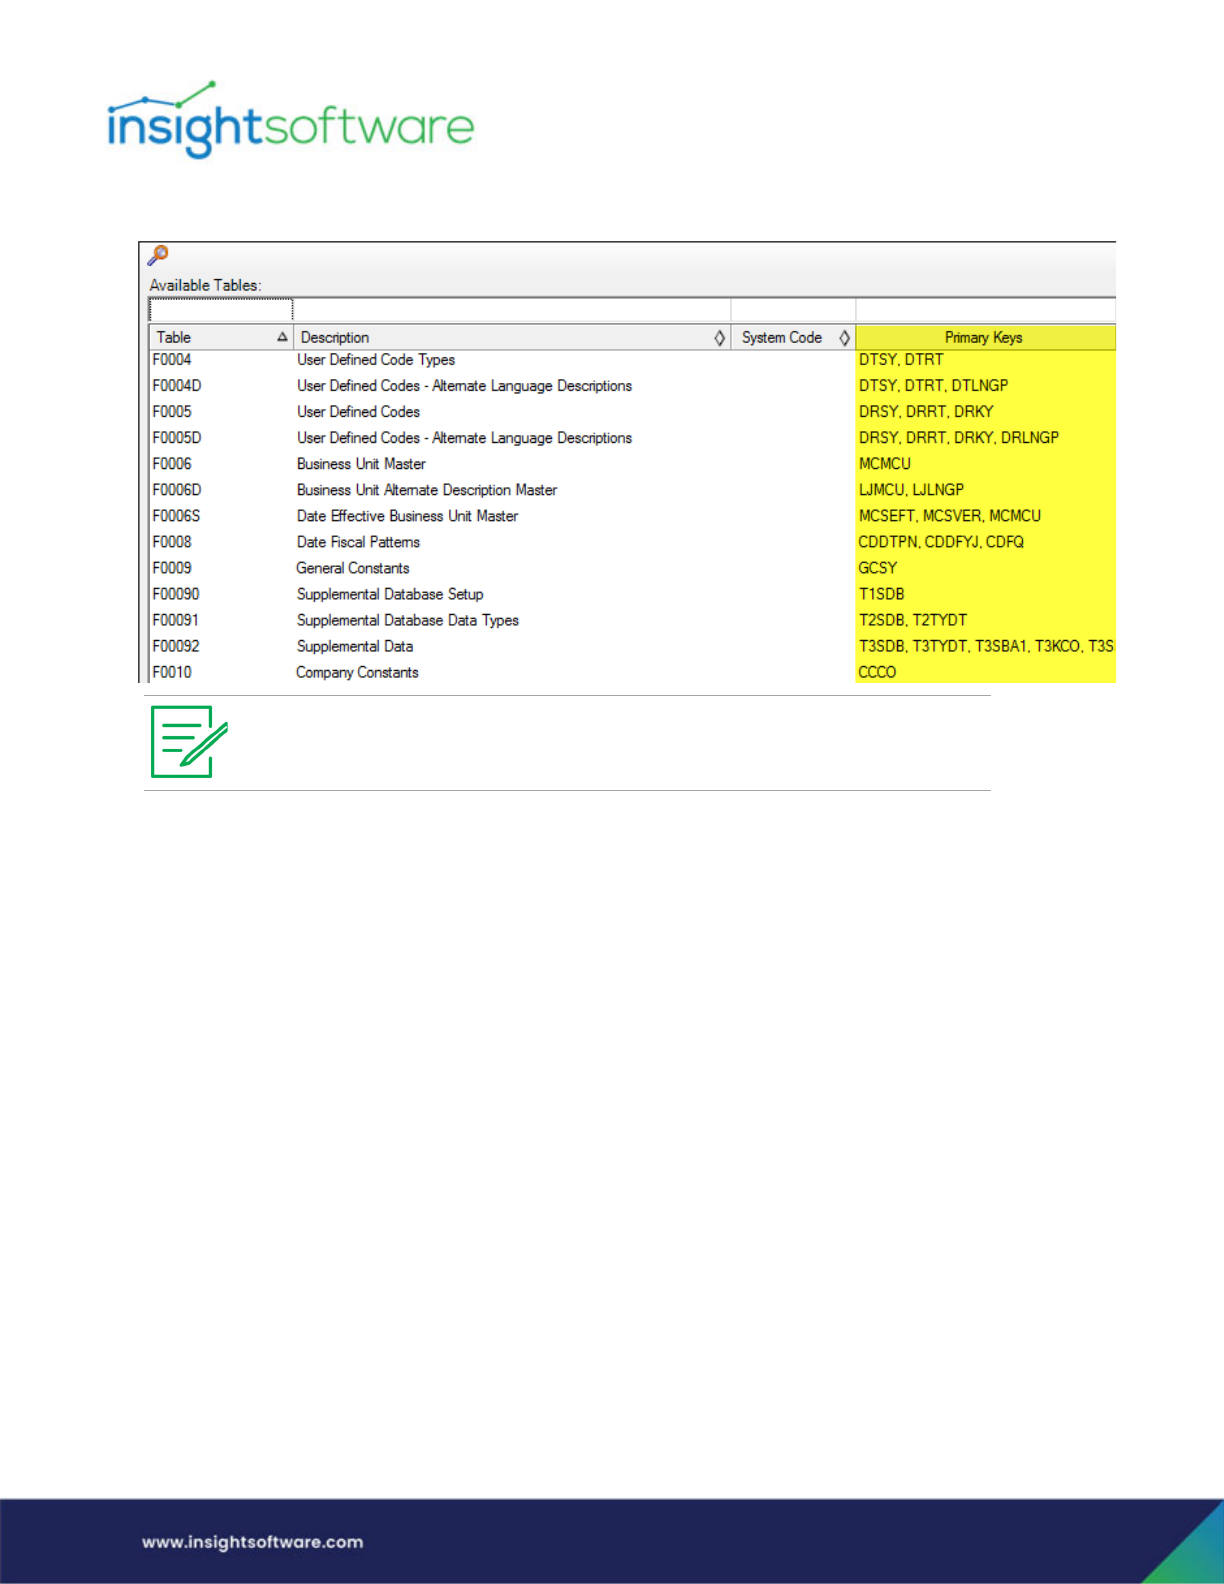
Viewing the Primary Keys associated with a Table
When choosing the tables upon which you are building your Designer Express template, you can view
the primary keys associated with each table.
1. Within Template Designer, click Add Table.
When manually defining the primary keys in the CustomerPK.xml file, be sure to use
the same upper case/lower case letters as they are in the Importing Missing Primary
Keys message as shown below. In other words, if the Table or View is listed in upper
case, then key in the Column Name(s) in upper case.
Designing a Template | Technical Requirements/Recommendations
Page 23
2. Scroll to the right to see the Primary Keys column for each table.
Support
What we support:
● We provide support for the DX module and Hubble features.
● Our Professional Services team can be contracted to assist in the development of custom
templates, and these templates will be supported.
What we do not support:
● We are unable to provide support on which tables, views, columns and joins should be included
in your views to deliver your requirement. This should be provided by your in-house ERP system
expert or associated partner.
Maintaining Primary Key information during an Upgrade
When upgrading to a higher release level of Hubble, it is best to always copy CustomPK.xml from the
current installation directory into the upgraded version’s installation directory.
A new Hubble repository - If you create a new Hubble repository for an upgrade, then the CustomerPK
file located in the current installation directory needs to be copied into the installation directory for the
new Hubble version installation directory. When you go through the Profile Wizard for the upgraded
version, the contents of the CustomerPK file is read and is incorporated into the information collected by
the Profile Wizard for use in creating custom templates.
You can only see the primary keys in the New Table dialog. You cannot see them in
the Table dialog after the table has been added to the report.

Designing a Template | Template Design Considerations
Page 24
Existing Hubble repository - If you are not creating a new repository for the upgrade (for example if you
are upgrading to a Service Pack and a new repository is not required), then technically you do not have
to copy the CustomerPK file into the upgraded Hubble version installation directory. The current
information stored within that file is still stored in the repository. If, however, the Administrator edits the
Profile Wizard, all information related to the older CustomerPK file version is lost and new information is
read from the CustomerPK file that is stored in the installation directory of the upgraded Hubble version.
This is why it is recommended to copy the CustomerPK file into the upgraded version installation
directory, even in the case of using the existing Hubble repository.
Changes to the CustomerPK file
If you make changes to your CustomerPK file, you do not need to copy that amended file to each
workstation where Hubble is installed. It does, however, need to be copied to the workstation for each
person who has access to Administrator and has privileges to edit the Profile Wizard. The CustomerPK
file is only read during the setup tasks at the end of the Profile Wizard. The information on primary keys
is then stored in the repository, against that profile, and the workstations where Hubble is installed read
it from there when they start up.
If the CustomerPK file on a workstation with access to Administrator does not contain updated
information on the primary (unique) keys in the database tables and/or views and the user edits the
Profile Wizard, then any database table or view that does not have a primary key defined at the
database level will not be available for use within Designer Express. The reason for this is that the
Importing Missing Primary Keys task reruns at the end of the Profile Wizard and stores the information
contained within the CustomerPK file within the repository. If the CustomerPK file is out of date or is
empty, those database tables or views that have no primary (unique) keys defined cannot be used to
create custom templates.
Template Design Considerations
Defining the reporting requirements
Before beginning to build your custom template/report, it’s a good idea to clearly understand and define
why you are building it. Use the list of questions below as a guide to help you define the content and
purpose of the template/report.
● What are the business requirement?
○ What decisions do I need to be able to make to run my department/business better?
○ What information do I need to make these decisions?
○ What business or reporting need will this report satisfy?
● What will a single row on the report represent?
Designing a Template | Template Design Considerations
Page 25
● Who will be using the report?
○ What skill level is required to use and understand it?
○ What is the possibility that users will misinterpret the results?
● When sharing the template/report:
○ What type of users will be using the report/template (Power or Viewer)?
○ What file formats will be needed/used (online, Excel, PDF, Word)?
● Define your report specification:
○ What tables are needed?
○ What fields do you need to join on?
○ What are the label columns?
○ What are the amount columns?
○ How is the data being sorted and aggregated?
Know your data
An important step in any report development process is data validation and knowing the correct data in
which to compare your test data to as you are creating a new report. We recommend that you use
Hubble standard templates, ad hoc inquiries and reports to validate your data, field names/columns,
and joins as you build your report.
Before building your custom template/report, verify that your business/reporting
requirement cannot be met with one of the standard templates. Whenever possible,
we recommend building new reports from the standard templates to leverage the
existing business logic and advanced functionality that cannot be duplicated within
Designer Express. If you have verified that a standard template cannot be used to
meet your business requirement, determine if a similar custom template/report
already exists. If one does exist, clarify the differences to avoid duplication of effort.
There are several methods available for identifying fields and tables in EBS for use in
templates. It is best to work with an Oracle user who is familiar with the fields and
tables and the methodologies for finding the correct ones. Oracle’s Electronic
Technical Reference Manuals (ETRM) are an excellent source of information.
Designing a Template | Template Design Considerations
Page 26
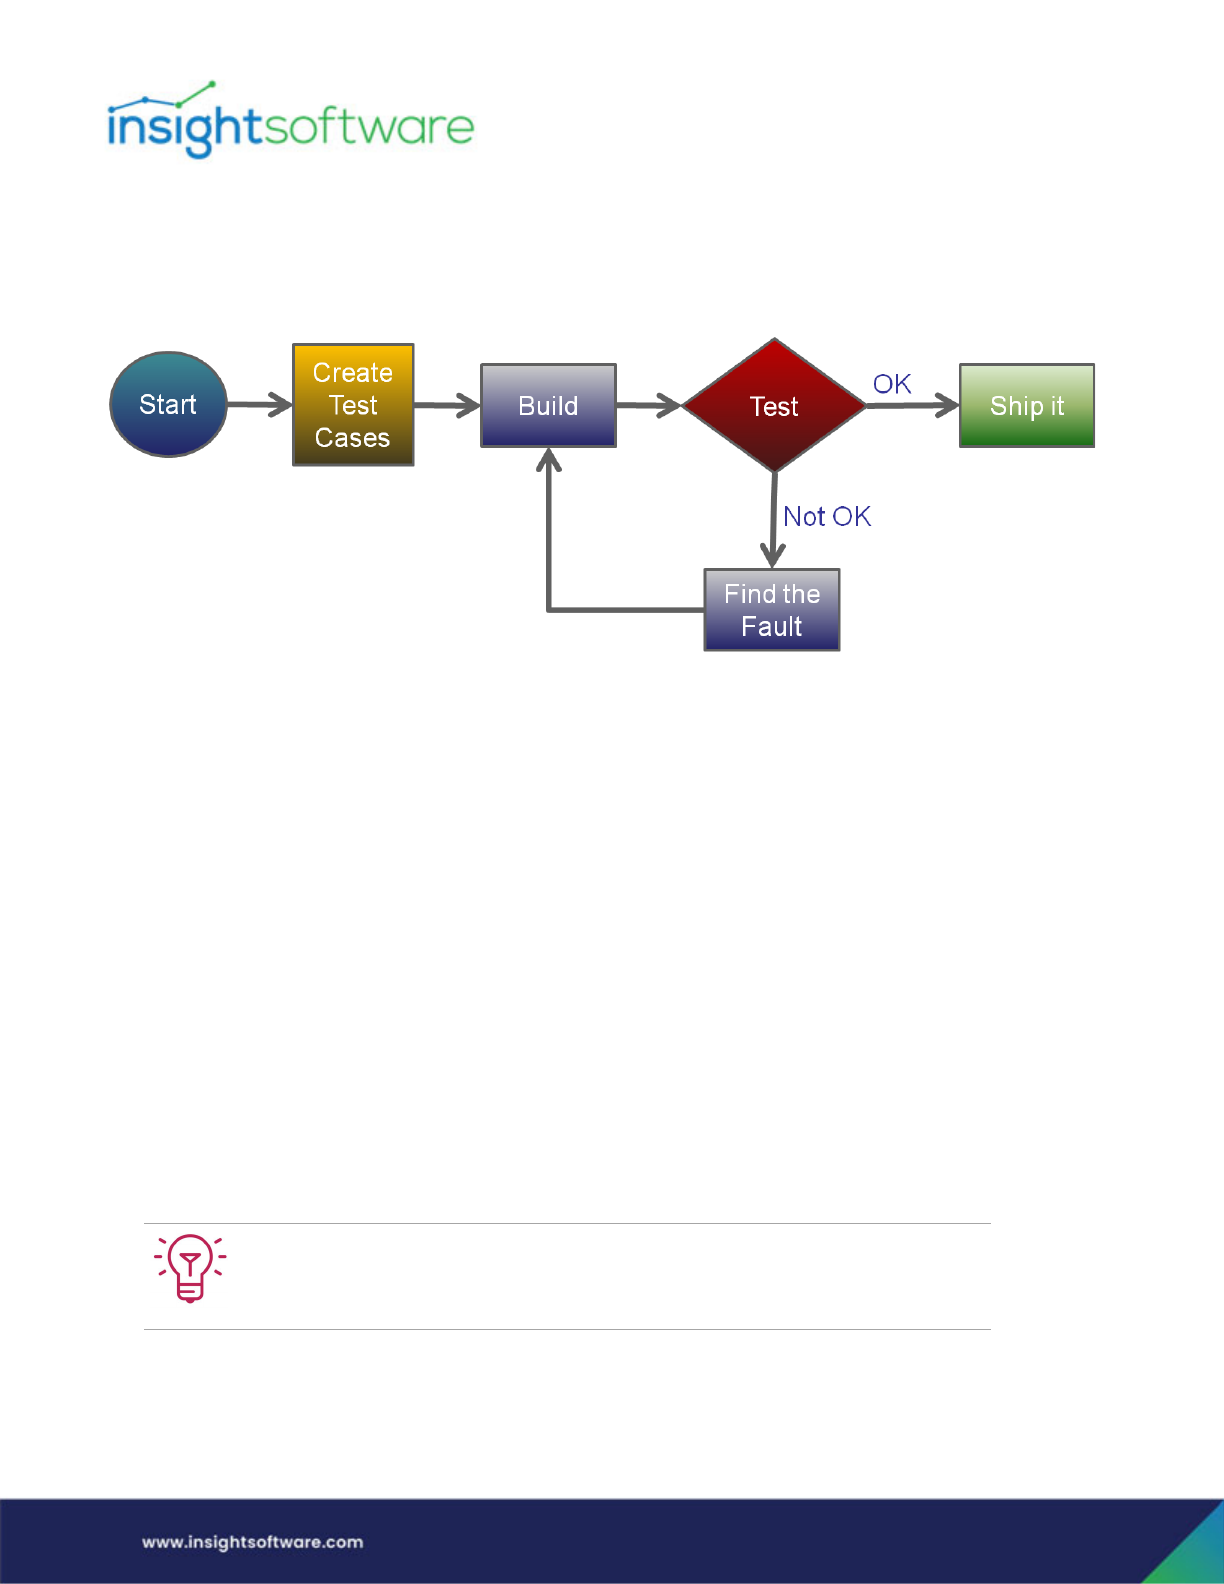
Test Driven Development is a methodology commonly used in software development whereby a
software specification is converted into a set of tests with known inputs and expected outputs, before
any actual coding begins. The output from any development is repeatedly verified against the test cases
until the results match the expected output.
If you want to build an inquiry that joins several tables together, it can be helpful to create a set of
supporting inquiries first, each based on an individual table from the main inquiry. These supporting
inquiries will provide a clear view of the data that you may wish to use in your main inquiry and alert you
to any problems because of unpopulated columns, unexpected data in the tables, or joining issues.
When creating your test cases, use your individual inquiries to pick some example input data and work
through the joins by hand to see what data you would expect to see from the different tables in each
case. If your inquiry includes a 1:M, M:M or M:1 join, then you should expect to see several rows in one
table corresponding to a single row in another.
When you are confident that you have the data from the different tables correct, you can use a
spreadsheet to replicate any calculations that would occur in the inquiry. Once you have a spreadsheet
with expected results, it can be a good idea to show this to the end user just to verify that what they’re
expecting and what you’re expecting agree.
Each iteration around the cycle of “build test, find the fault, rebuild …” takes time. The amount of time
required per iteration goes up exponentially as the number of items being tested in one go increases.
For this reason it’s important to test as frequently as possible, so that as few components as possible are
tested in one go.
When creating your inquiry, we recommend you run the inquiry and test what you’ve
done so far at frequent intervals such as every time you add a new column or
calculation. If you then find a problem, it is comparatively simple to work out where
the problem lies and then determine what can be done to fix it.

Designing a Template | Create a New Template
Page 27
Building your Template/Report
The Strategic...
What makes a good report or inquiry? How much data should a report contain? Is more always better?
Should you create a data dump of everything just because you can?
A big problem we all face today is “information overload”. If we create a report with 10,000 rows and 50
columns of data, there is no way that someone can take in and mentally process it in a meaningful way.
If an inquiry contains more than just a very small number of rows, people stop looking at the individual
rows and start looking at the totals instead. If there are more than just a small number of subtotal rows,
then even they can start to become meaningless. The most useful inquires and reports are those that
contain no more information than is necessary. Less can actually be more!
Showing less information on a report is fine, but what if you need access to all that information? We
suggest instead of trying to jam more and more information into the same report, you instead create
several reports, each of which highlights a different aspect of the data. With Hubble, you can link reports
together so that you can move from one to another, narrowing down your selection as you go. Each
report will run faster as you’re bringing back fewer columns and by filtering out the data you don’t need
at each stage, you keep each report clean and easy to understand, and you are returning data quickly. In
the end, a report can be viewed as a list of items with various pieces of information presented about
each item.
To understand the report, we must be able to understand what a single row in the report is referring to.
If we have overly complex inquiries, and particularly if we have inquiries that bring in data from several
tables with a variety of joins, it is easy to lose sight of what it is that a single row represents. If you’re
designing a report, either for yourself or someone else, try asking yourself what it is that a single row of
that report represents. Is it a customer? A document? An order line? If the answer is tough to explain
then that’s a pretty clear signal that the report may be too complex.
Create a New Template
Process Overview
Here is an overview of the required steps:
1. From the Backstage view, click New > Designer Express > New Template. The Template Designer
dialog is then displayed.
2. Add tables to the template.
3. Create and add virtual views to the template.
4. Define suggested Master Table joins.
5. Define the joins between the tables.
Designing a Template | Create a New Template
Page 28
6. Alternately, set the Table Options.
7. Set the Report Options (Mode Type and First Table).
8. Verify the amount and quantity fields being used in the template.
9. Design the report layout.
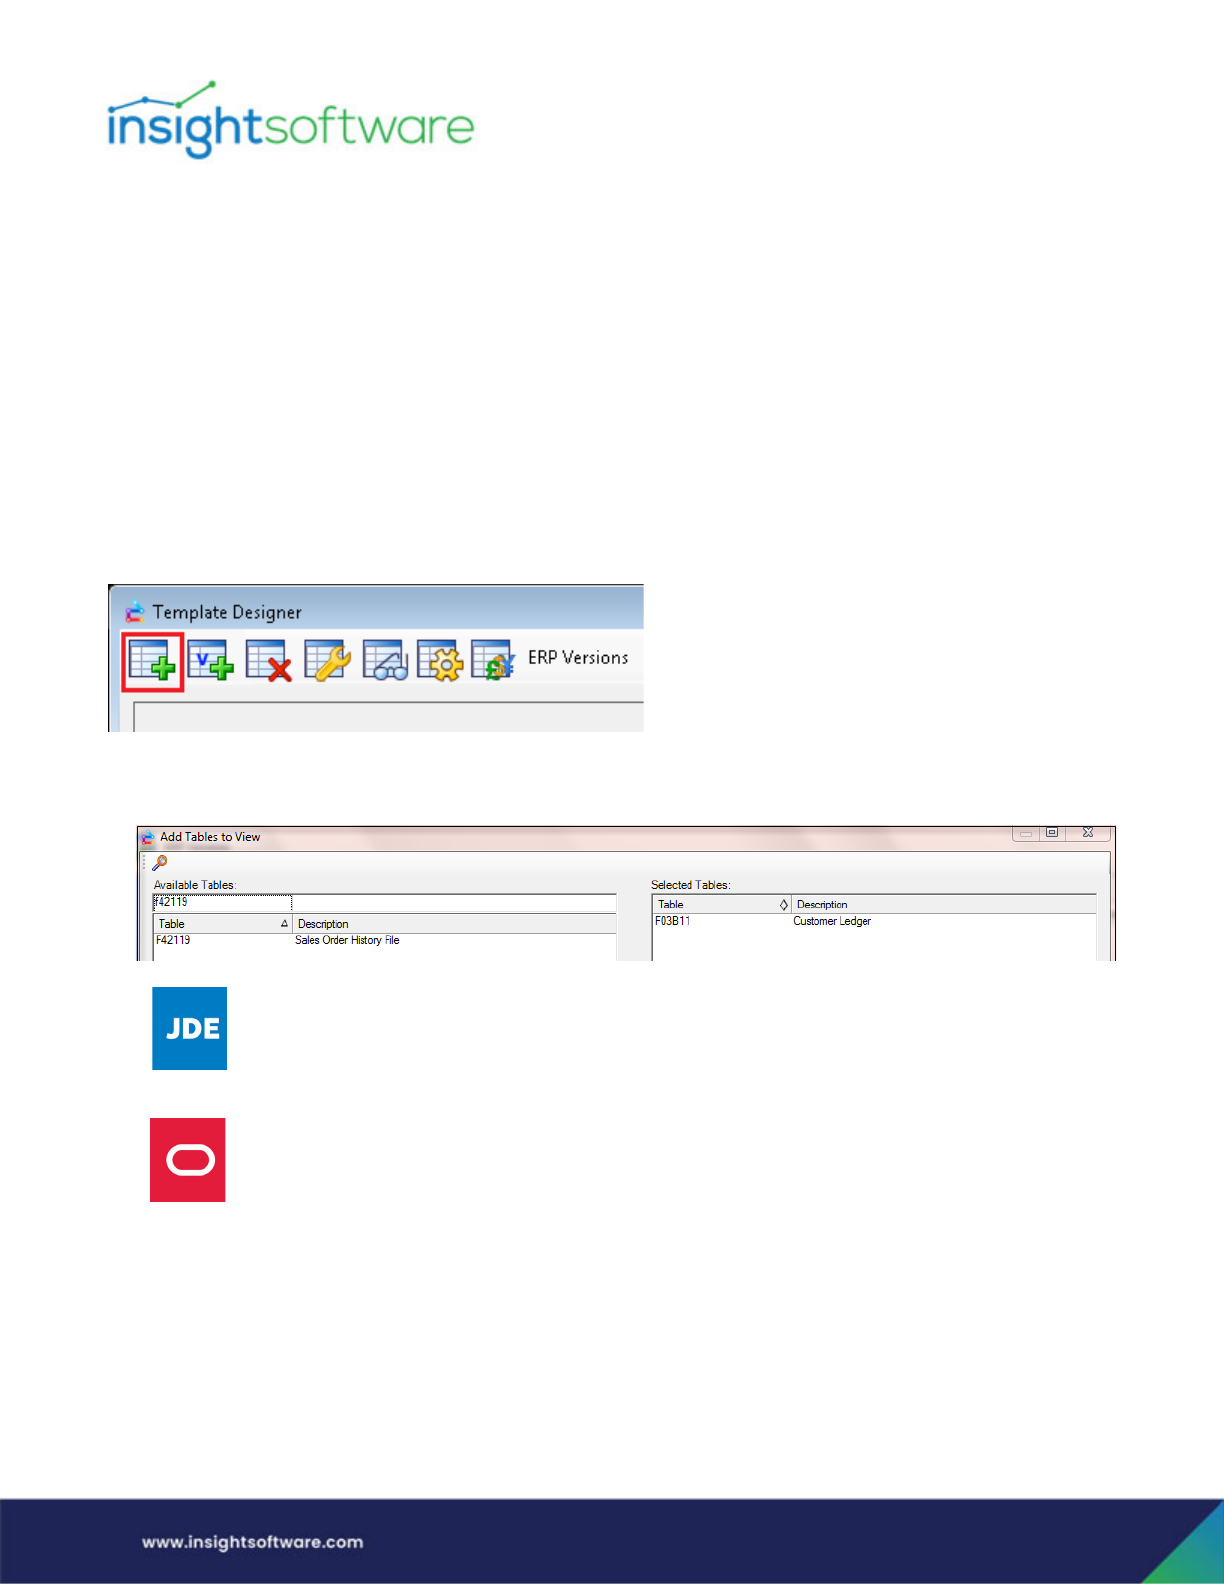
Adding Tables to a Template
Once you have created a new template (step 1 above), the Add Tables to View dialog immediately
appears with the Template Designer dialog. Use this to add the tables needed for your report.
The Add Tables to View dialog is also displayed when you click the Add Tables button of the Template
Designer dialog.
1. You can use the QBE line to narrow down your table selection and then move selected tables to
the right panel under Selected Tab.
At this time, you do not need to add any Master Tables, such as Address Book,
Business Unit Master or Company Master, in which to join. You will have an option
later to add suggested Master Tables if needed. Master tables are not applicable for
EBS ERP System users.)
Master tables are not applicable for EBS ERP System users.
Designing a Template | Create a New Template
Page 29
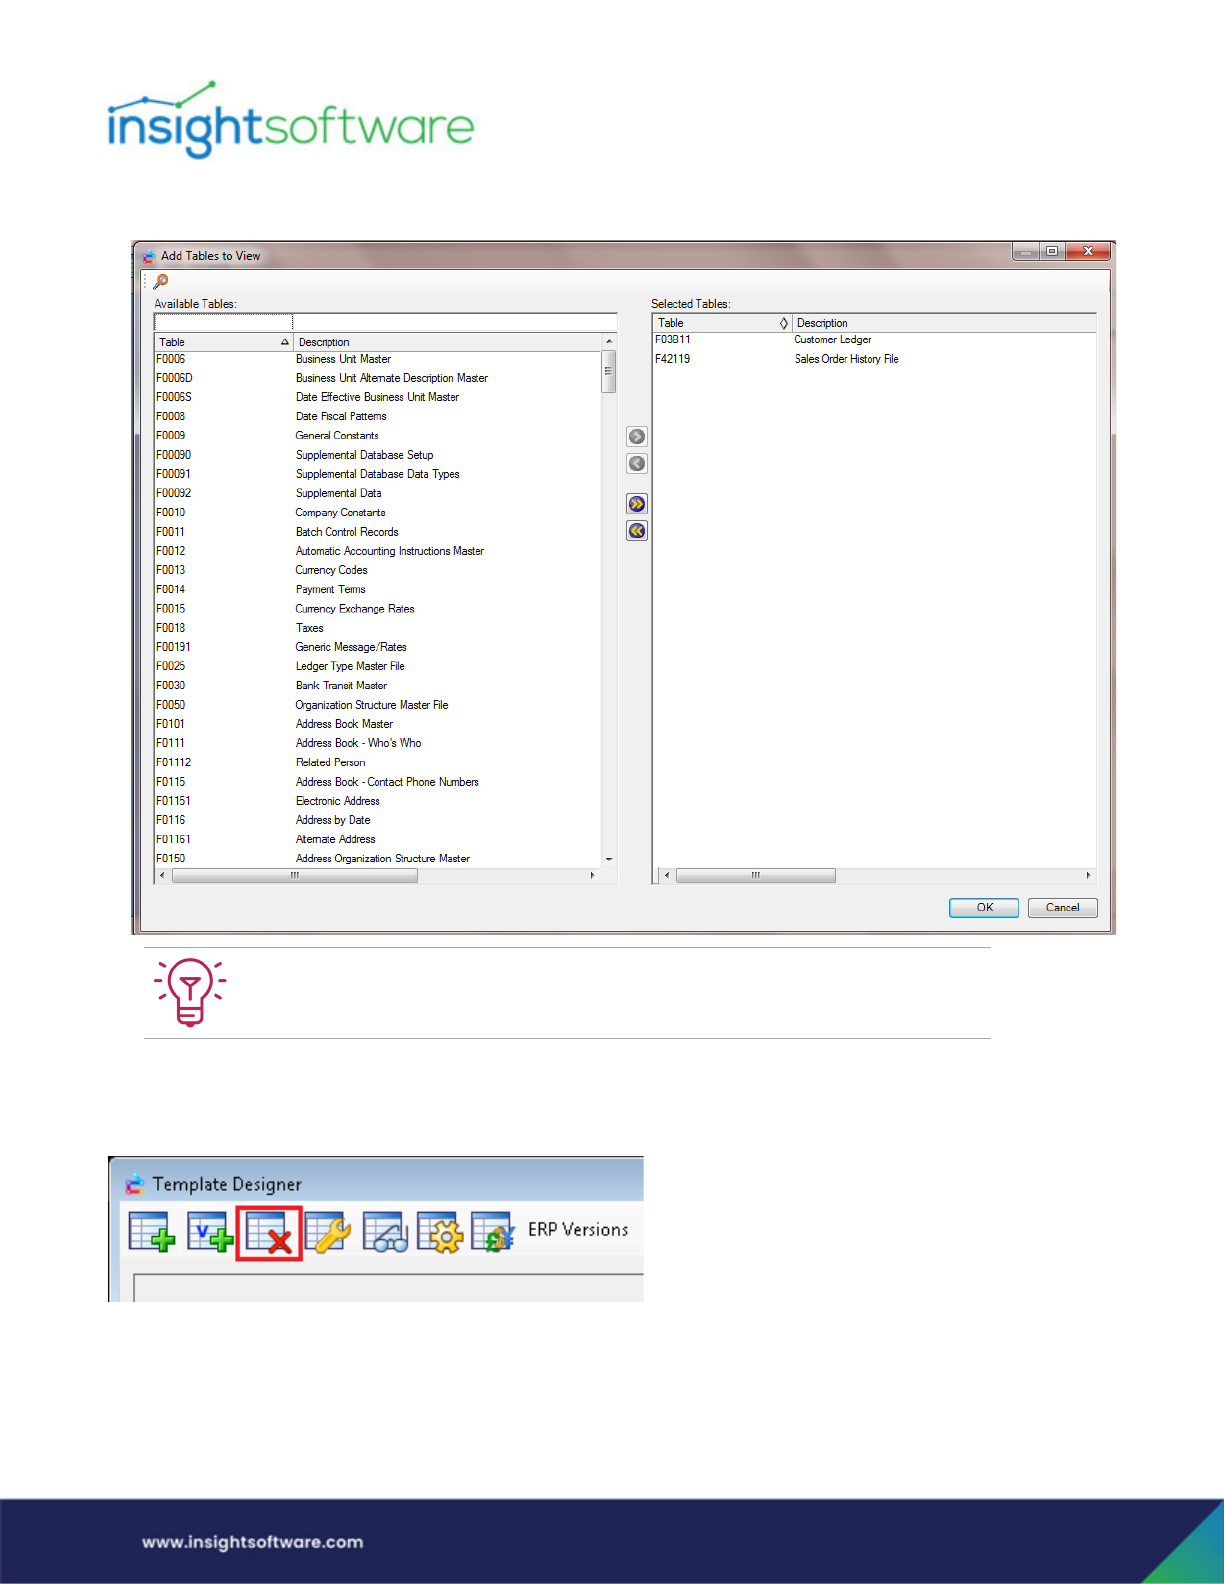
2. Click OK after you have selected the tables you would like to join.
Deleting Tables from the Template
If you need to delete a table from a template, use the Delete Tables button:
When building your template, we recommend that you add one table at a time
through the Template Designer and validate the results with each change or addition
Designing a Template | Create a New Template
Page 30
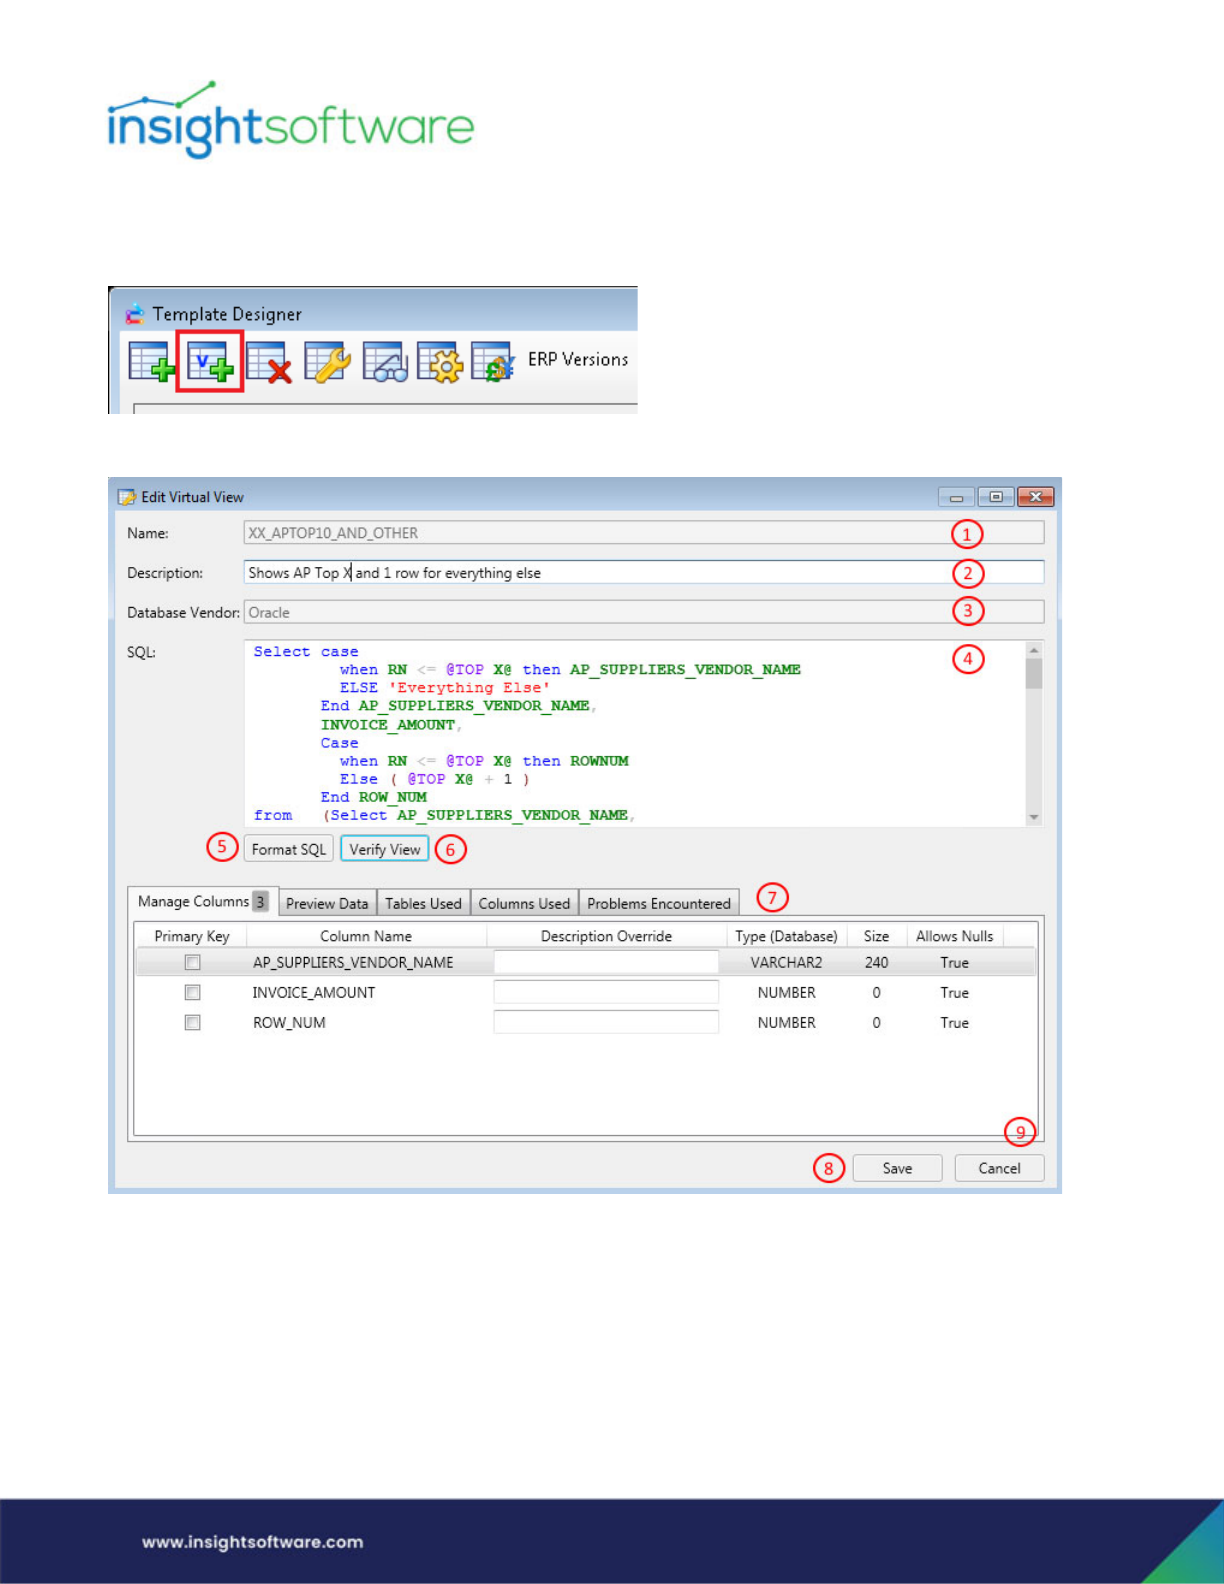
Create and add Virtual Views
To access the virtual view creation facilities, click this button:
This will open the Edit Virtual View dialog.
Designing a Template | Create a New Template
Page 31
The dialog includes the following:
1. Name field – used to insert the name of the view. The name can only contain letters, numbers
and “_”. Once saved, this cannot subsequently be edited.
2. Description field – used to enter a description for the view. This description is for informative
purposes only (e.g. it appears in the Add Table dialog), and need not be completed.
3. Database Vendor field – this field displays the Database Vendor the view was created from. It is
used to restrict the export/import process to ensure views can only be imported into the same
Database Vendor on which it was created.
4. SQL field – the “main” field of the dialog. Used to define the SQL that will be used to create the
view. If you add aliases to columns, they will be used as the view’s column names.
Please refer to Entering SQL Statements - Limitations below.
5. Format SQL button – used to format the SQL entered in the SQL field, indenting it and color
coding it etc.
6. Verify View button – verifies the view to retrieve information about it and to identify any
problems. These details will be displayed in the Details / Settings area.
7. Details / Settings area – after the view is verified, information about the view is displayed in this
area. The Manage Columns tab of this area will also enable you to define column information,
i.e. primary keys and column descriptions, as described below.
8. Save button – used to save the virtual view. The save will only be successful if the view has no
“blocking” problems. If there are, they will appear in the Problems Encountered tab, as
described below.
9. Cancel button – cancels the creation of the view and closes the dialog.
Entering SQL Statements - Limitations
The following should be noted when entering SQL in the SQL field:
● Only a single SQL statement can be entered.
● No lower case, spaces or non-alphanumeric characters can be used in column names or aliases.
● Only select statements are allowed. Declare and other statement types will generate an error
when you verify the view.
We strongly recommend a standard naming convention for Virtual Views so they will
be easy to find and distinguish from tables. For example, you could add the following
characters to the beginning of all virtual views: 'VV_'. In this example, if a virtual view
is based on the F0411 table, it would be named 'VV_F0411'. Furthermore, if a virtual
view is named with a table name that Hubble is unaware off, you will be unable to
use that table later in Hubble, even if you bring the table in via the “configure
additional tables” facility, as virtual views take precedence.

Designing a Template | Create a New Template
Page 32
● Recursive SQL (using CTEs) is not supported. SQL beginning with ‘WITH’ cannot be used.
Exception: There is a workaround ONLY on an Oracle Database, which is to wrap the Recursive
Select with a Select Statement. For example:
- SELECT
Column1, column2
FROM
(WITH CTE AS (SELECT column1,Column2
FROM
Table)
) VV_CTEtest
● JDE stores dates as numbers, so when a virtual view uses a date column in JDE, it stores its data
type as numeric. This means that the column cannot be filtered by date etc.
The workaround for this is to include SQL in the SQL field to convert date columns from numeric
to date format. For example:
○ In SQL Server:
DATEADD(day, CAST(RIGHT(DATECOLUMN ,3) AS int) - 1,
CONVERT(datetime, LEFT(DATECOLUMN,2) + '0101', 112)) AS
DATECOLUMN_DateUpdated
○ In Oracle DB:
to_date(DATECOLUMN,'J')
...where DATECOLUMN is the date column to be added.
Verifying the Virtual View
To address security concerns but also to ensure the view information conforms to certain rules so that it
can be used throughout Designer Express just like another table would be, a new virtual view must be
verified.
This is carried out using the tabs in the Details / Settings area, which is populated with data about the
view when the Verify View button is clicked.
● Manage Columns tab:
Designing a Template | Create a New Template
Page 33
The tab displays the following metadata:
○ How many columns are in the virtual view.
○ Whether or not each column is a primary key.
The user must define which columns are primary keys by ticking the Primary Key checkboxes.
○ Each column name, type and size.
○ User-defined column descriptions in the Description Override fields, which override the
default descriptions.
○ Whether or not each column allow Nulls.
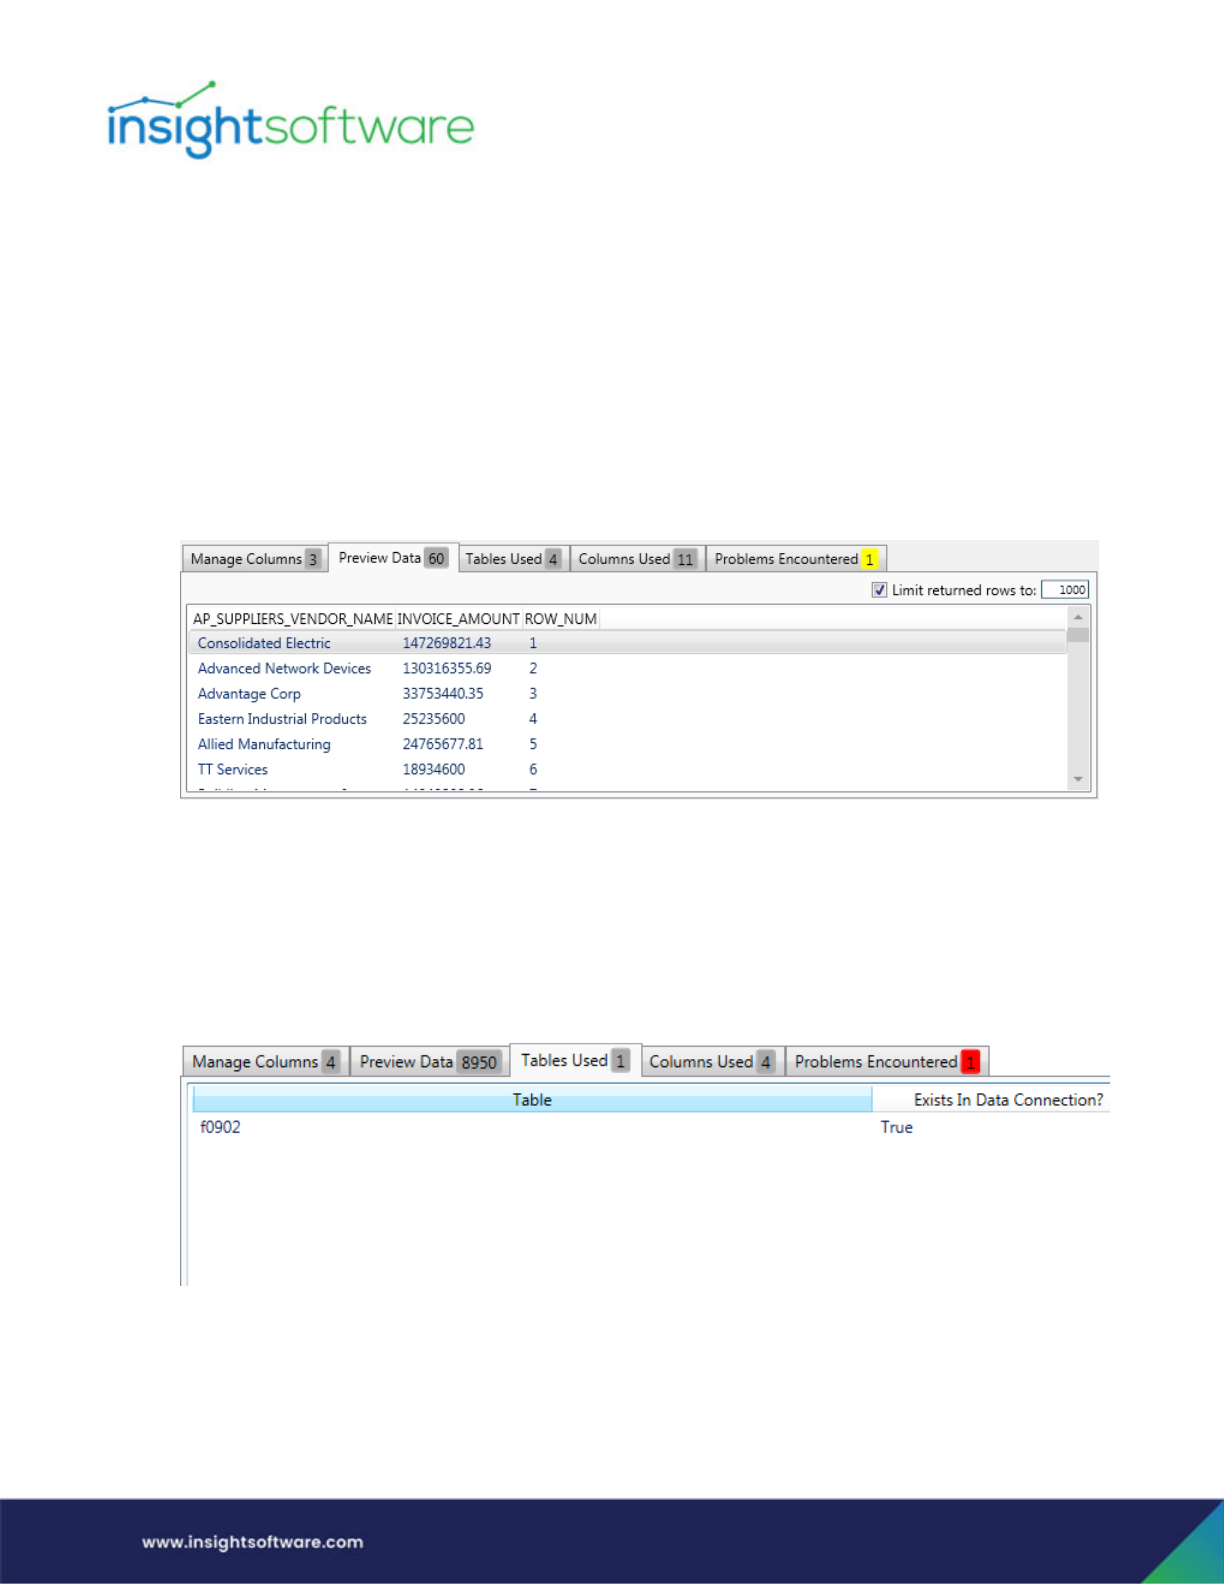
● Preview Data tab:
The tab displays a preview of the data returned. This lets you check that running your SQL will
have the results expected.
The Use the Limit returned row to checkbox and field are used limit the number of rows
returned in the preview. Without this limit, running the SQL might take a lot of time and
resources. This will not limit the rows returned in report that use the view.
● Tables Used tab:
This tab lists the tables used by the view and whether or not they exist in the data connection.
Designing a Template | Create a New Template
Page 34
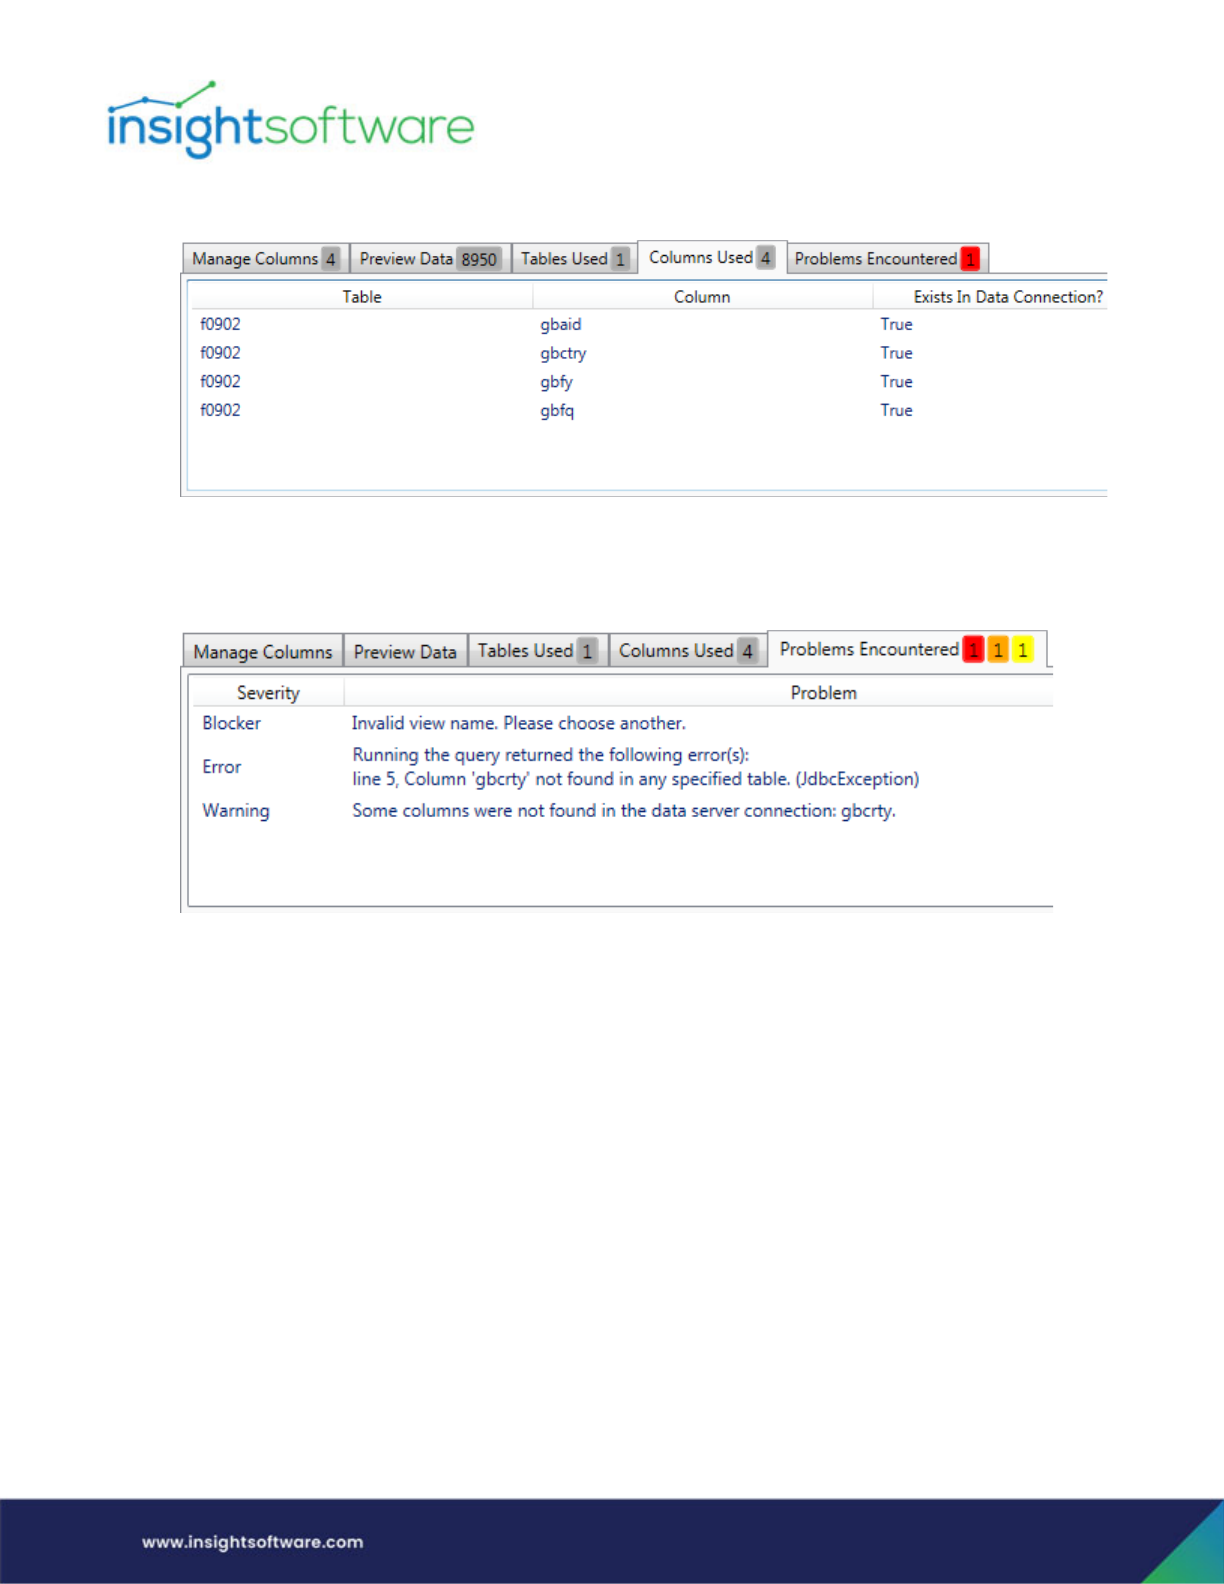
● Columns Used tab:
This tab lists the columns used by the view, the tables they are part of, and whether or not they
exist in the data connection.
● Problems Encountered tab:
This tab displays any problems found with the virtual view and how severe they are, i.e.:
○ Blocker – These are problems that will stop the view from being saved. You must fix all
blockers before the view can be saved.
○ Error – These are problems which will cause issues when running the virtual view as part of a
report. You can still save the view anyway and choose to fix these problems later.
○ Warning – These are minor problems with the virtual view. They may not necessarily prevent
reports from running. You can save the view and choose to fix these problems later.
Designing a Template | Create a New Template
Page 35
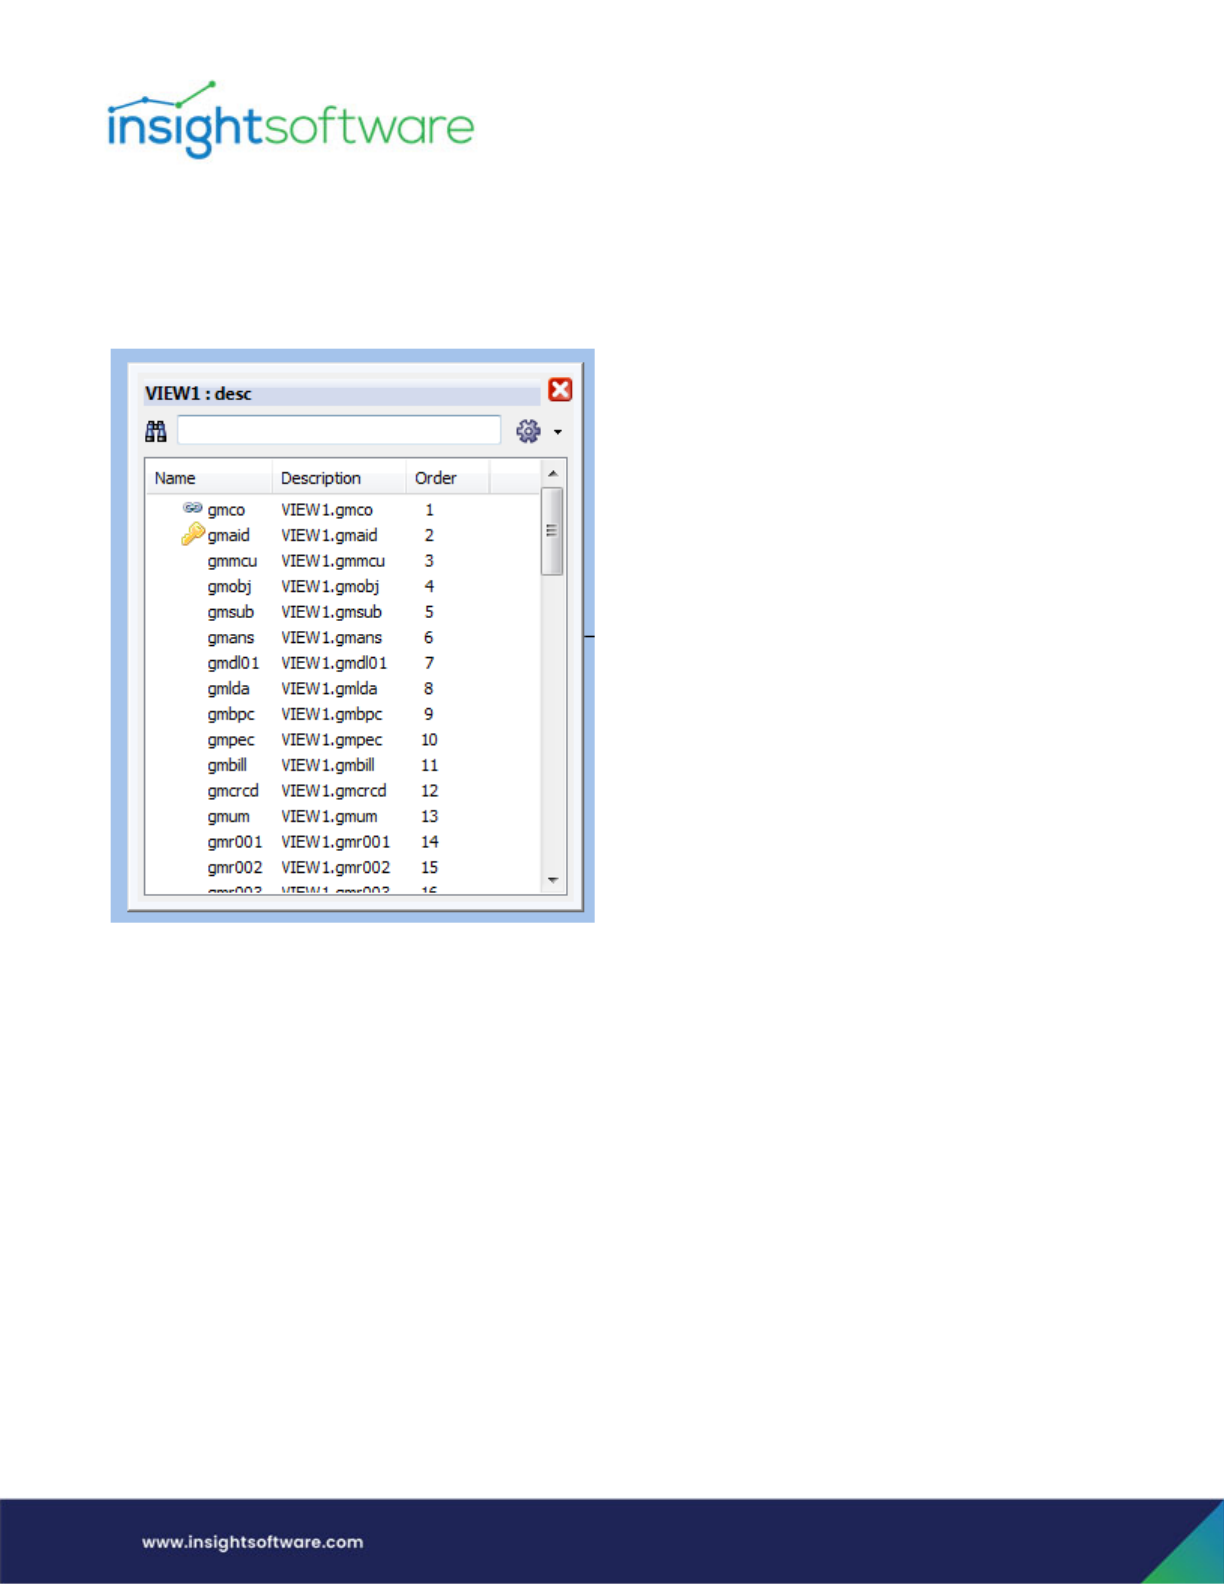
Adding Virtual Views to Template Designs
Once a virtual view has been saved, it will be added to the list of available tables in the Designer Express
Template Designer. It can be added to a report template design using the Add Tables dialog, in the same
way as any other table.
Virtual view primary keys columns are indicated by a key icon.
Editing and Deleting Virtual Views in Template Designs
Only the user who created a view, and users in the Administrator group, can edit and delete that view.
Unions cannot be created with virtual views. The Unions option is therefore not available from the
Settings button menu for views (although the views themselves may include unions within them).
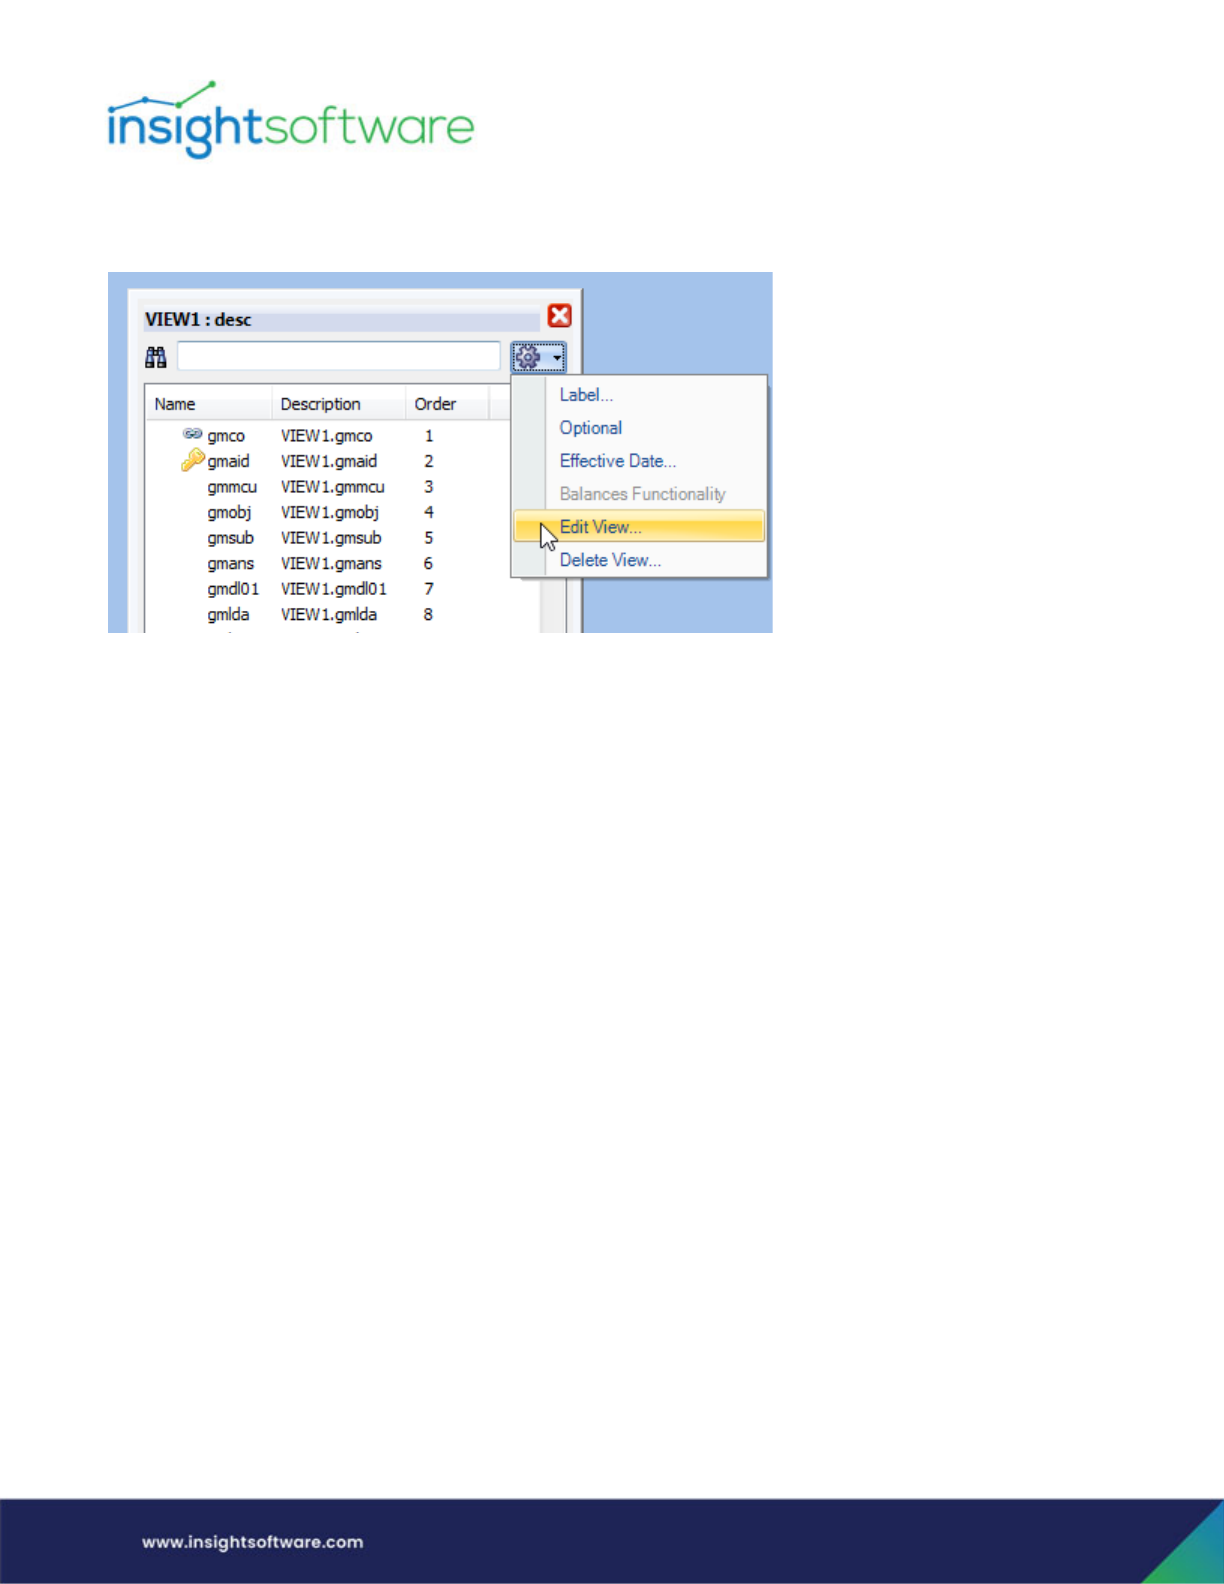
Designing a Template | Create a New Template
Page 36
In other respects, facilities for virtual views in the Template Designer are the same as for other tables.
For example they can be edited and deleted from the options accessible via the Settings button.
The Edit View option will open the Edit Virtual View dialog described previously.
Adding Variables to Virtual Views
Report variables may be added to virtual views in order to store dynamic data within that view. These
variables can then be modified using filters in order to change the view accordingly, for example to run
the view for a different date range. Text, Numeric and Date variables are supported.
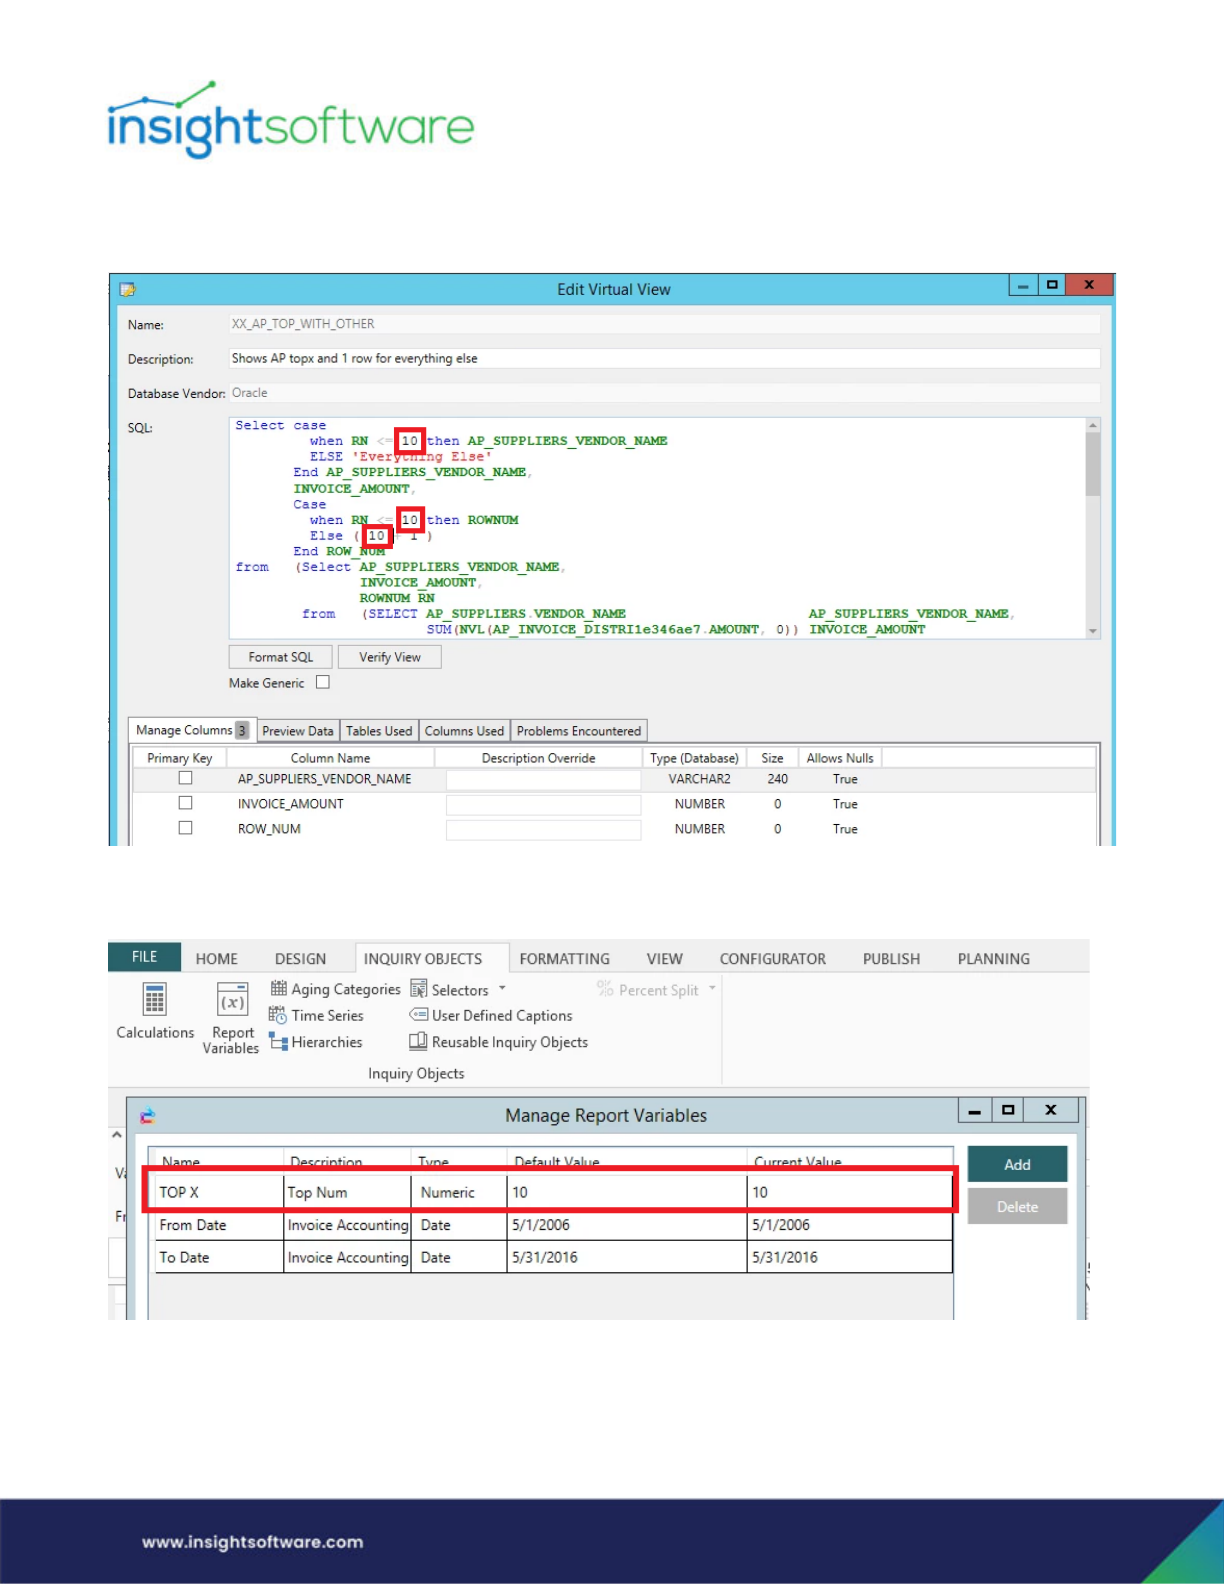
Designing a Template | Create a New Template
Page 37
To include variables in a virtual view, first generate the view as described above without any variables at
this point, and complete the Designer Express Template. For example:
Then add the required variables using the Manage Report Variables dialog, accessed from the Inquiry
Objects > Report Variable option. For example:
Designing a Template | Create a New Template
Page 38
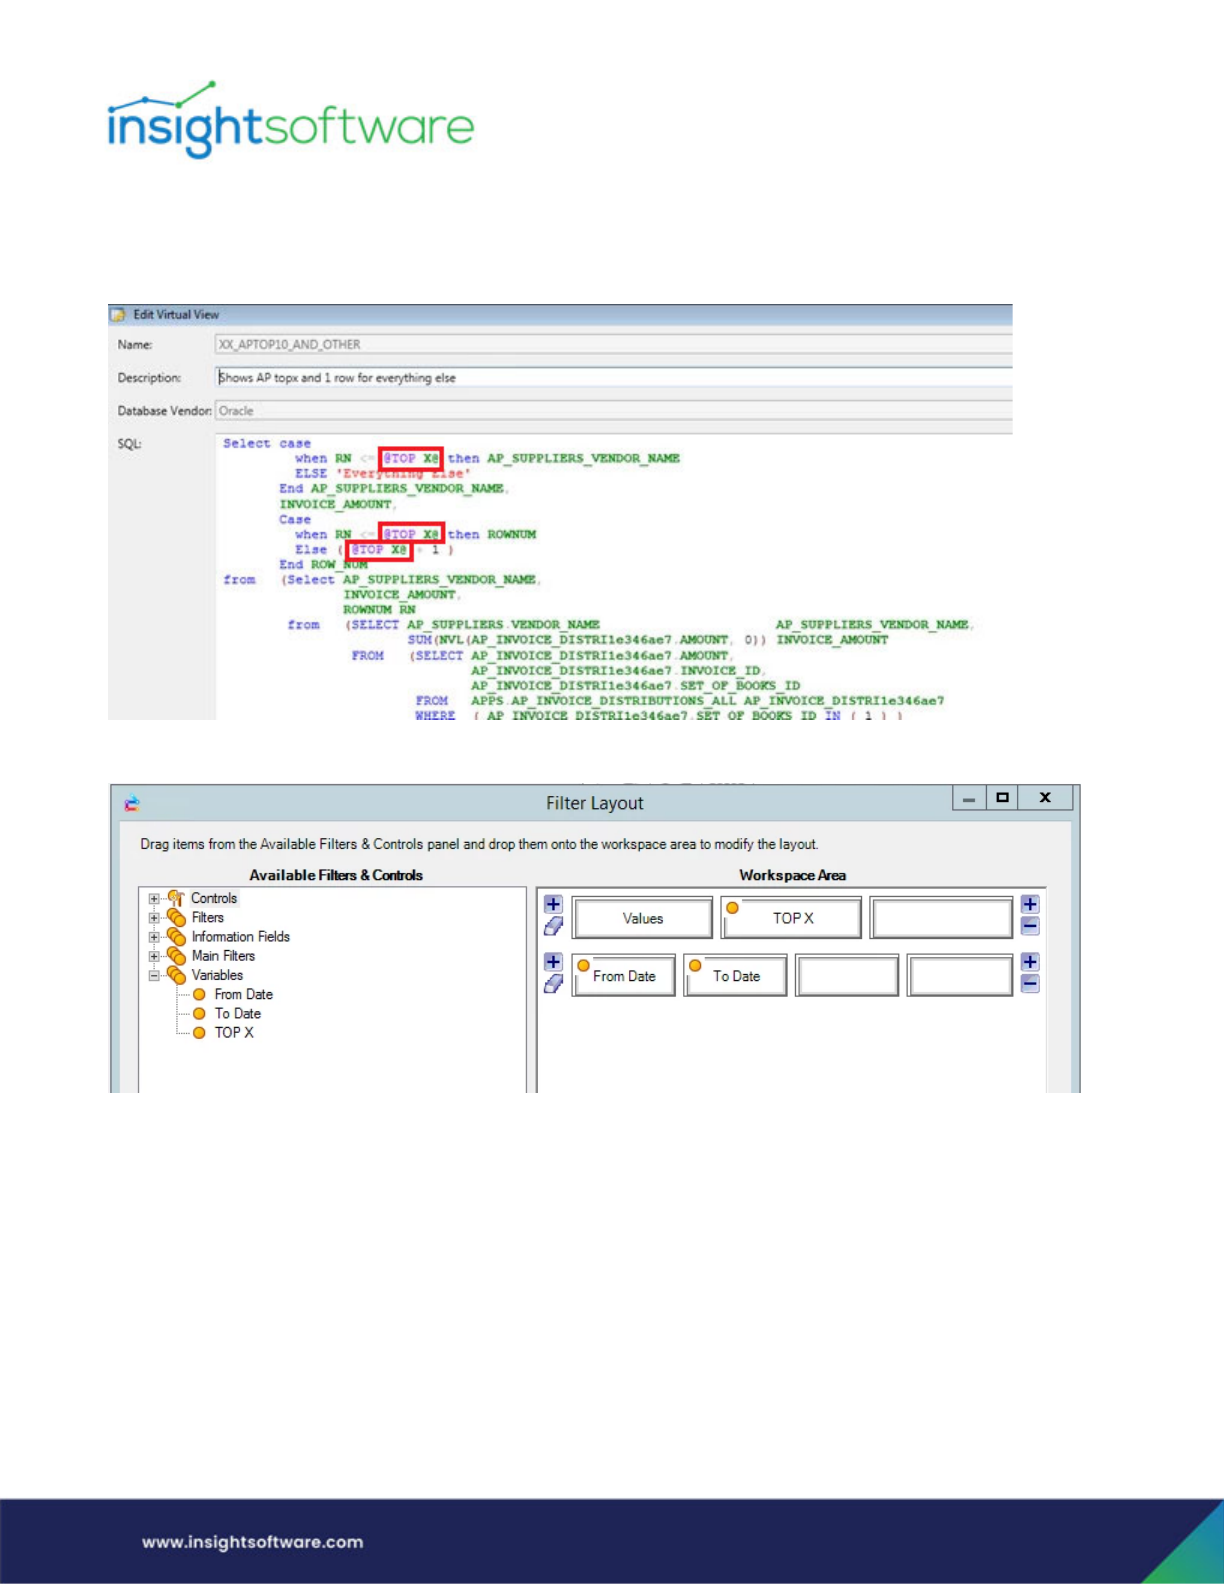
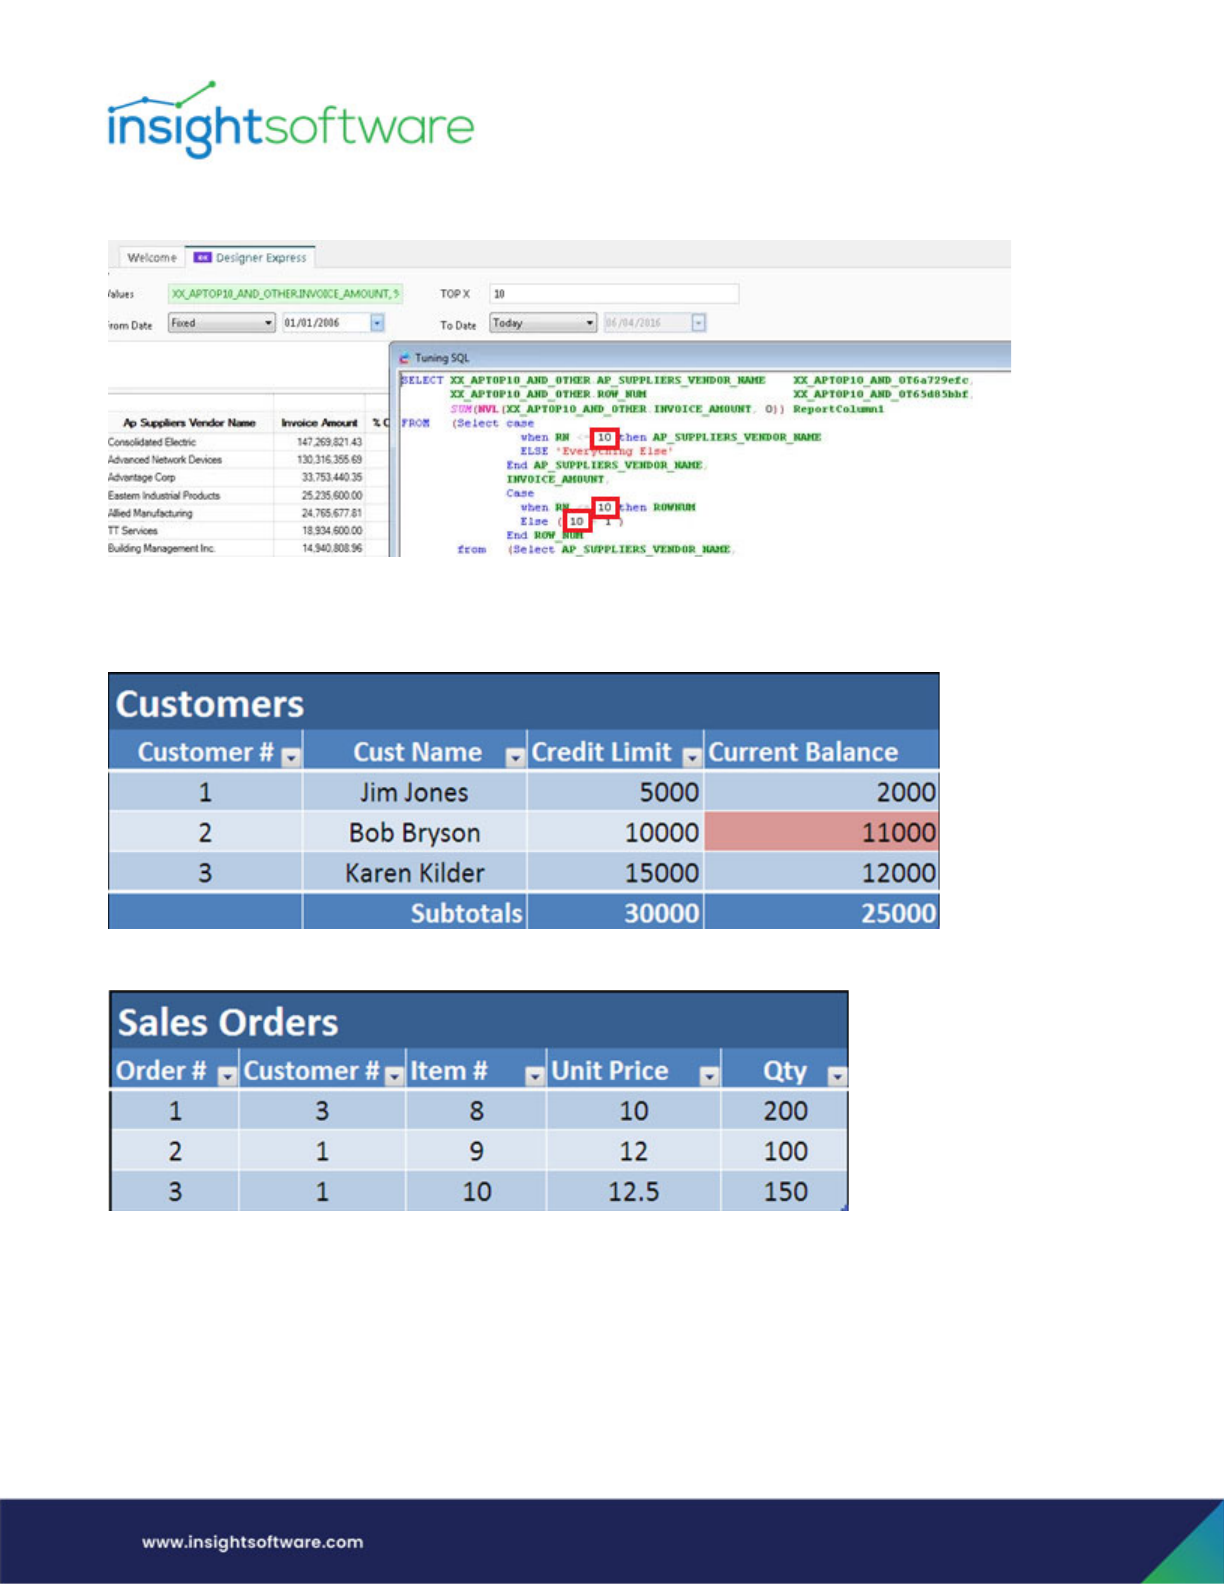
The next step is to edit the virtual view to reference the variables by surrounding them with the @
character. For example if the variable was named TOP X, then the view would need @TOP X@ in order to
substitute this for the value of the variable:
The final step is to publish the variable filters (note that only Date filters can be changed in Hubble Web).
Designing a Template | Create a New Template
Page 39
The resulting SQL as displayed in the view SQL window shows the variable replaced with the filter value:
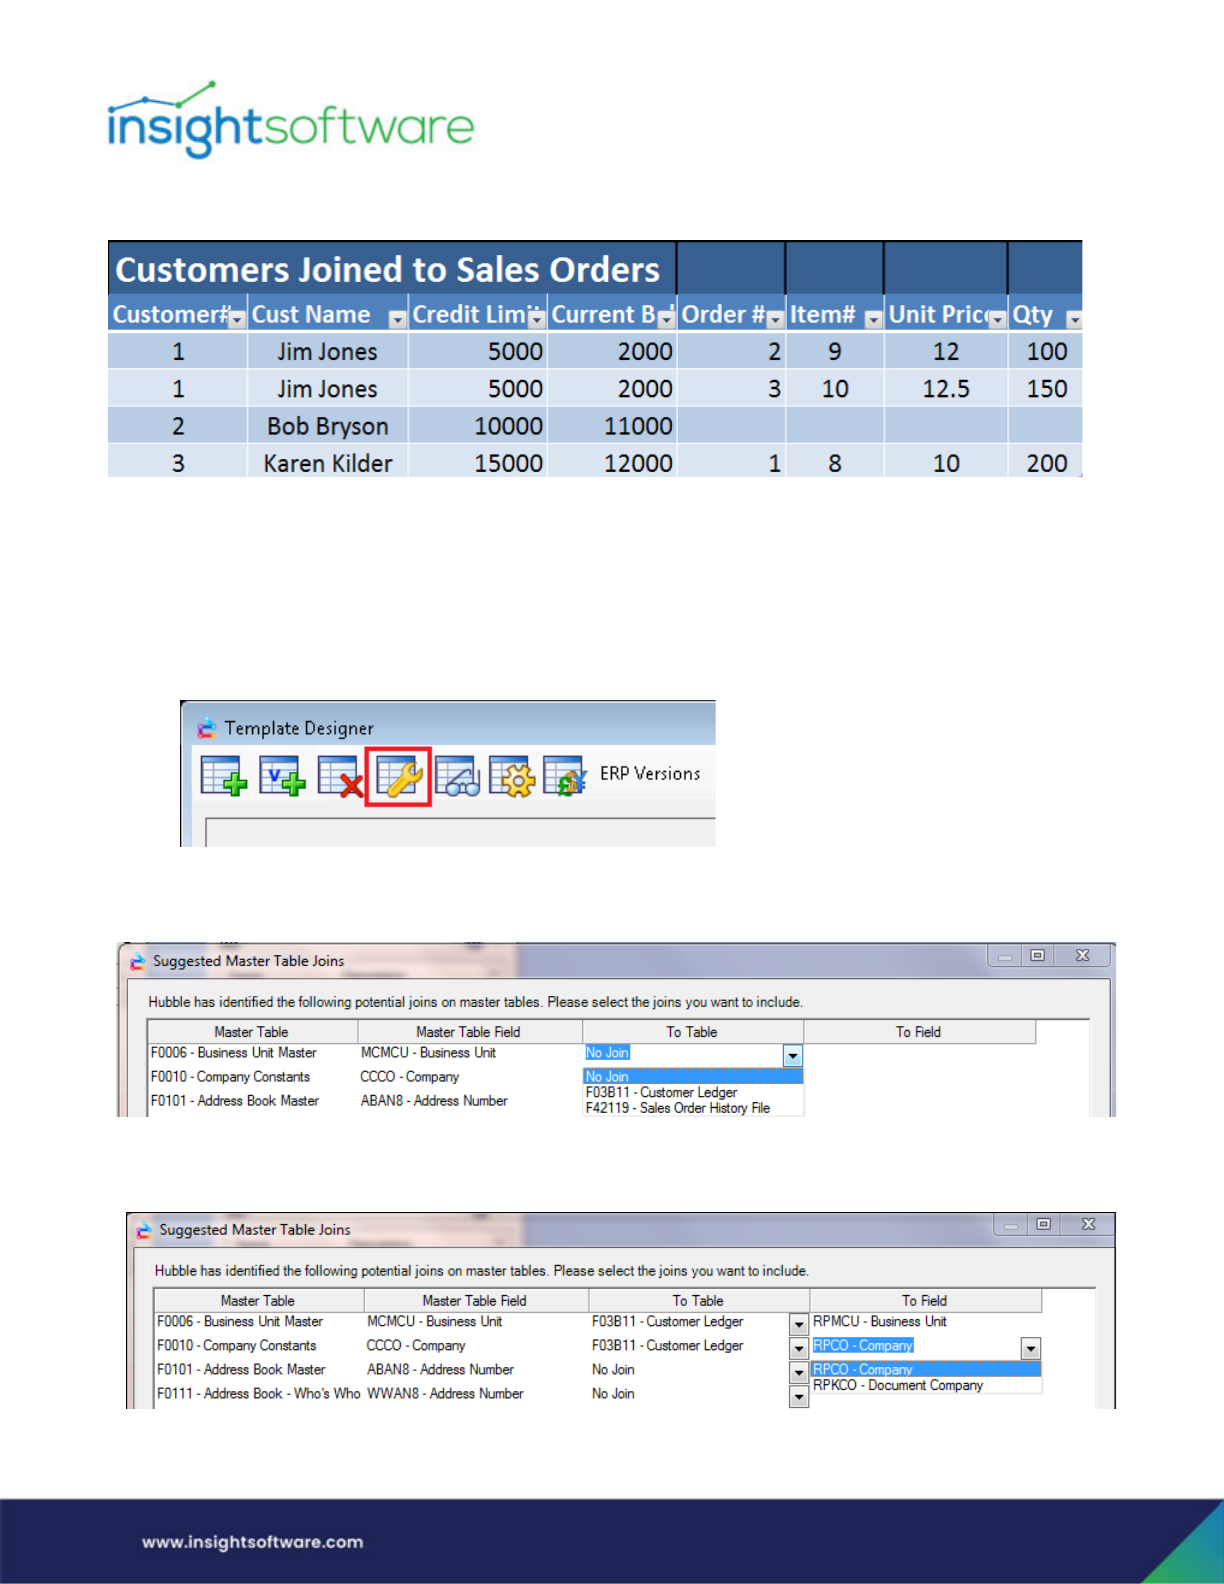
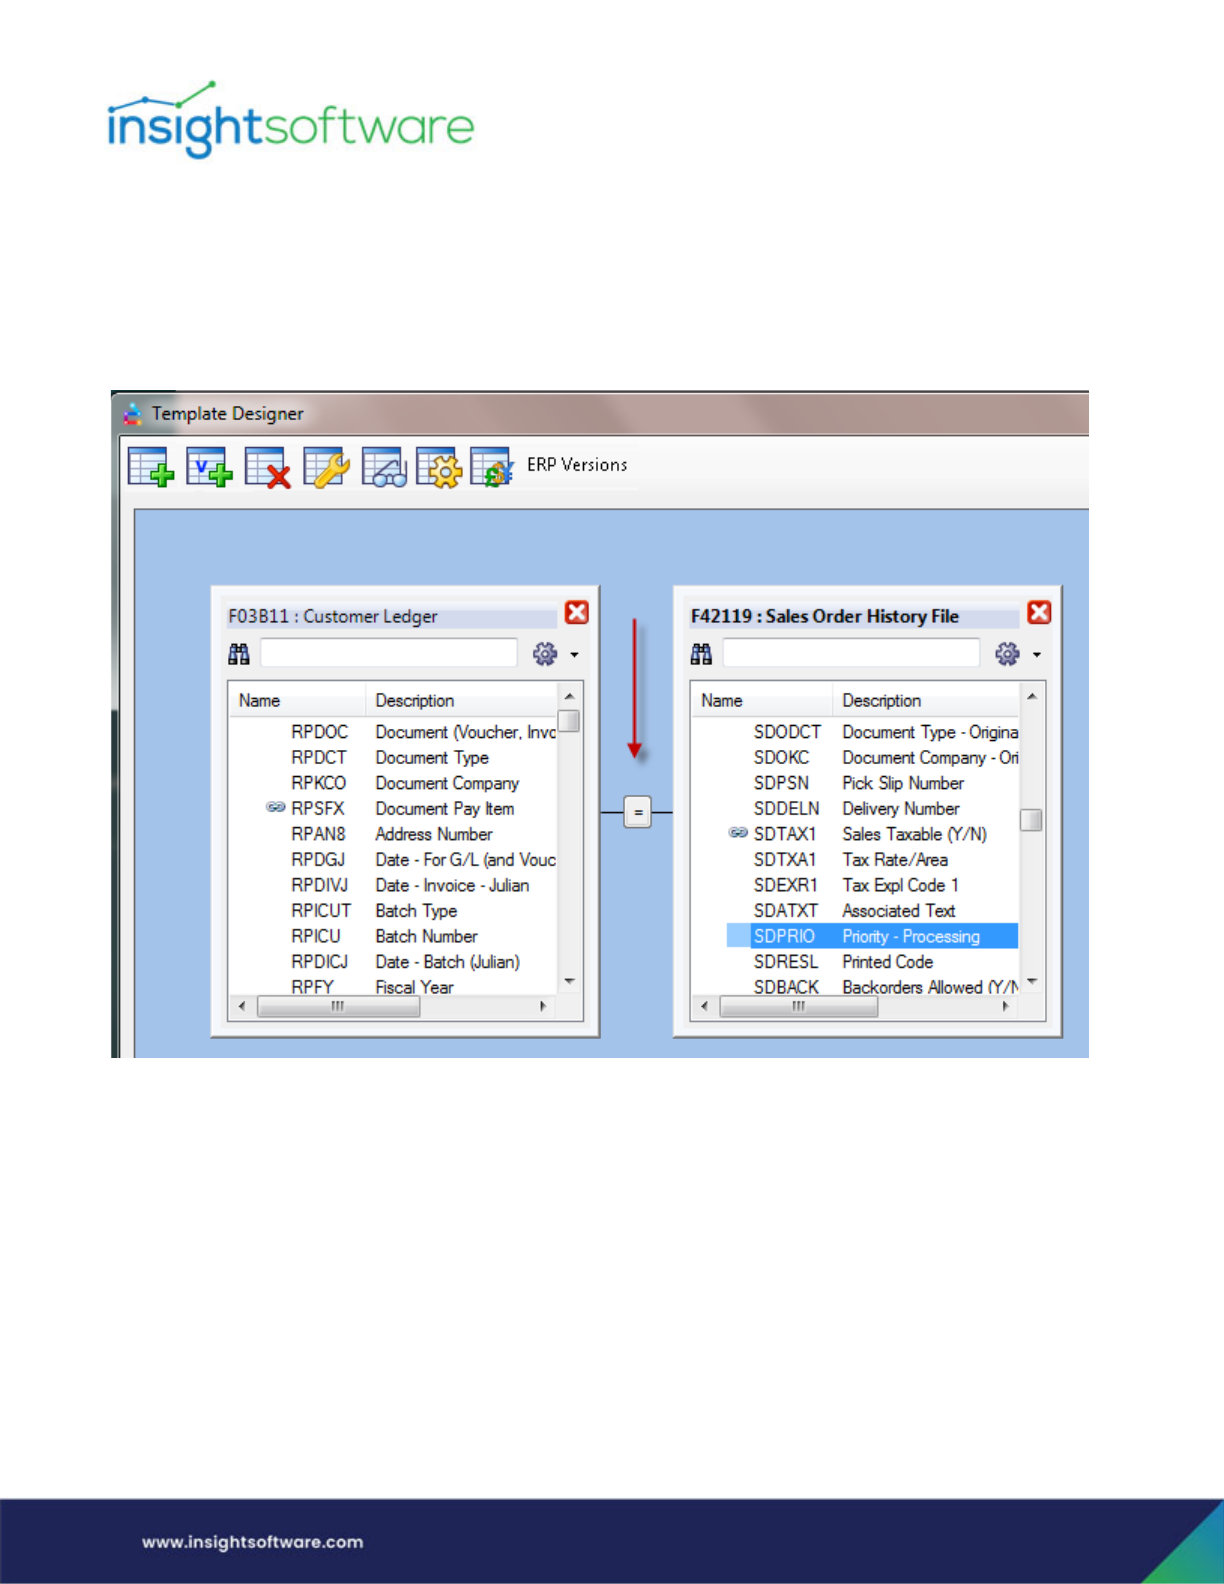
Understanding Joins - what does it mean to join two tables?
Let’s say you have customer data you wish to include in your report.
You also have sales order data you wish to include.
Designing a Template | Create a New Template
Page 40
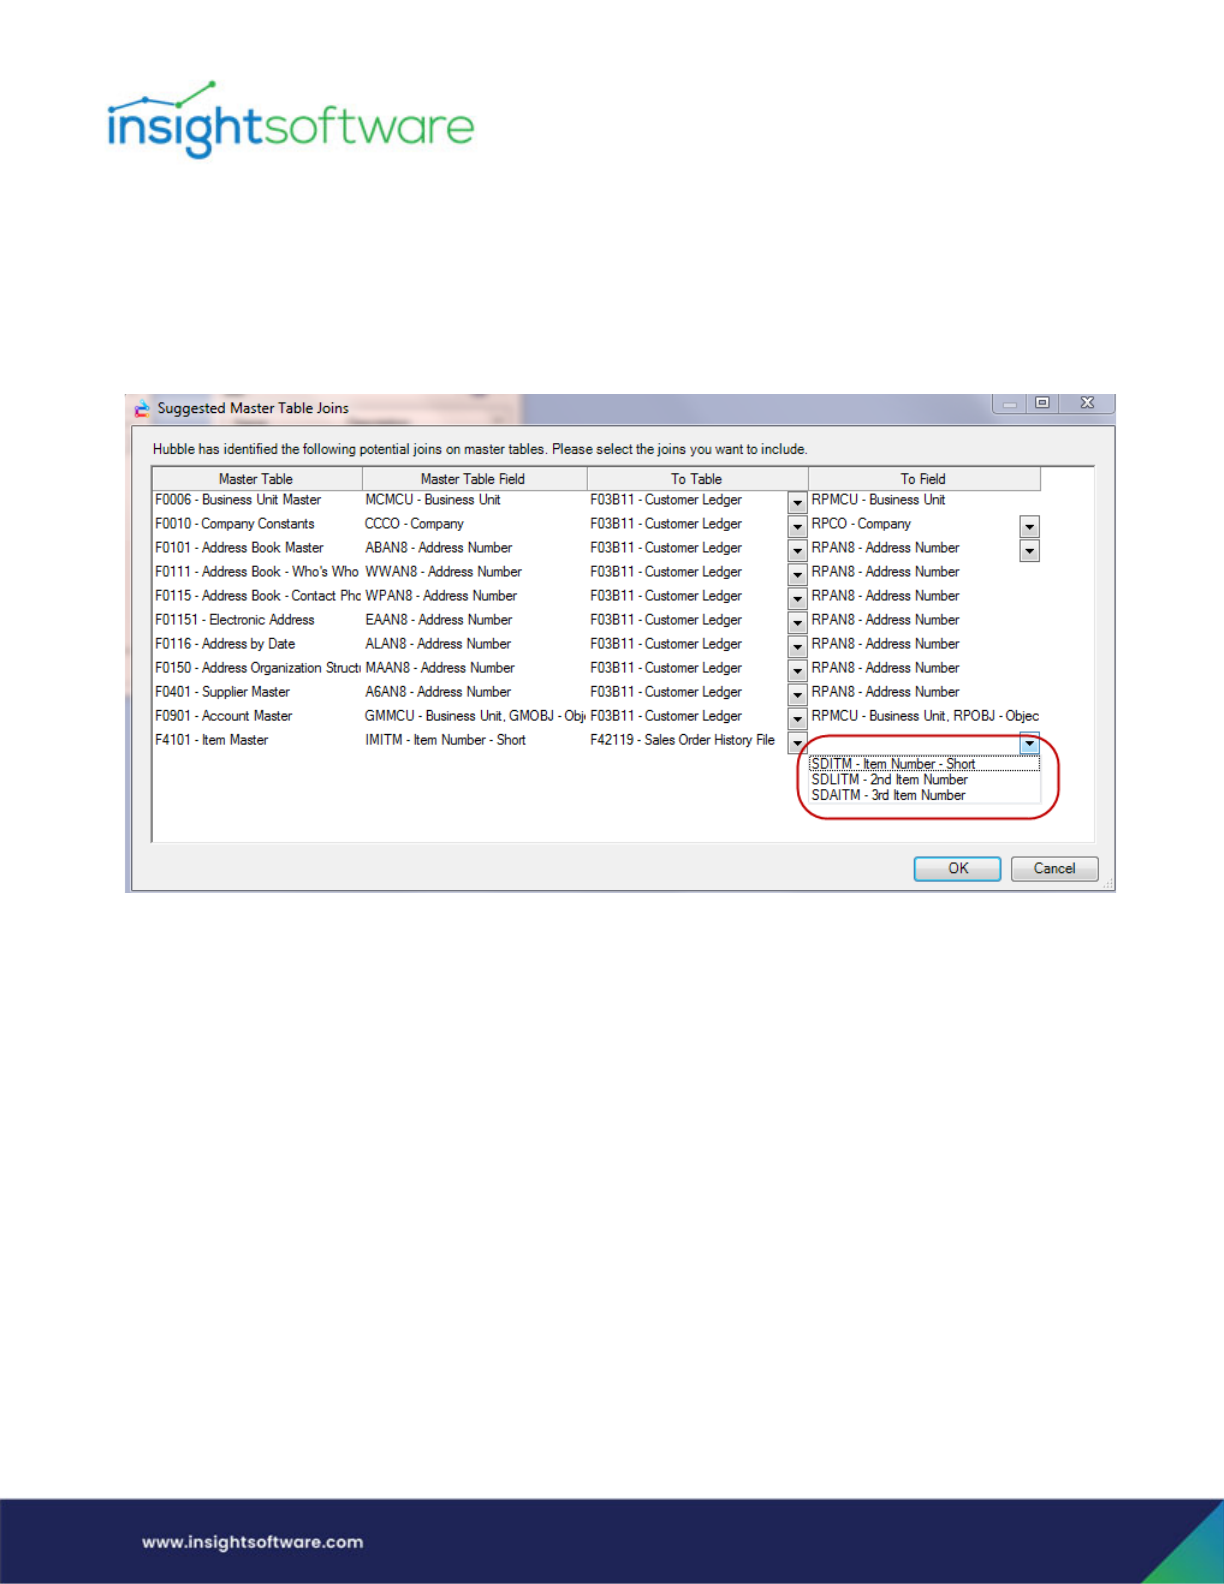
Joining these 2 tables, you can show both customer data AND sales order data in 1 report.
Defining the Suggested Master Table Joins
For JD Edwards ERP users, once you have defined the joins to the tables being used in your custom
template or inquiry, the next step is to define any Master Table joins you would like to include in the
template if they have not been defined already.
1. From within Template Designer, select Manage Suggested Master Table Joins.
2. To start defining your joins to each table, select the appropriate To Table from the column using
the drop-down provided.
3. Depending on the To Table, you may need to select the To Field you wish to use in the join. In the
below example, we have selected Table F03B11 and can choose to join to either RPCO or PRKCO.
Designing a Template | Create a New Template
Page 41
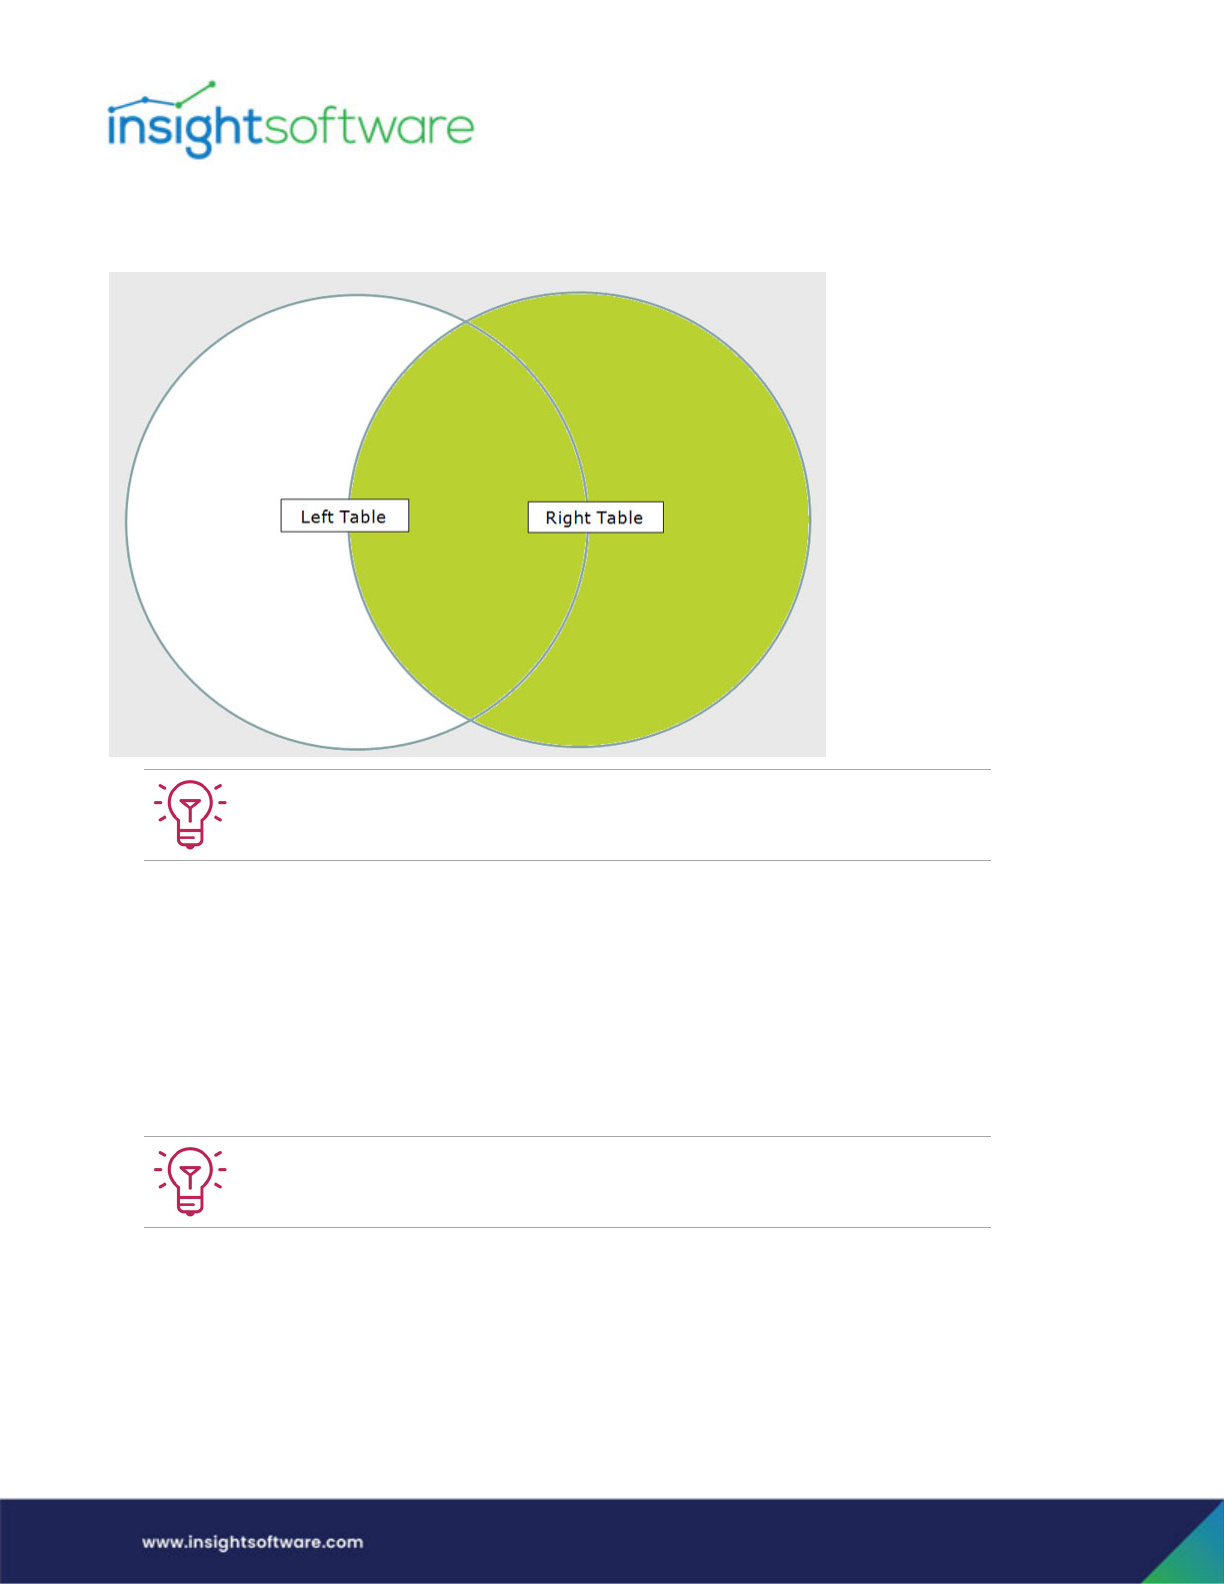
Continuing in the same example, when joining to the F4101 Item Master, you are prompted with
a choice of fields to join with:
> ITM – Item Number Short
> LITM – 2nd Item Number
> AITM – 3rd Item Number
Defining Table Joins
Within Template Designer, you define more fields to join as well as the join type to be used between the
two tables. Your options of join types are listed in the following descriptions.

Designing a Template | Create a New Template
Page 42
Inner Join – Includes only records where both tables meet criteria.
Left Outer Join – Include all rows from Table A and just those rows from Table B which meet the criteria.
Designing a Template | Create a New Template
Page 43
Right Outer Join - include all rows from Table B and just those rows from Table A which meet the
criteria.
Changing the join type changes the rows that are returned in the inquiry. When we join tables, we refer
to the two tables as the left and right table. This has nothing to do with the relative position of the tables
in the Template Designer dialog, but instead refers to the relative position in the underlying SQL
statement that creates the join.
When you use Template Designer and drag fields from one table to another to create the join:
● The table you drag from becomes the left table.
● The table you drag to becomes the right table.
You can hover over each join type to get a description of what each join type
accomplishes.
When determining which fields to join between tables, start with the primary keys
and join as many as possible.
Designing a Template | Create a New Template
Page 44
Setting the Join Type
To set or change the type of join:
1. Once you see the fields you want to join in each table, you simply connect the fields by dragging
your mouse from one table to the other. Once you do this, you see an equals sign between the
two tables.
2. Once the first join has been defined, you will see the join definition listed in the panel on the
right. You can edit the join by either clicking on the equal (=) sign between the tables or
highlighting the join from the right side panel and selecting the Edit Join button located at the
bottom of the panel. This launches the Join Properties dialog.
When creating custom templates over your JD Edwards ERP System, you can create a union between
tables that have identical fields. (Unions are not applicable with EBS.) Unions are discussed in the
following section.
For JD Edwards ERP system users, there is a Padding button. (EBS does not use padding/alignment, so
this feature is not needed for these users.) Through the Padding button, you can perform field
formatting/transformation for table joins. With this function you can change the format of fields so you
can pass certain fields to another table where the same field has different formatting, such as passing

Designing a Template | Create a New Template
Page 45
the Subledger field from the F0911, GL Transactions Table, to the F0101, Address Book Table. (Hubble
gets padding information from the JD Edwards Data Dictionary, but this padding feature lets you
override that for a given join in DX.) So if your Data Dictionary says the field is right aligned, prefixed with
zeros, but the data in your table is actually left aligned and without zeros, then you can tell Hubble to
ignore what the Data Dictionary says, for this join only.)
The default value in the Comparison field is equals; however you can choose other comparison
operators (does not equal, greater than, greater than or equal to, less than, less than or equal to) for the
column join if required.

Designing a Template | Create a New Template
Page 46
You can also choose to define Literal Values if you choose. When this box is checked, you can define a
specific field value in the join, such as the option to only join when the Business Unit = 30 in the
Customer Ledger (F03B11), RPMCU field, as in the following example.
Effective Date conditions can be set on a join as well. More details can be found in that section below.
Designing a Template | Create a New Template
Page 47
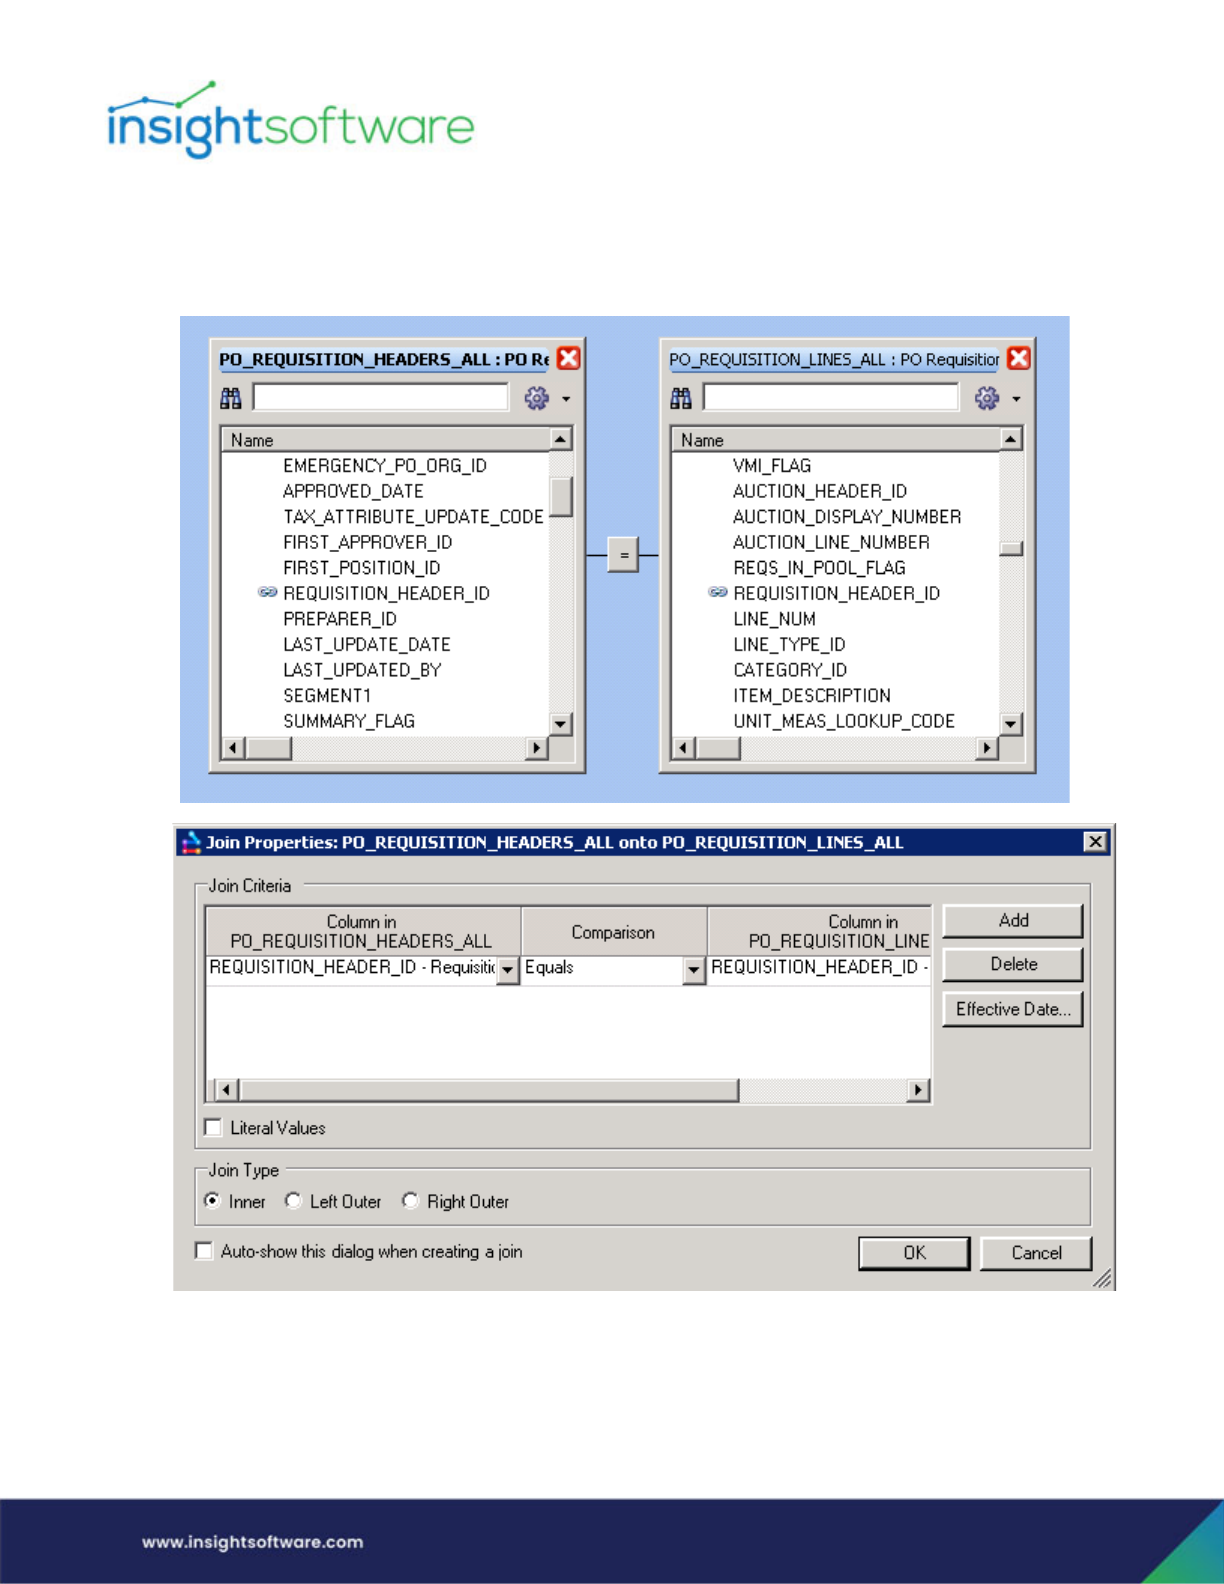
EBS Examples
1. This example shows an inner join between the PO_REQUISITION_HEADERS_ALL and the
PO_REQUISITION_LINES_ALL tables. These tables are joined by HEADER_ID.
Designing a Template | Create a New Template
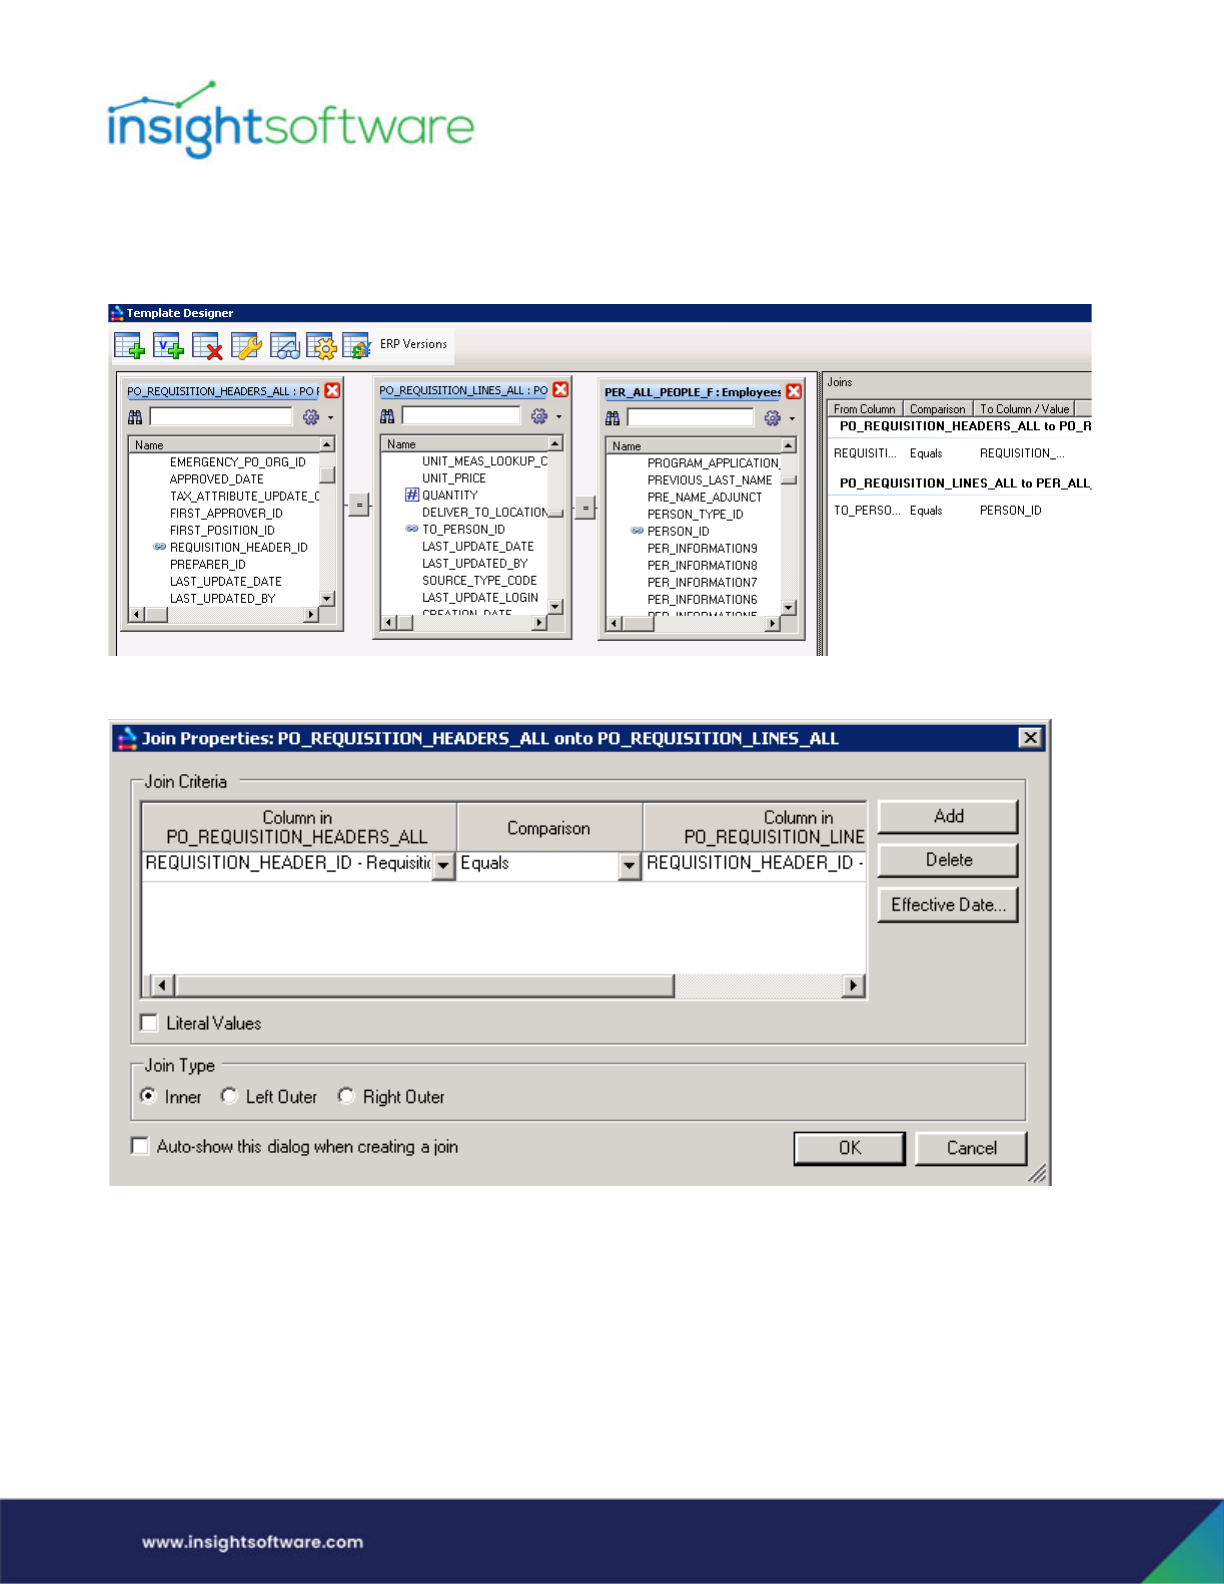
Page 48
2. This example shows 3 tables that are joined: PO_REQUISITION_HEADERS_ALL,
PO_REQUISITION_LINES_ALL, and PER_ALL_PEOPLE_F tables. There is 1 inner join between the
first 2 tables, and a left outer join between the last 2 tables.
Designing a Template | Create a New Template
Page 49
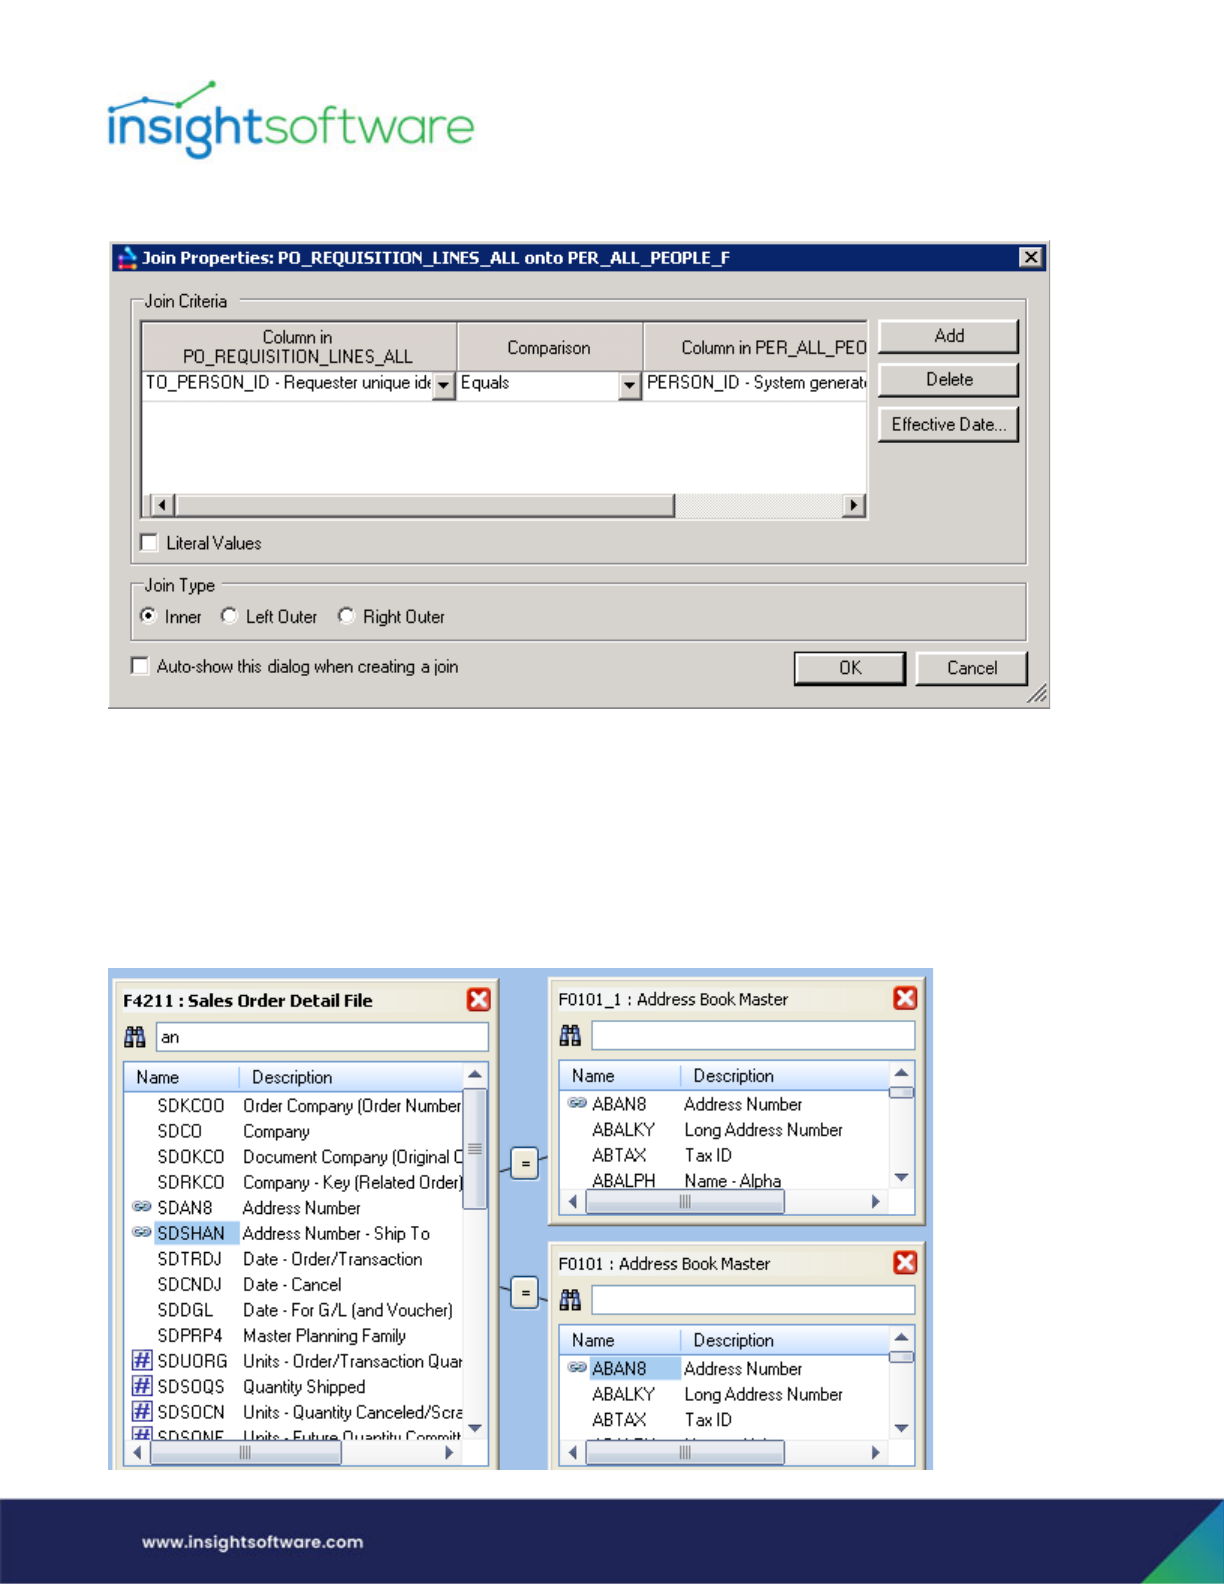
Joining to the Same Table
One significant benefit of creating custom templates is that you can join to the same table multiple
times.
For customers using JD Edwards ERP data, this feature is particularly useful for joining to the same
master table multiple times. For example, if you are joining the Sales Order Detail (F4211) to the Address
Book Master (F0101), you may want to base the join on Sold To, Ship To and Parent.
Designing a Template | Create a New Template
Page 50
When joining a table more than once, in order to make the different instances of the same table
distinguishable, Hubble will give subsequent table instance an alias. This alias then becomes the primary
identifier of the aliased table, both internally and at the user interface level.
When a Designer user adds a table more than once, the table will be assigned an alias automatically.
This will depend on the ERP, as follows:
● EBS (e.g. AP_INVOICES_ALL and AP_INVOICES_ALL_1)
● JD Edwards (e.g. F0006_1 when adding the F0006 for the 2nd time and F0006_2 when adding
F0006 for the 3rd time)
The table alias (not the physical table) will be shown throughout the system, including when displaying
columns/tables in dialogs, in internal data structures, and the SQL generated by the system. The system
ensures that aliases are unique and are valid as table names.
Note that you can set a label for the table in the general UI in order to make the name more meaningful.
This will change the name in certain dialogs but not in any background SQL. Labeling is done in Template
Designer by going to Table Options and selecting Label.
Table Options
In Template Designer, there are several types of options you can set once you have added a table to the
template. Table Options are accessed by clicking on the gear icon in the upper right corner of the table:
● Unions
● Label
● Optional
● Effective Date
Designing a Template | Create a New Template
Page 51
● Balances Functionality
Designing a Template | Create a New Template
Page 52
Unions
When using Designer Express over your JD Edwards ERP System, you can create a union between tables
that have identical fields. (Unions are not applicable with EBS.)
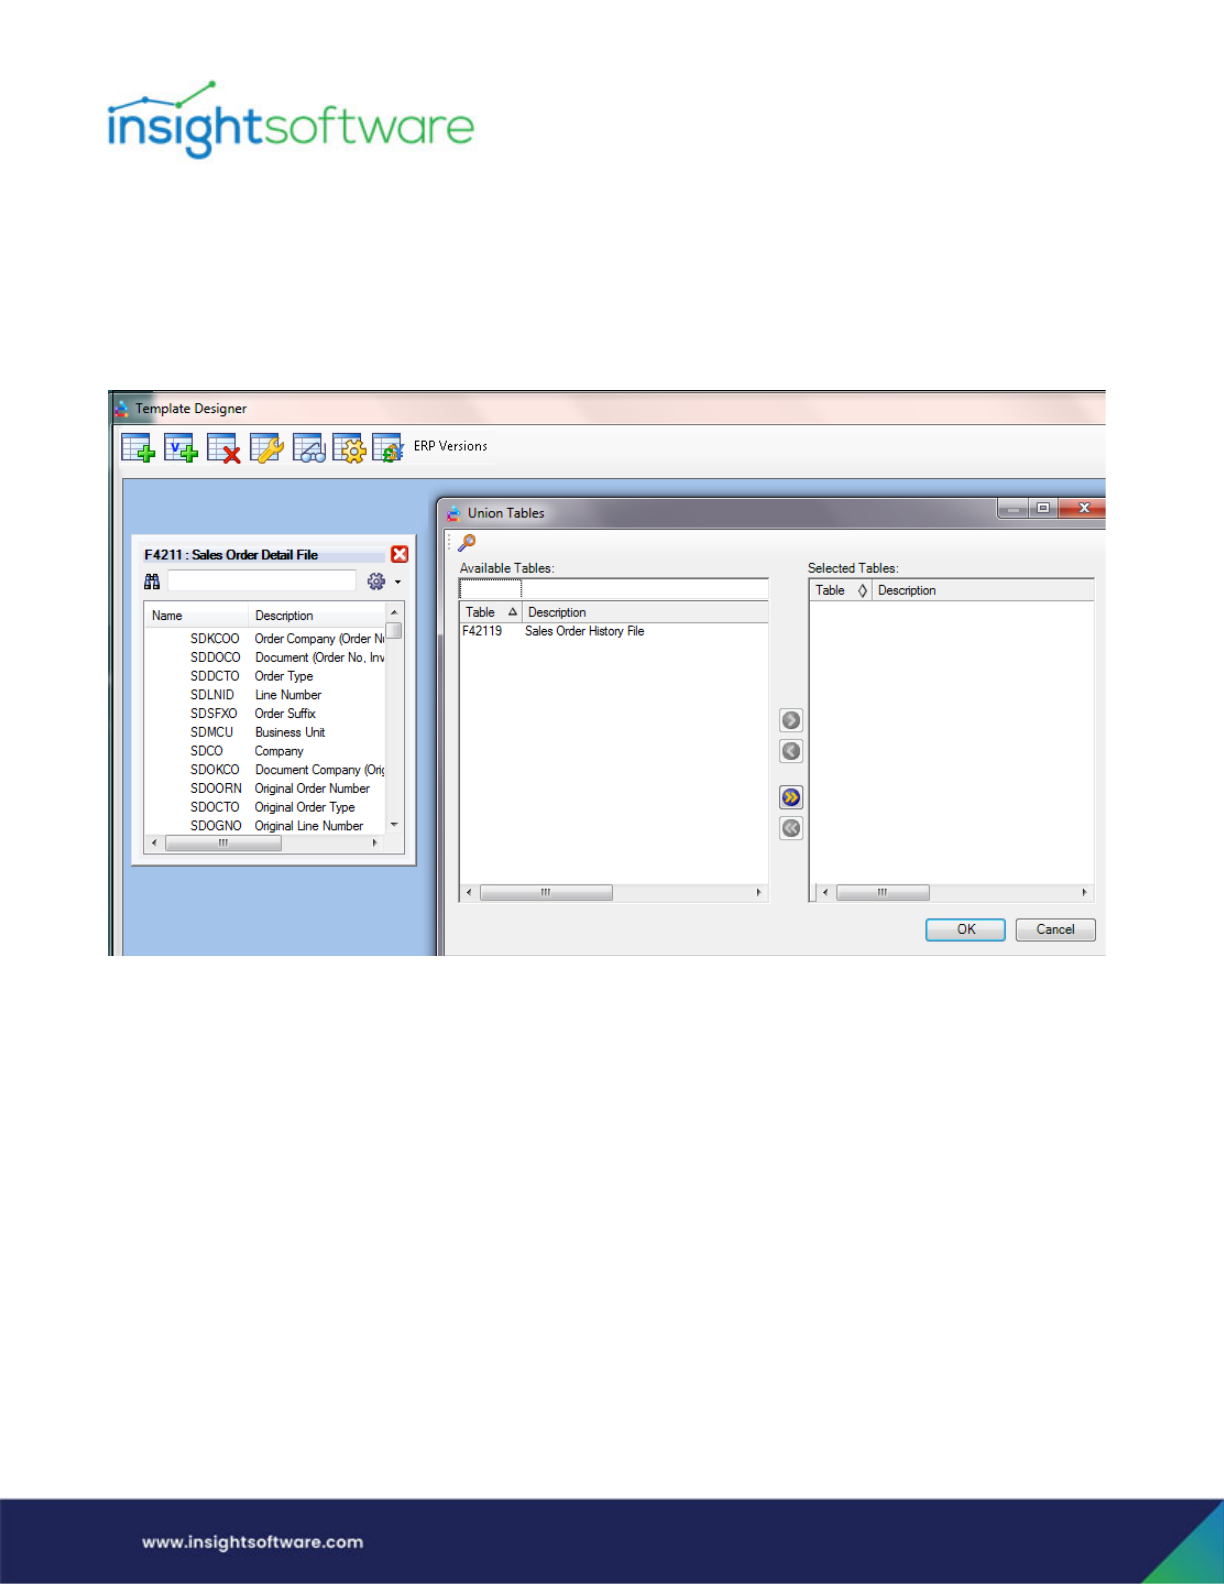
In Template Designer, once a table has been selected, click Table Options to view any tables available to
union to the original table. If one is available, it can be selected.
An example of tables that can be unioned is the F4211 (Sales Order) Table and the F42119 (Sales Order
History) Table; these tables have identical fields within them. When unioned, these tables would show
both historical and current sales data.
Designing a Template | Create a New Template
Page 53
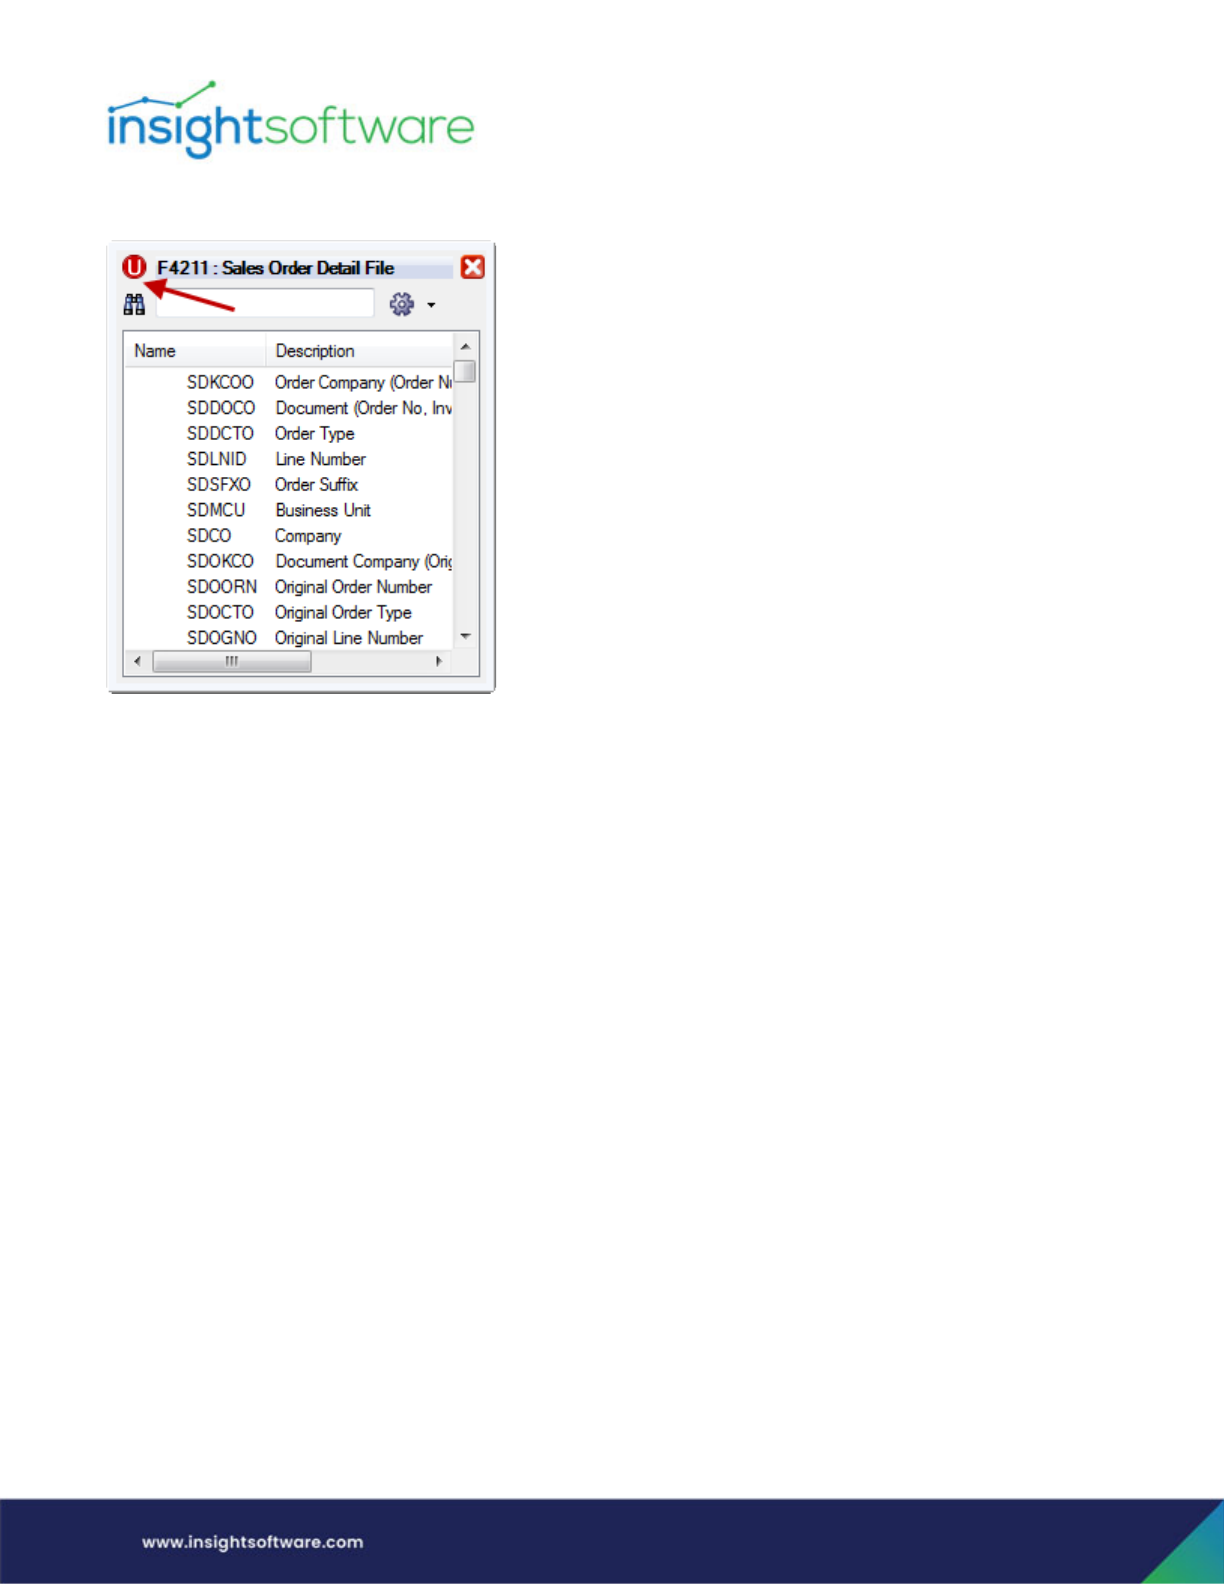
An icon identifies that a table is unioned with another one.
Label
You can set a label for the table in the general user interface. This will change the name in certain dialogs
but not in any background SQL.
Optional
You can make a table optional so that it is not a required table for the report to work. (An example of
when this would be particularly helpful is if you needed to create a template that would suit all users,
regardless of the version of their ERP system. So if you had users on both JD Edwards World and E1,
sometimes the user would not have a specific table in their environment; therefore if it is not a table
that filters and or columns have been defined for in the report, it should be identified as optional and if
the table is not mapped, the report will still load for all users.)
In Template Designer, once a table has been selected, click Table Options and select Optional. If you go
back into Table Options now, you see that Optional has a check mark next to it and the table name has
parenthesis around it, indicating that it is optional.
Effective Date
You can set an effective date condition on a join so that effective date logic is applied to the date that an
event took place (the event date) and is used to look up some state for that event at a particular
effective date.
For example a financial analyst wants to see what exchange rate was in effect for a group of GL
Transaction records in a particular currency, based on the record’s GL Date. In other words, the analyst
wants to see the exchange rate in another currency that was in effect on the date the transaction
Designing a Template | Create a New Template
Page 54
occurred, and then have the amount converted using the effective exchange rate. In this example the
state is the exchange rate, the event is the GL Transaction in the F0911 and the effective date is the
Effective Date in the Currency Exchange Rate table F0015.
Defining an Effective Date Condition on a Join
When effective dates are used to specify a join, the event and event date are stored in a table and the
facts about the event and the effective dates of those facts are stored in another table.
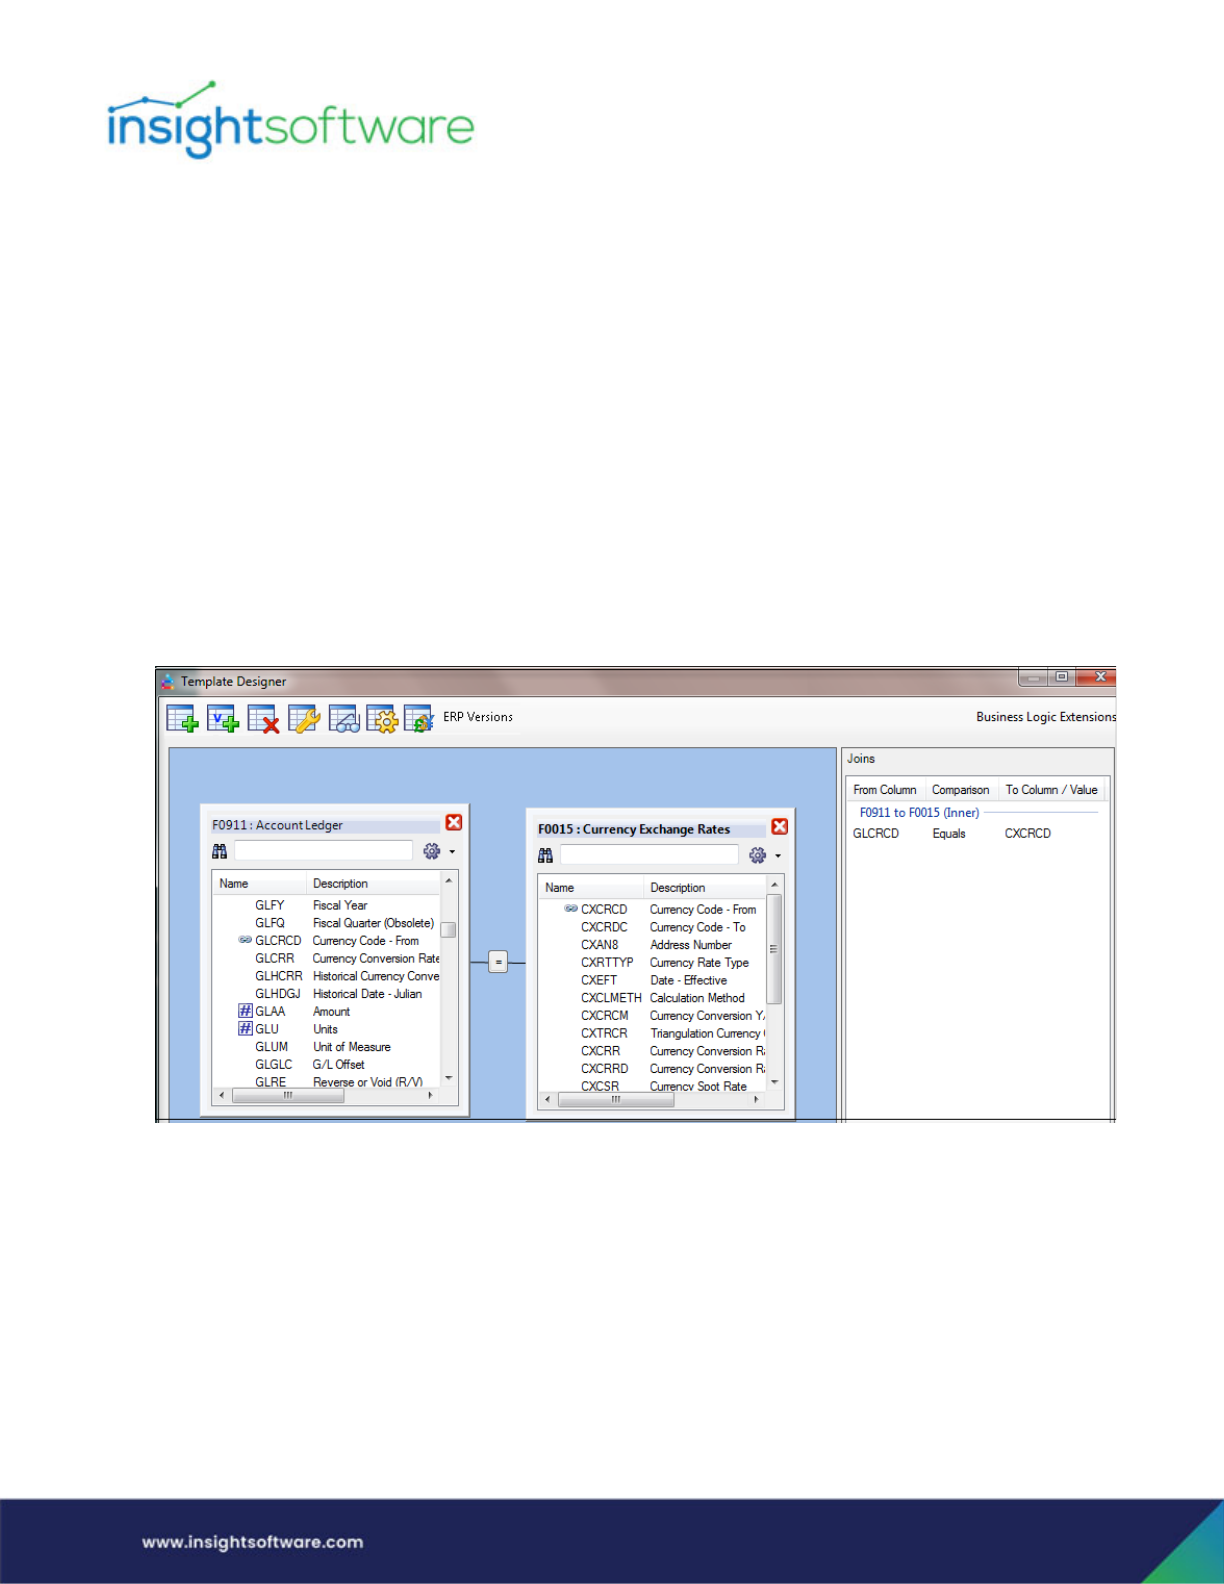
In explaining how this is defined, we will use a specific example in joining the F0911, GL Transactions
table, to the F0015, Currency Exchange Rates table.
1. To define the effective date join, go to Template Designer and either click on the Join button (the
= button) or double-click the actual join in the Joins Panel.
Note that a join has to have been defined before an effective date condition is applied. In this
example, we have joined on CRCD (Currency Code).
Designing a Template | Create a New Template
Page 55
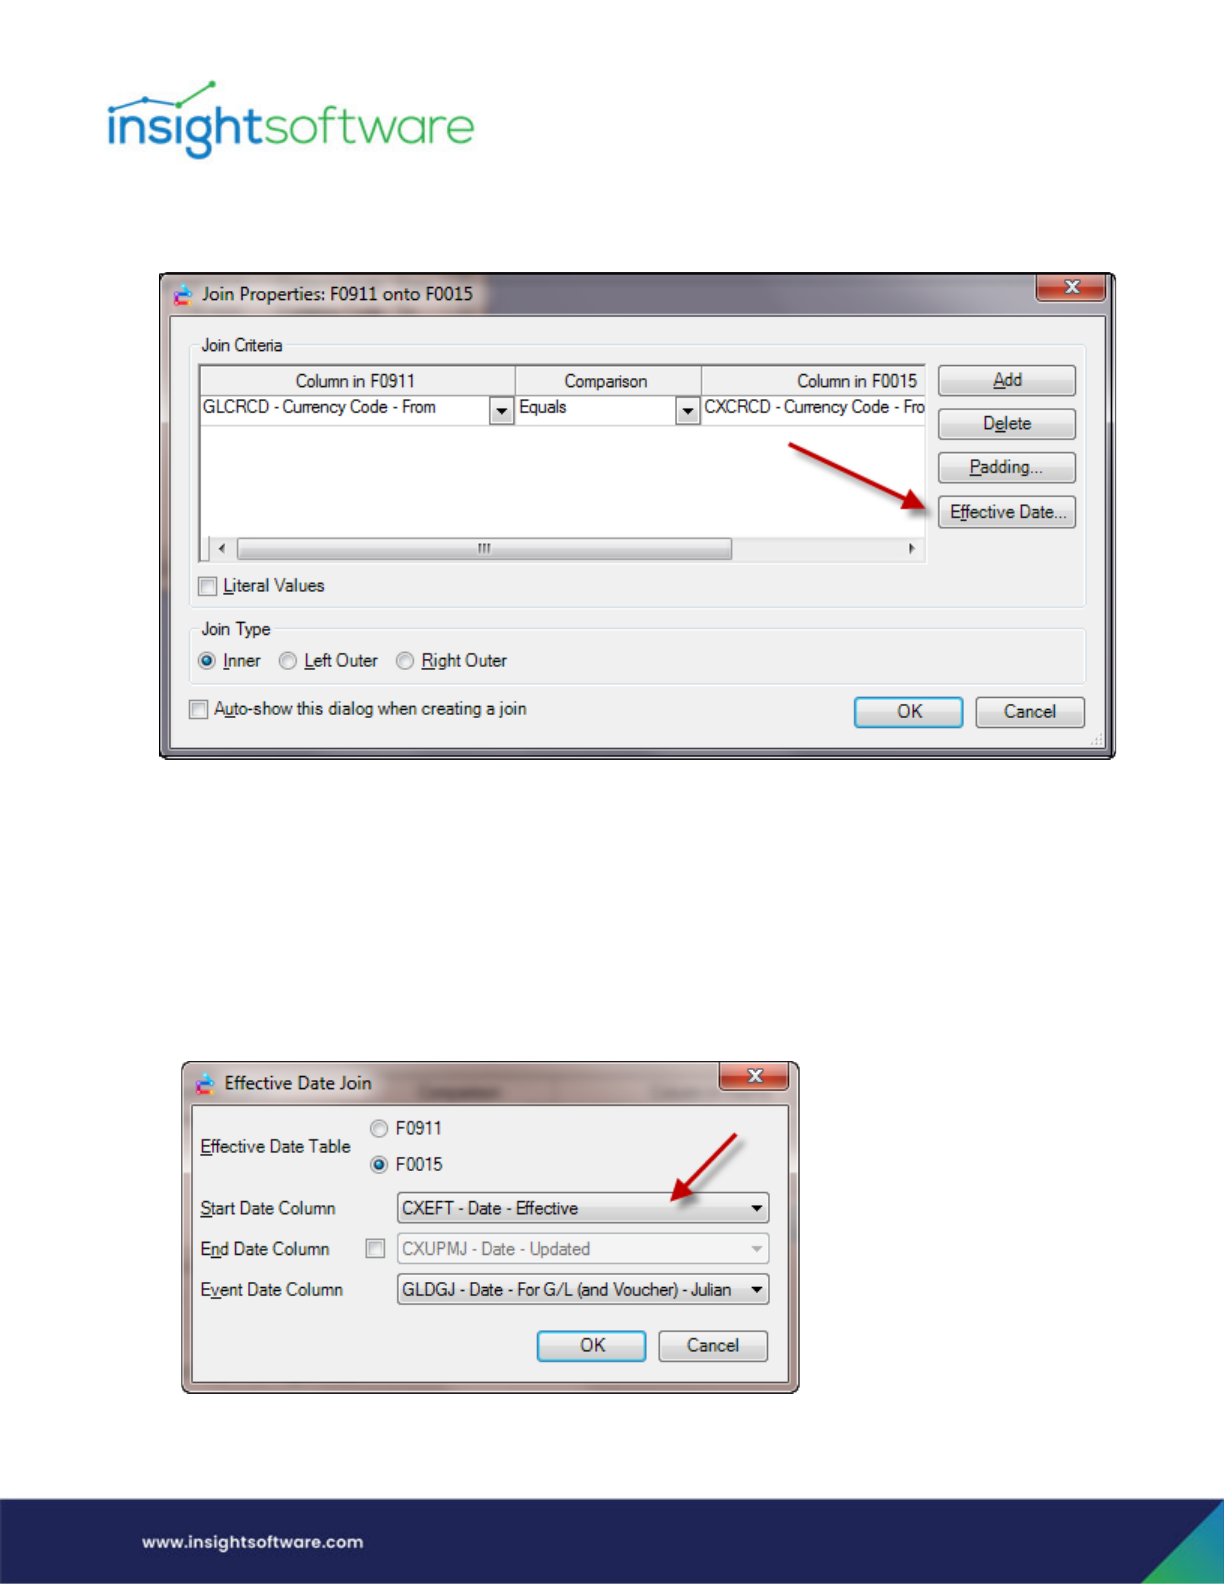
2. Clicking on the = sign or the actual join brings up the Join Properties dialog where you can see
the detail of the join that was already set up. Click on Effective Date.
3. Within the Effective Date dialog, you define which table contains the historical information that
is based on a date. In other words, you want to select the table that has the effective date ranges
defined for the data you are interested in seeing. In this example we select the Currency
Exchange Rate Table, F0015, since that table contains the exchange rates we want to see based
on the effective date.
Depending on which table is selected, all the date columns from the selected table are available
to select from the Start Date Column drop-down. In this example we will select the Date
Effective CXEFT from the F0015.
Designing a Template | Create a New Template
Page 56
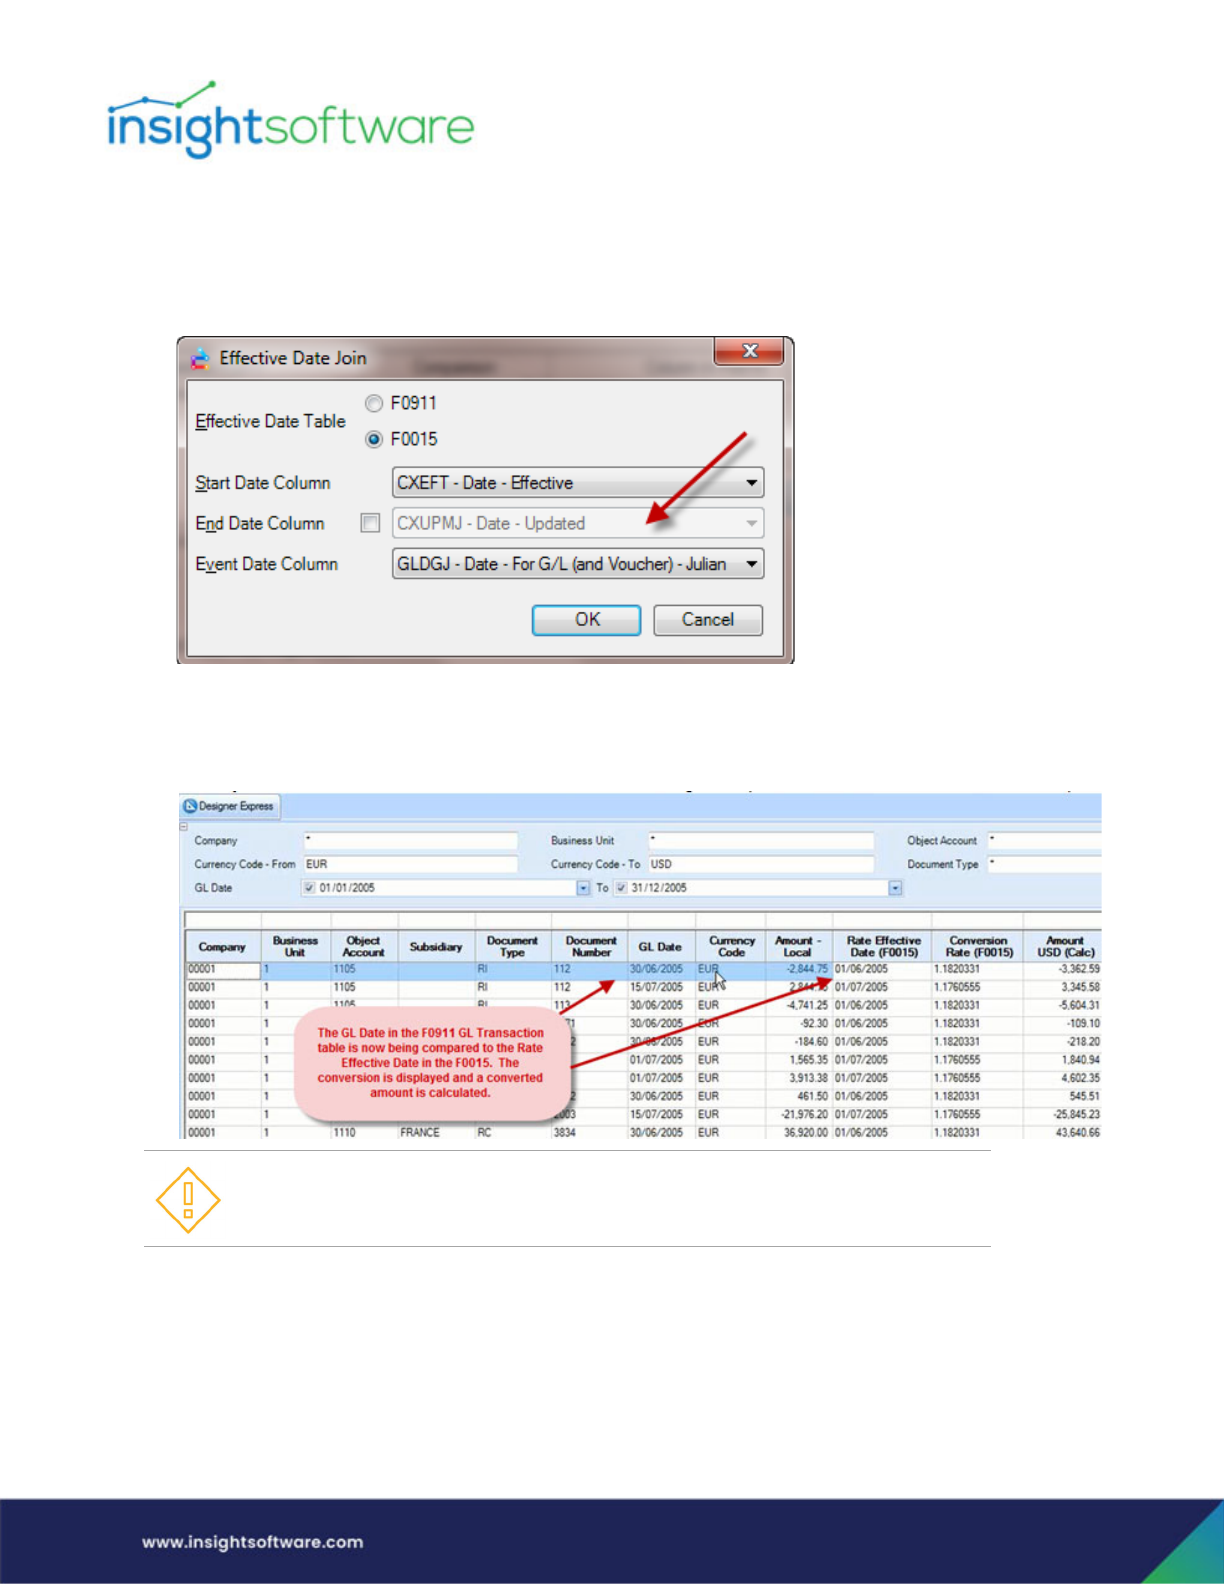
4. If the table also has an End Date Column, you can define that here as well. In our example, the
Currency Exchange Rate, F0015 table, does not contain an End Effective Date, so we leave this
blank (undefined). If no End Date is defined, it is implied. If a record in the F0015 has a greater
Start Date, then the previous record has ended.
5. Lastly, the Event Date Column will define the event that we are using to compare to the Start
Date Column. In our example, we are using the Currency Exchange Rate Effective Date in F0015
to compare to the GL Date GLDGJ in the F0911.
Setting up an Effective Date Condition that Does Not Use a Join
There is a way for a user to see all the effective records in a table based on Today’s Date. The below
explanation includes an example using the Address Book by Date Table, F0116. This table stores all the
A zero, blank or null start date is interpreted as ‘from the beginning of time’ and a
zero, blank or null end date is interpreted as ‘to the end of time’.
The start and end dates are interpreted as inclusive.
Designing a Template | Create a New Template
Page 57
addresses that have existed for a customer. We will use Today’s Date to compare to the Beginning
Effective Date in each record to only return those records that are currently valid.
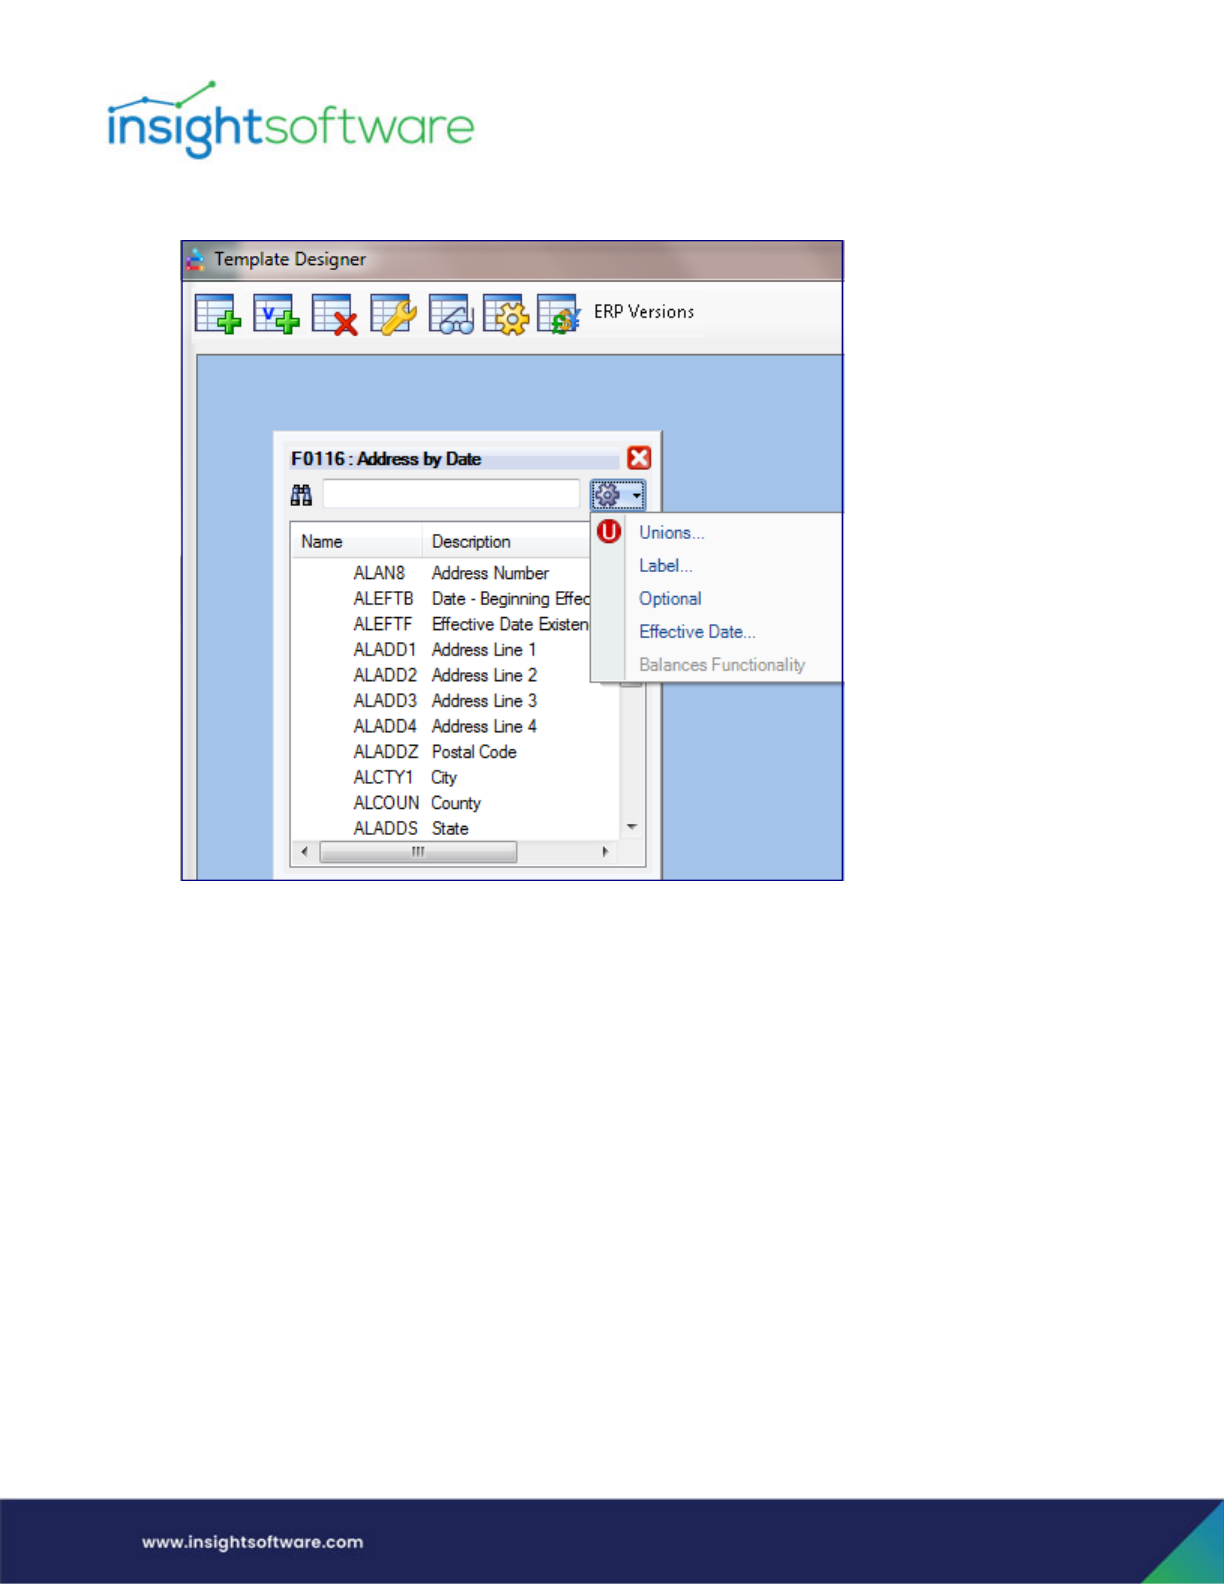
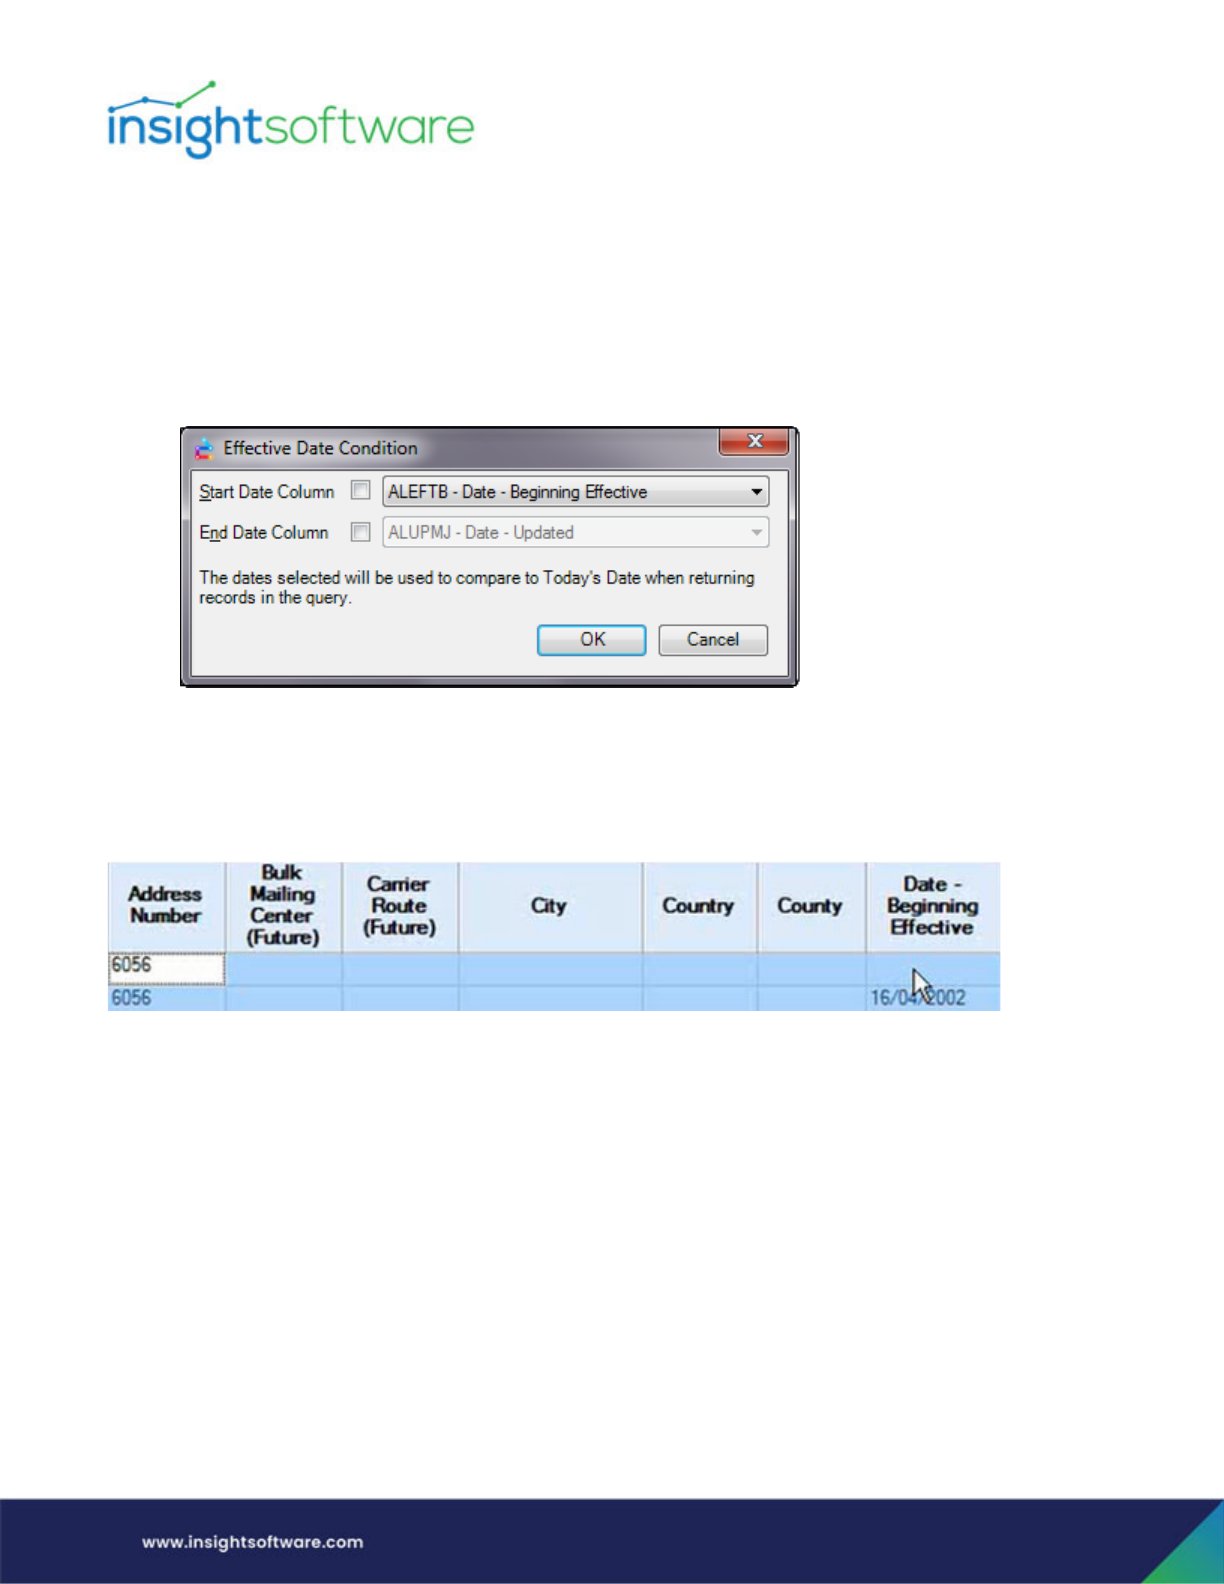
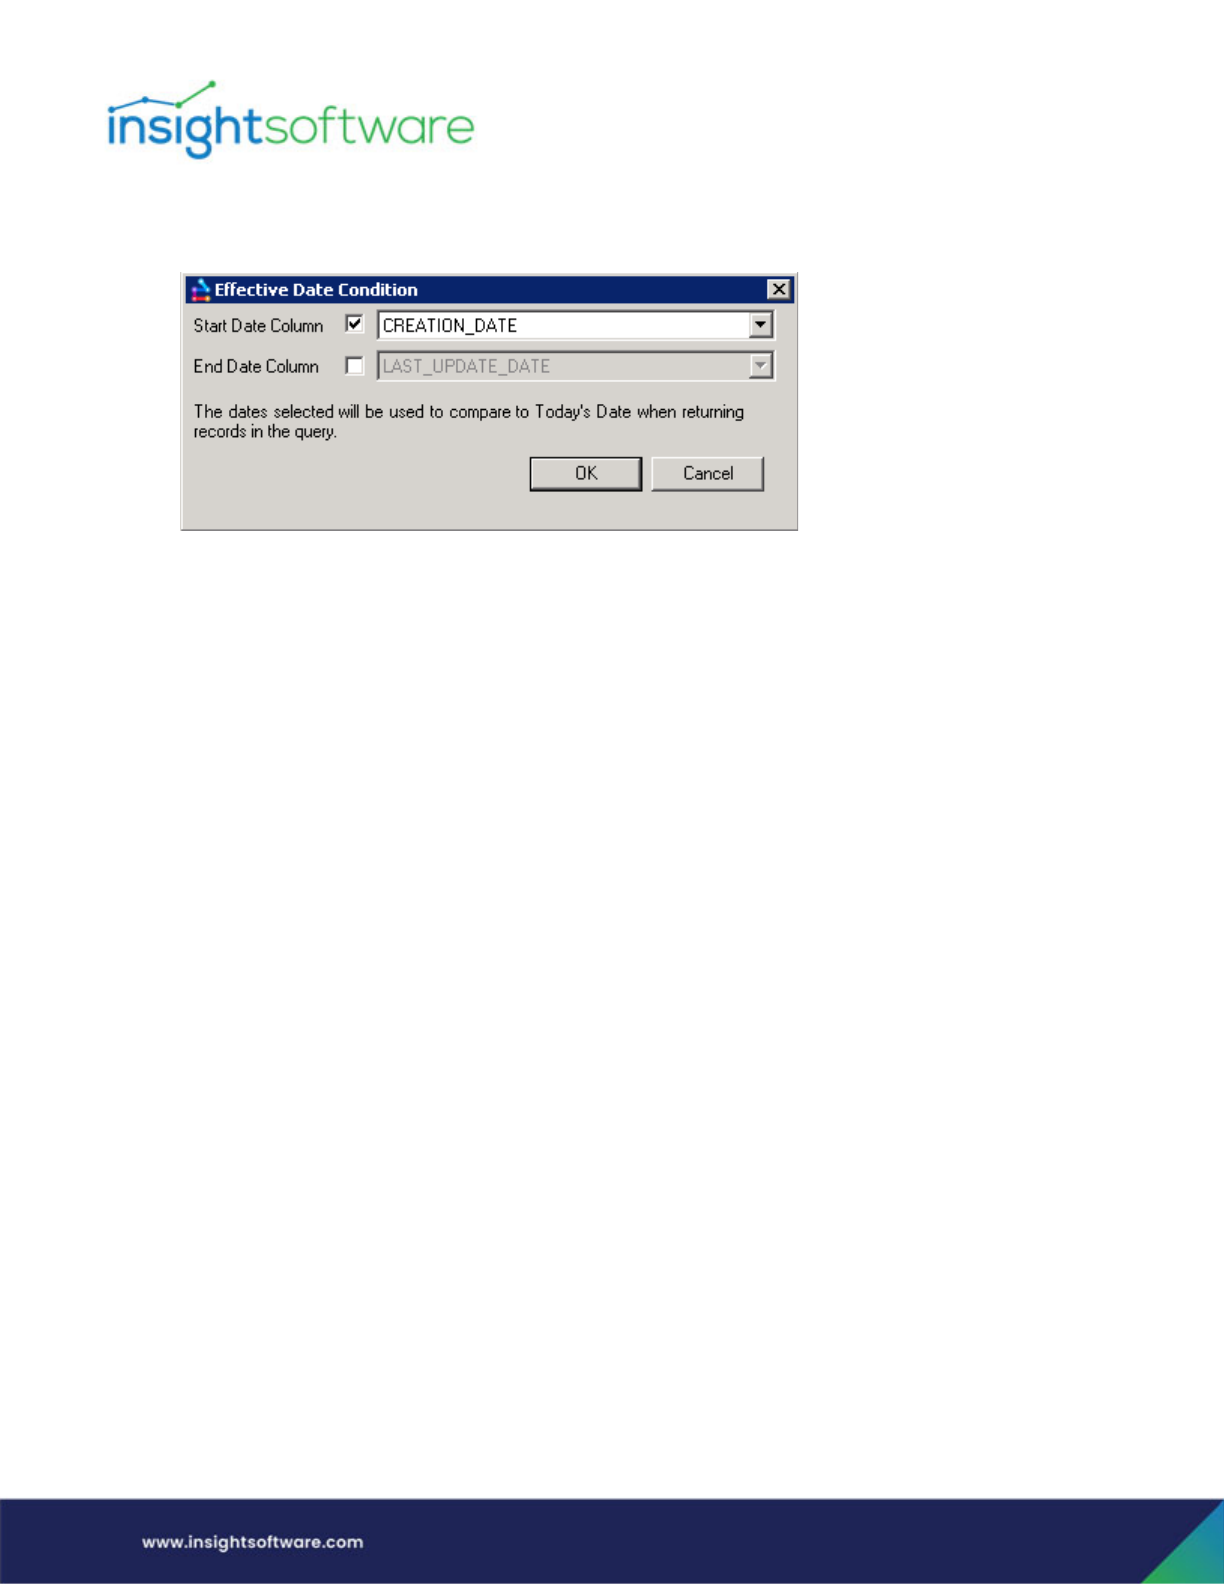
1. From Template Designer, go to Table Options and select Effective Date. This is where you will
define which date in a table is to be compared to Today’s date.
2. You can define a Start Date and/or End Date here based on the table selected. Once defined, you
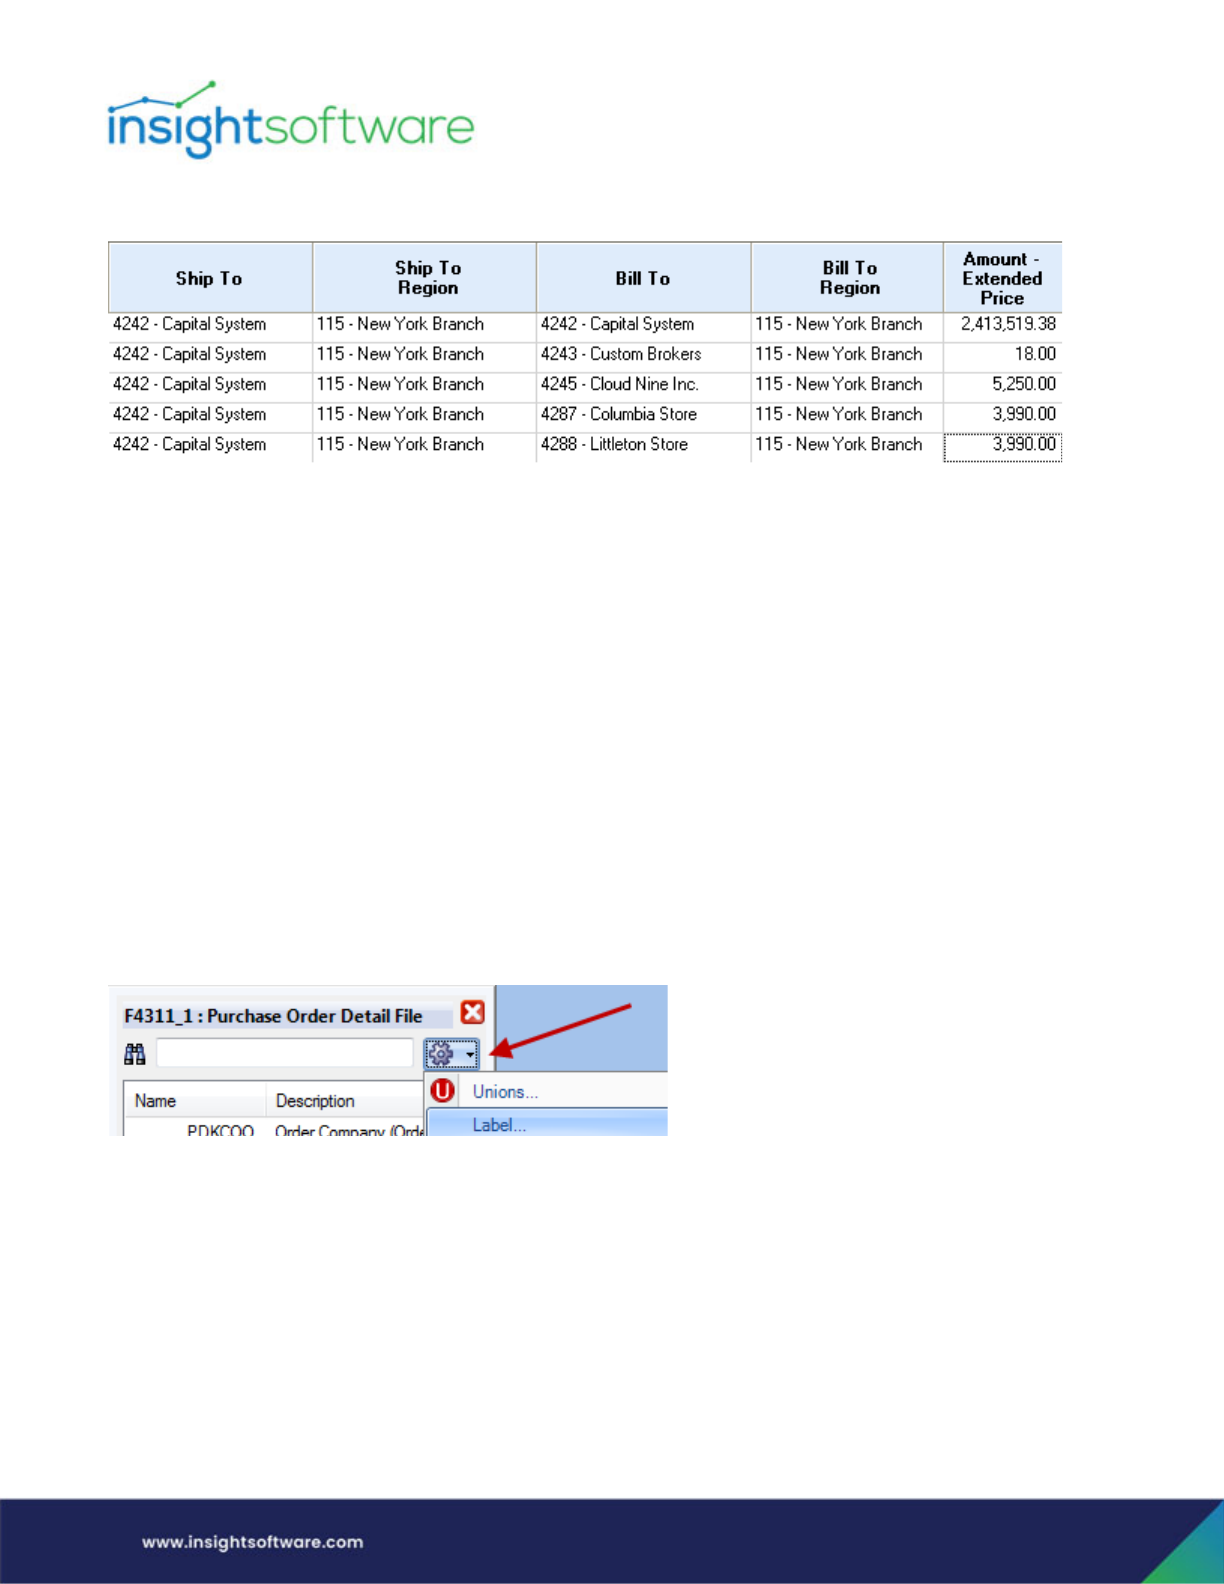
will see the date selected being compared to Today’s Date.
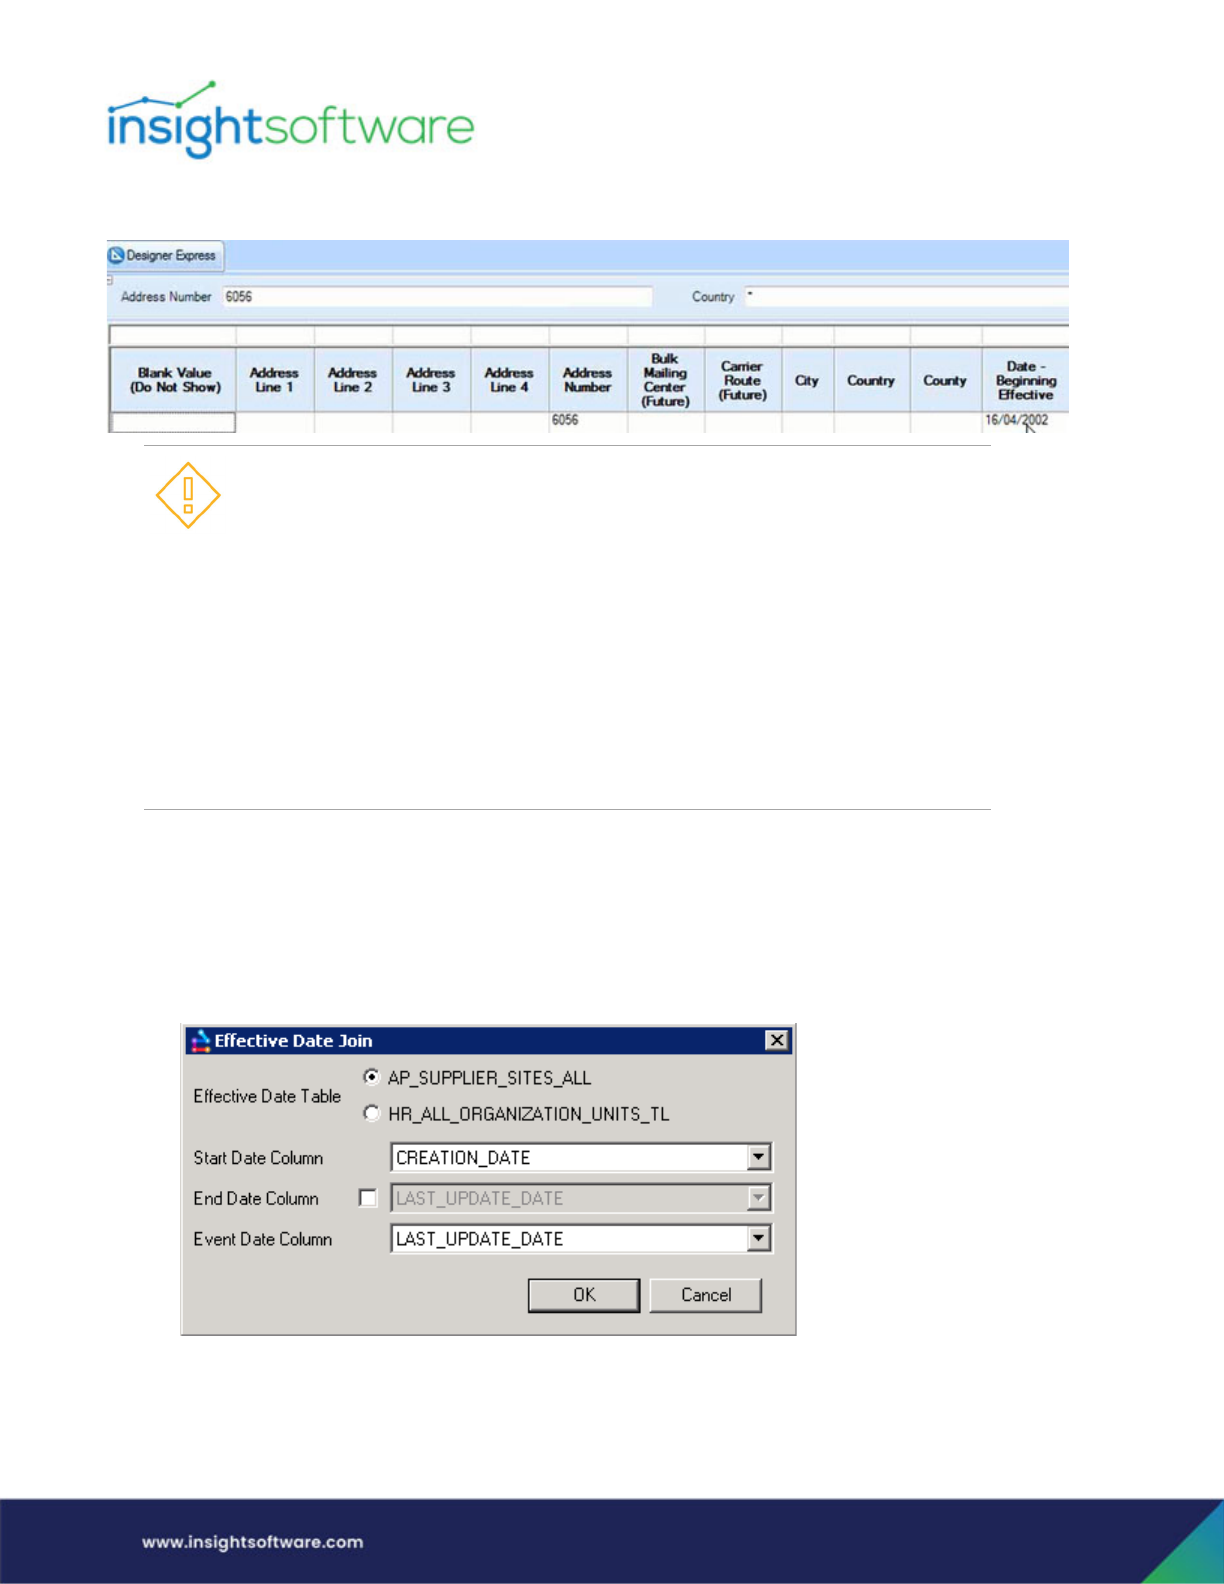
3. If this Effective Date logic is not used in a Designer Express Template, you will return ALL rows
from the Address Book by Date Table, F0116. The screen below is showing 2 rows for the same
address, of which the row with the BLANK Beginning Effective Date is no longer active.
Before Date Effective Logic is defined:
Designing a Template | Create a New Template
Page 58
If the Date Effective logic is used, you would only return 1 row.
EBS Example
This example has 2 tables in the template: AP_SUPPLIER_SITES_ALL and
HR_ALL_ORGANIZATION_UNITS_TL.
1. Using effective date with join – A join first has to be defined before an effective date condition is
applied. This feature is accessed from Edit Joins.
• In some scenarios this Effective Date Condition enhancement may not appear to
be functioning. If you experience this, you need to evaluate the primary keys for
the table used. This enhancement will perform a MAX function for the effective
date and return the effective date less than or equal to today. If a Unique Key ID is
defined as a primary key, then the MAX function will be applied to each record,
therefore returning all records. In this scenario you will need to re-define the
primary keys in the CustomerPK file so that the effective date condition returns the
Max Date. Table F00092 falls into this scenario.
• A zero, blank or null start date is interpreted as ‘from the beginning of time’ and a
zero, blank or null end date is interpreted as ‘to the end of time’.
• Any time component stored with the date is ignored.
• The start and end dates are interpreted as inclusive.
• The current date (today) is taken from the machine running Hubble.
Designing a Template | Create a New Template
Page 59
2. Effective date condition not using a join – This logic strips away the time component from the
date when used to compare to today’s date.
Balances Functionality for JD Edwards System Users
Creating a Balances report over an F0902 or F0902-like table can be challenging due to the unique
structure of JD Edwards and the amount of hard-coded logic, such as selectors and cumulative periods,
which have already been done in the standard JD Edwards GL Balances template. There is a feature you
can set to restore some of the functionality present in the standard GL Balances template when you are
creating a template based off of the F0902 or F0902-like table. In order to use this feature, a Designer
user must activate it.
● Setup/Example - This example shows a basic inquiry built over the F0902.
● To set this up initially, create a simple custom template which has just the F0902 in it. From
within Template Designer, designate it as the Balances table which is done by going to Table
Options and selecting Balances Functionality. Now continue setting up the template how you
normally would.
● Usage - When you go to the Values query assist, you will see additional fields such as the
following, which closely mirror options you would have had in a standard GL Balances template:
○ CE01_F0902 – Cumulative Period 01
○ CE02_F0902 – Cumulative Period 02
○ CE03_F0902 – Cumulative Period 03
Designing a Template | Create a New Template
Page 60
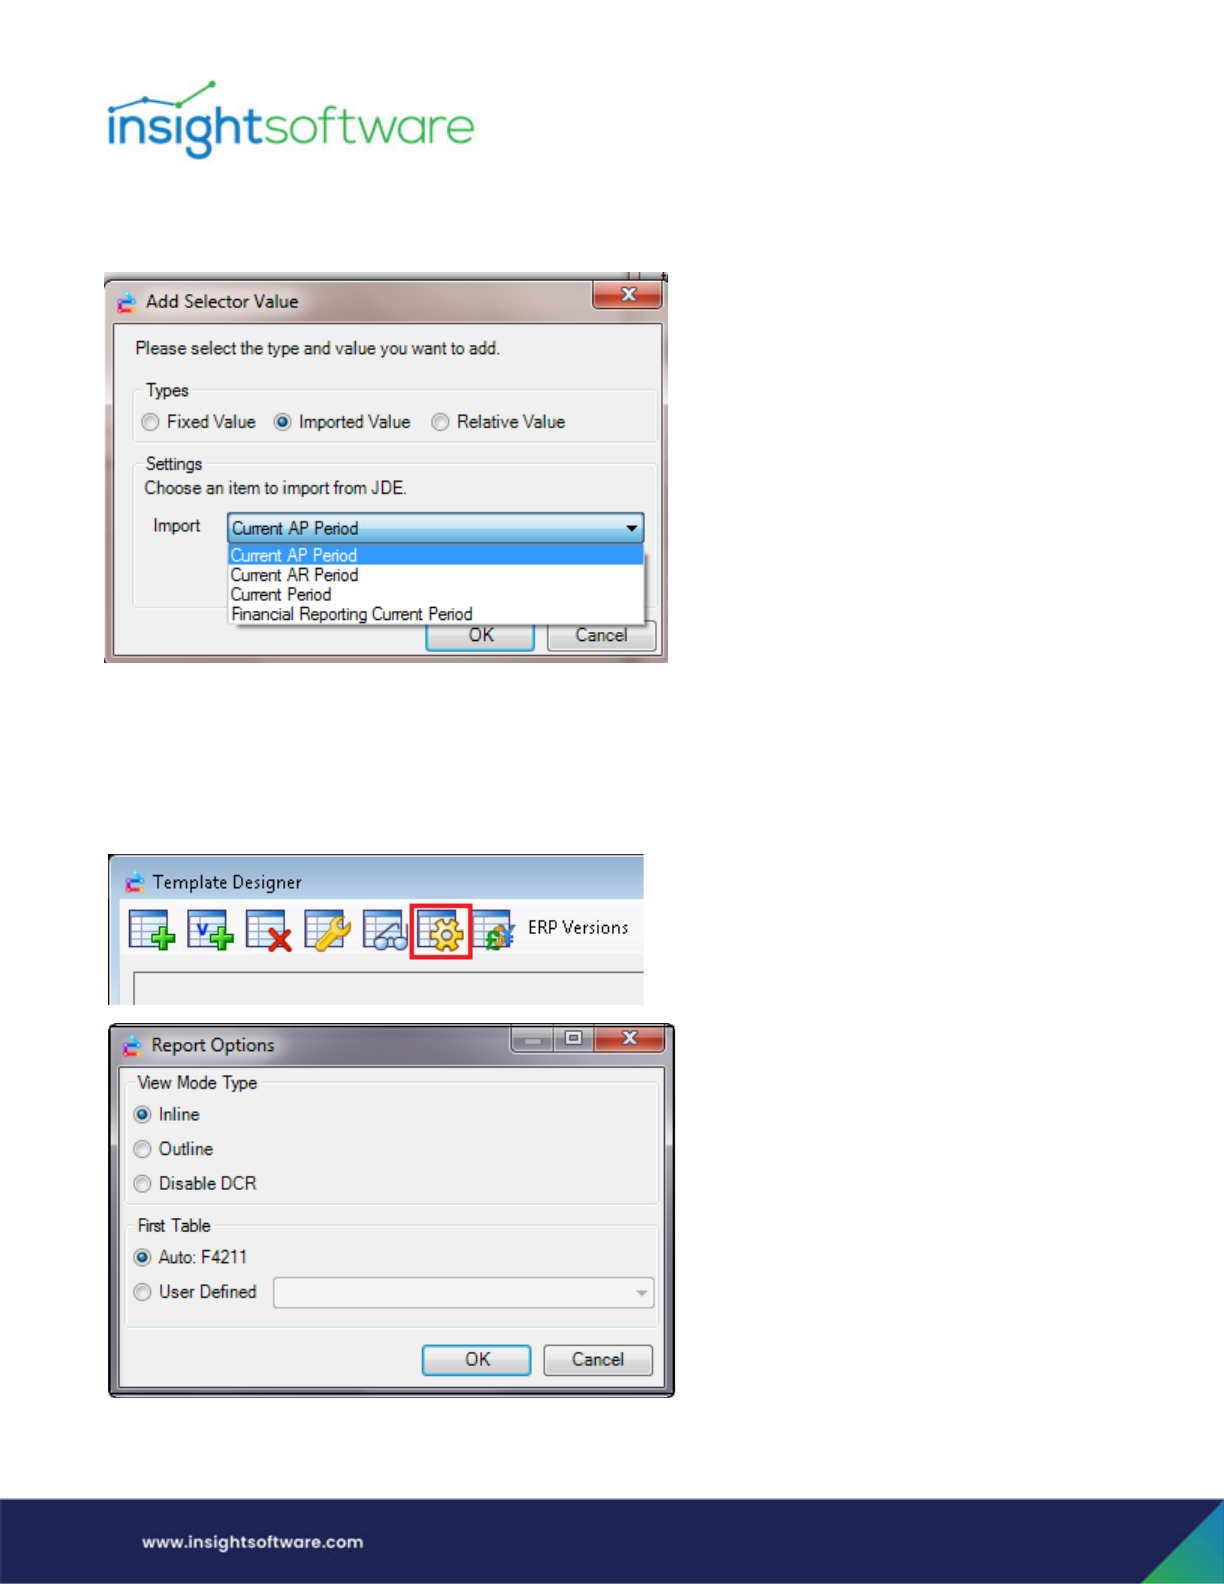
In addition, if you set up a selector on Values, you’ll be given the ability to import some items from JD
Edwards.
You can now create a current period selector in your custom Balances report.
Report Options
In Report Options, which are accessed in Template Designer, you set the Mode Type (Inline versus
Outline View) as well as designate the first table in the report.
Designing a Template | Create a New Template
Page 61
Mode Type
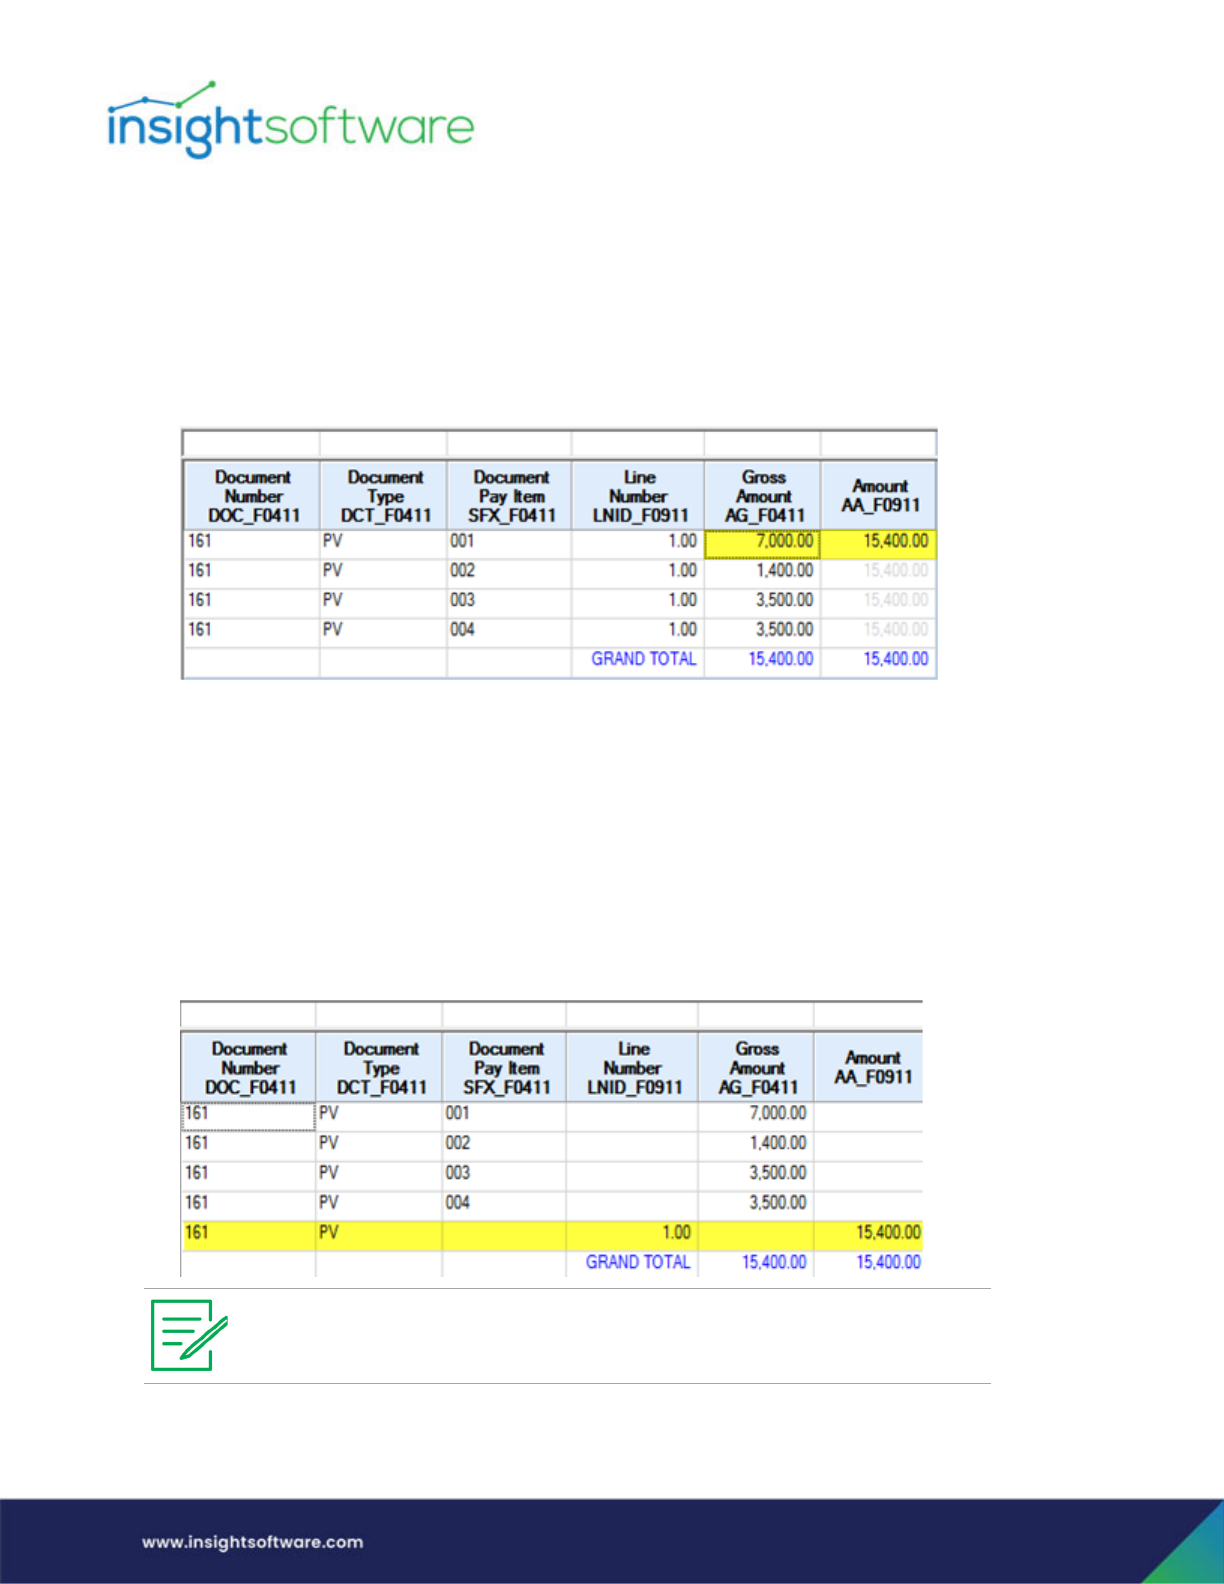
1. Inline – One row can contain values from more than one table. This view displays the first child
row on the same row as its parent. For example, an invoice parent record with two child payment
records would display on two total rows with the first payment row on the same row as the
parent invoice. Any duplicate values are grayed out when using Inline View.
A total of four lines display; amounts from Table A and Table B display on the 1st line.
In Inline view, the Grand Total is based on separate SQL query.
2. Outline – Each record from each table gets its own row. This view displays the first child row on
the row below its parent. For example, an invoice parent record with two child payment records
would display on three total rows with the first payment row under the invoice parent row. In
Outline View, the Grand Total is based on the grid result set. Performance is better using Outline
View since the system is not using a duplicate counting resolver.
A total of five lines display; amounts from Table A display in lines 1-4 and the amount from Table
B displays in line 5.
● Disable DCR - Double Counter Resolver (DCR - see below) is disabled. DCR is responsible for
eliminating the counting of duplicate rows when using a “many to many” relationship between
Outline view omits rows for tables which have no amount columns on the report,
unless Zero Balances (Design menu > Options group) is enabled.
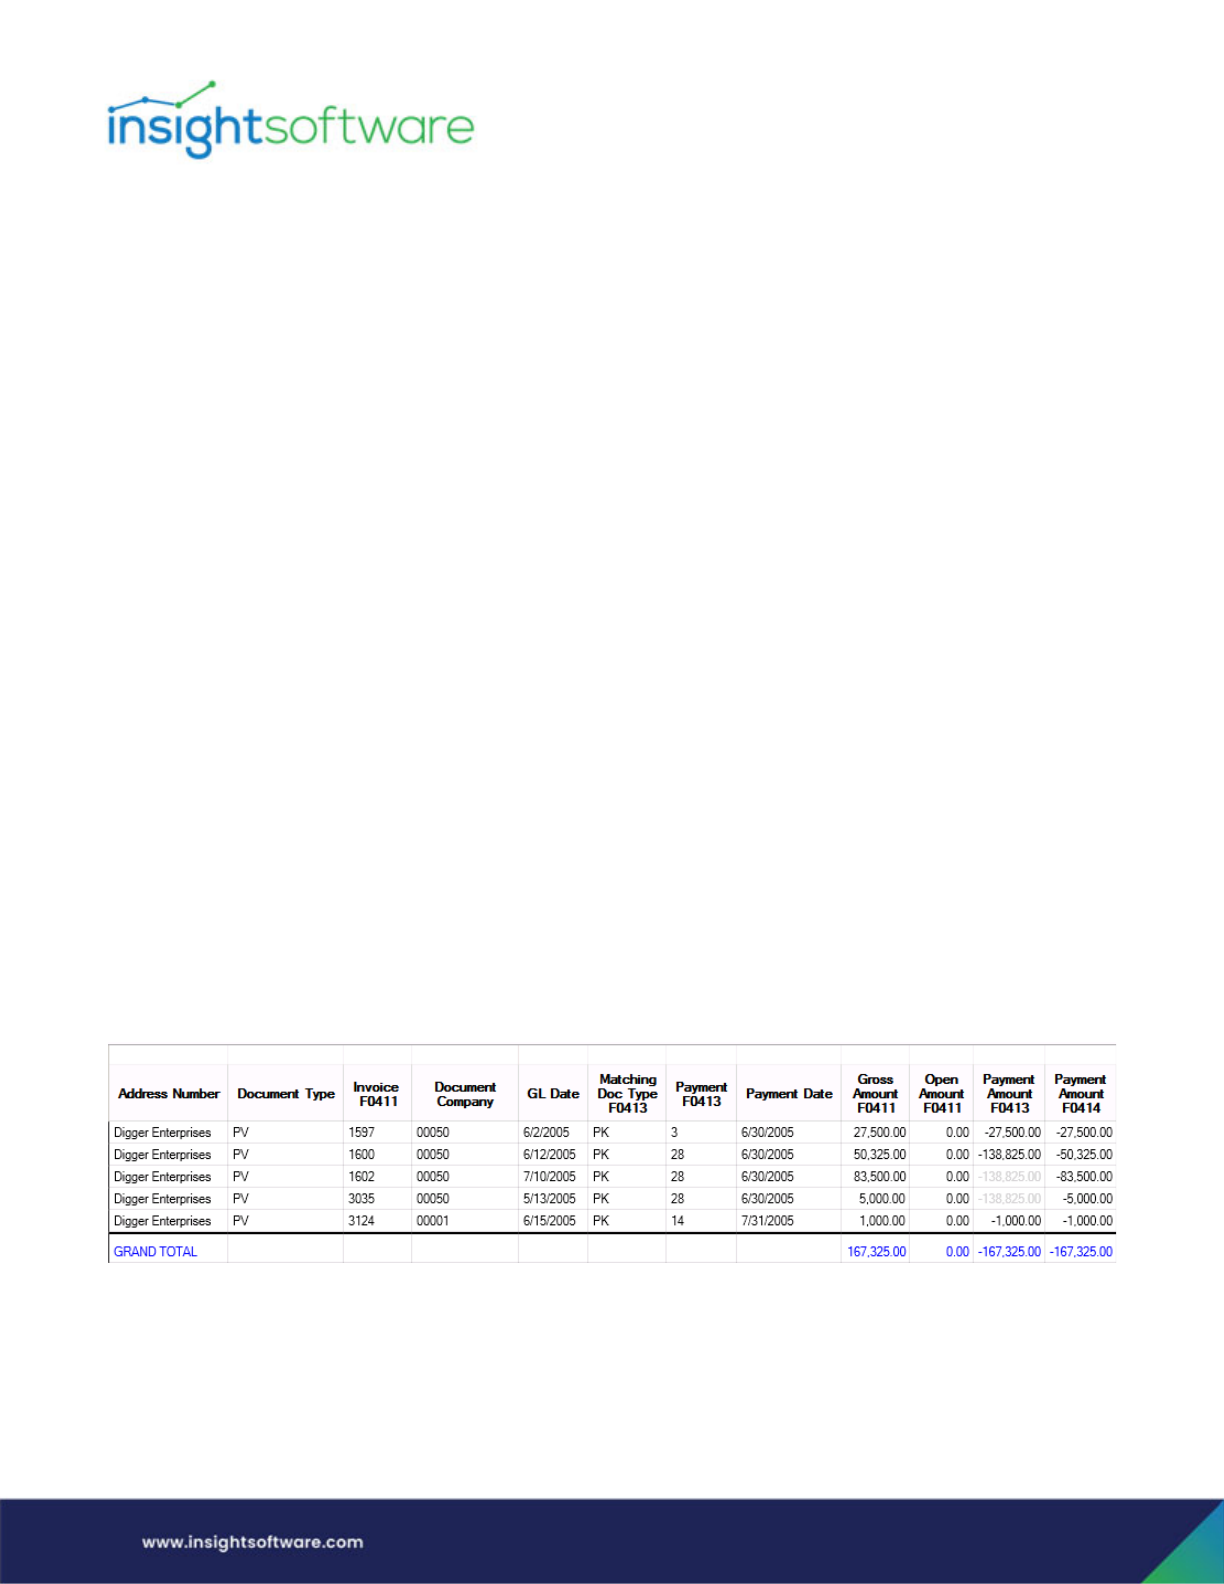
Designing a Template | Create a New Template
Page 62
tables. If such a relationship does not exist in a current report, then disabling DCR can improve
the report’s performance.
First Table
In Report Options, Designer users can also choose which table in the report is the “first” table in the
query to which all other tables are joined The first table is always part of the SQL; the impact is a
possible performance hit if the first table is one that you don’t always actually need to see, so you want
to be sure the correct table is selected as the first table.
Double Counting Resolver (DCR)
The Double Counting Resolver is an algorithm that modifies a given SQL statement to prevent double
counting. The algorithm only gets invoked when more than one table is joined, the relationship between
the tables in something other than one-to-one, and subtotal/Grand Total aggregations are used.
Hubble will use unique keys to determine how to detect duplicate rows if they are on the grid. If keys are
not on the grid, then hash totaling or row ID processing will be done to determine duplicate rows.
JD Edwards Example
In the example below, the JD Edwards Accounts Payable Ledger (F0411) is joined to the Accounts
Payable Matching Document Detail (F0414) table and forms a many-to-many relationship. The Accounts
Payable Matching Document Detail (F0414) table is joined to the ERP Accounts Payable – Matching
Document (F0413) file and forms a many-to-one relationship.
Notice that Payment 28 is paying multiple invoices. To avoid counting the amount -138,825.00 multiple
times, the duplicate counter resolver has been evoked. We see the payment header amount being
grayed out in all but the first row for Payment 28. As a result, the subtotal for Digger Enterprises and the
Grand Total for our Payment Amount F0413 column are displaying the correct total of -167,325.00,
which includes the amount for Payment 5 (-27,500.00) plus the amount for Payment 28 (-138,825.00).
EBS Example
In the example below, The AP_INVOICES_ALL table has been joined to the AP_HOLDS_ALL,
AP_INVOICE_LINES_ALL and AP_PAYMENT_SCHEDULES_ALL tables. Invoice numbers 5488474 and
CO4700 have multiple invoice lines and multiple holds which could result in double counting.
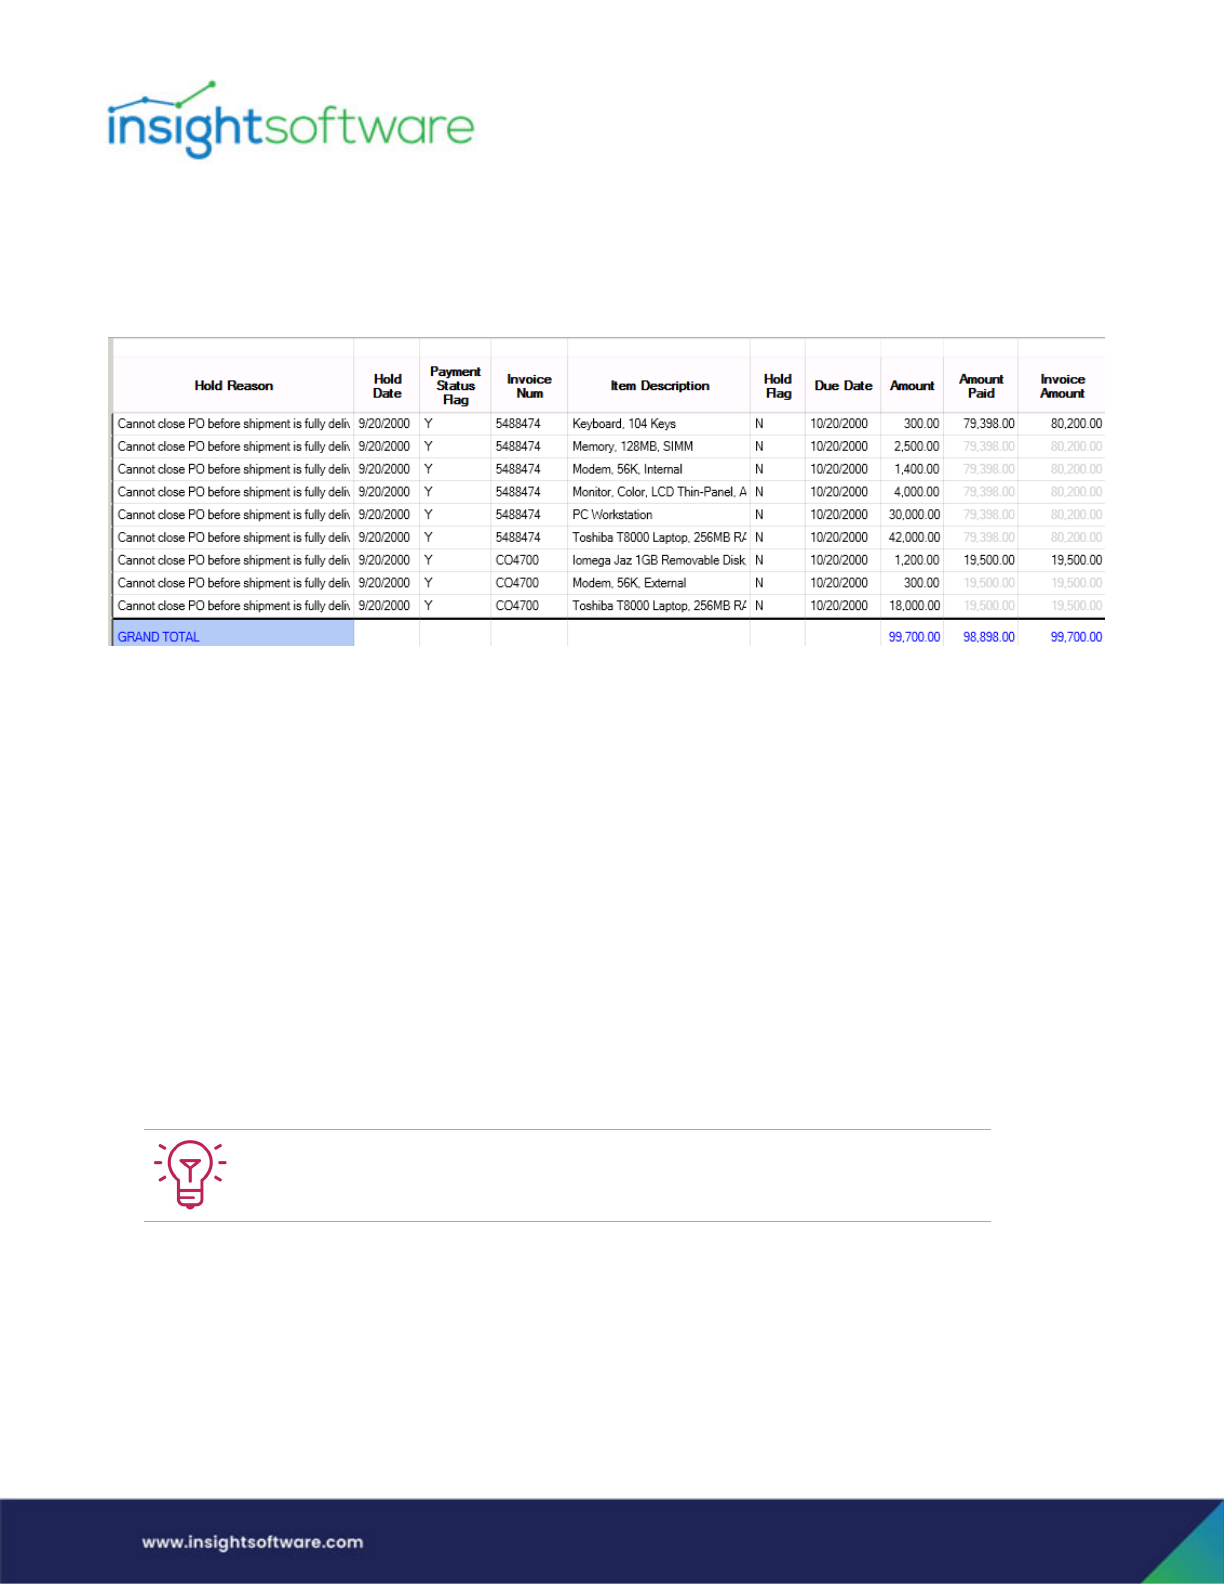
Designing a Template | Create a New Template
Page 63
To avoid counting the invoice line amounts twice, e.g. 79,398.00 and 19,500.00, the double counter
resolver has been evoked. We see the line amounts are grayed out for the second (and subsequent)
invoice hold lines for 5488474 and CO4700. As a result, the subtotals for these invoices are correct in all
columns.
Define Amount and Quantity Columns
Once tables and joins have been defined, measure columns need to be defined as either an amount or
quantity for subtotaling and totaling purposes. With Hubble Default Metadata, the quantity and amount
columns for all tables that we currently map to are pre-defined and will automatically default into the
template.
If you have set any overrides, these will take precedence. When looking for a definition for an amount or
quantity, Hubble looks at 3 libraries in the below listed order. The first library with a definition wins.
1. Report Level Library (measures defined for a specific report.)
2. Customer Common Library (customer-specific table definitions that have been upgraded from a
release prior to 2012.1.)
3. Hubble Default Library (Hubble Default Metadata that holds the measures that are defined for
all standard ERP tables.)
This section is specific to customers using an EBS ERP System
Examples of columns are as follows:
● Numeric (Label) - These are columns that are numeric, but the numeric value represents a code
number rather than a real amount, e.g. Person ID. Unit costs are normally treated as Numeric
Labels, since although they represent real amounts, it does not make sense to subtotal them.
Value columns should be changed in DX to be a value (amount) when the value has to
be used to aggregate or in calculations.
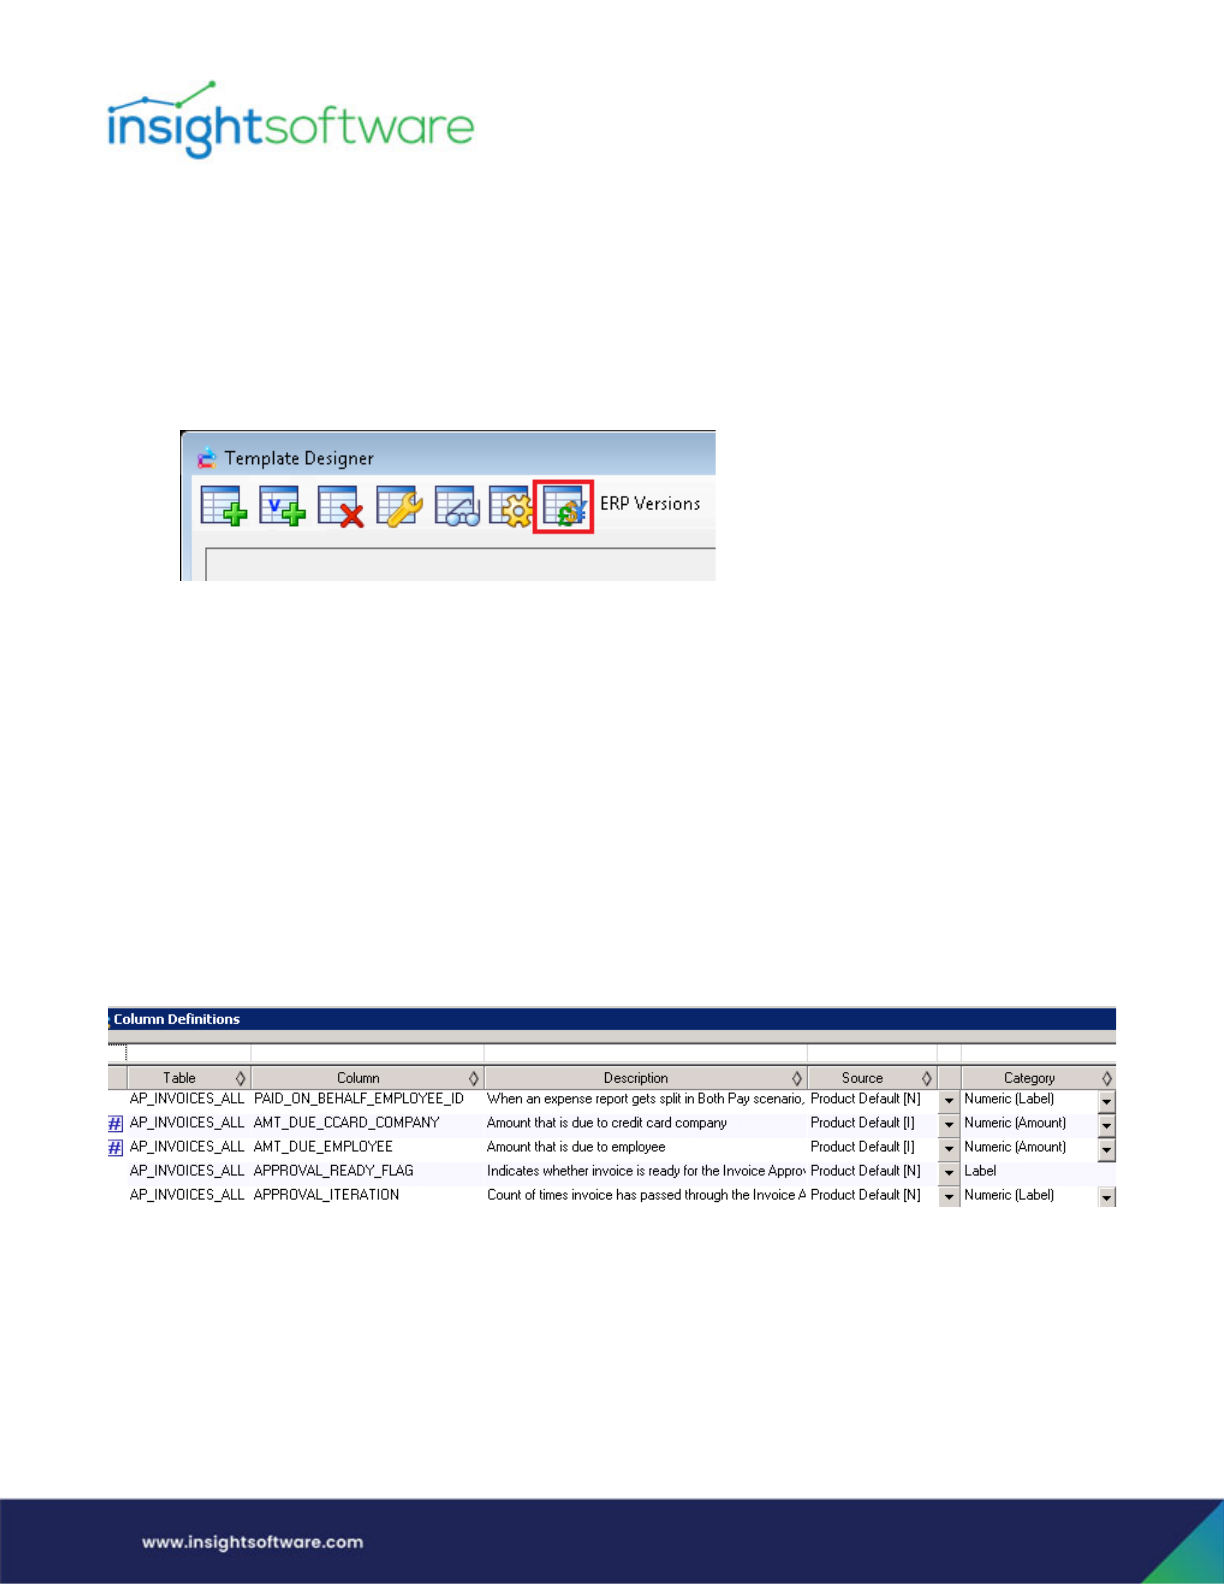
Designing a Template | Create a New Template
Page 64
● Numeric (Amount) – These are amount columns and can include non-currency amounts, e.g.
Amount and Currency Amount.
To verify how these fields are defined or to override any of them, go to Column Definitions, where the
various column attributes are defined.
1. From the Configurator menu, click Template Designer.
2. Click the Column Definitions button, which is located in the top left portion of your screen.
Each table you have defined a join to will display with its available numeric fields to define. You can sort
the list by using the QBE for any displayed column in order to narrow down your selection.
Once a field is manually defined as either Numeric (Label) or Numeric (Amount) for a specific table, it
does not need to be defined again when creating a new template or inquiry using the same table.
All amount columns are designated as such with a # sign.
To change an amount column setting perform the following tasks:
1. In the Source column, set the default setting for this column:
a. Report Override (setting will only apply to the report you are currently in)
b. Customer Default (setting will apply to all your custom reports using this column)
c. Product Default (the default setting that comes from Hubble Default Metadata)
2. In the Category column, define what type of amount column it is:
○ Numeric (Label)
○ Numeric (Amount)
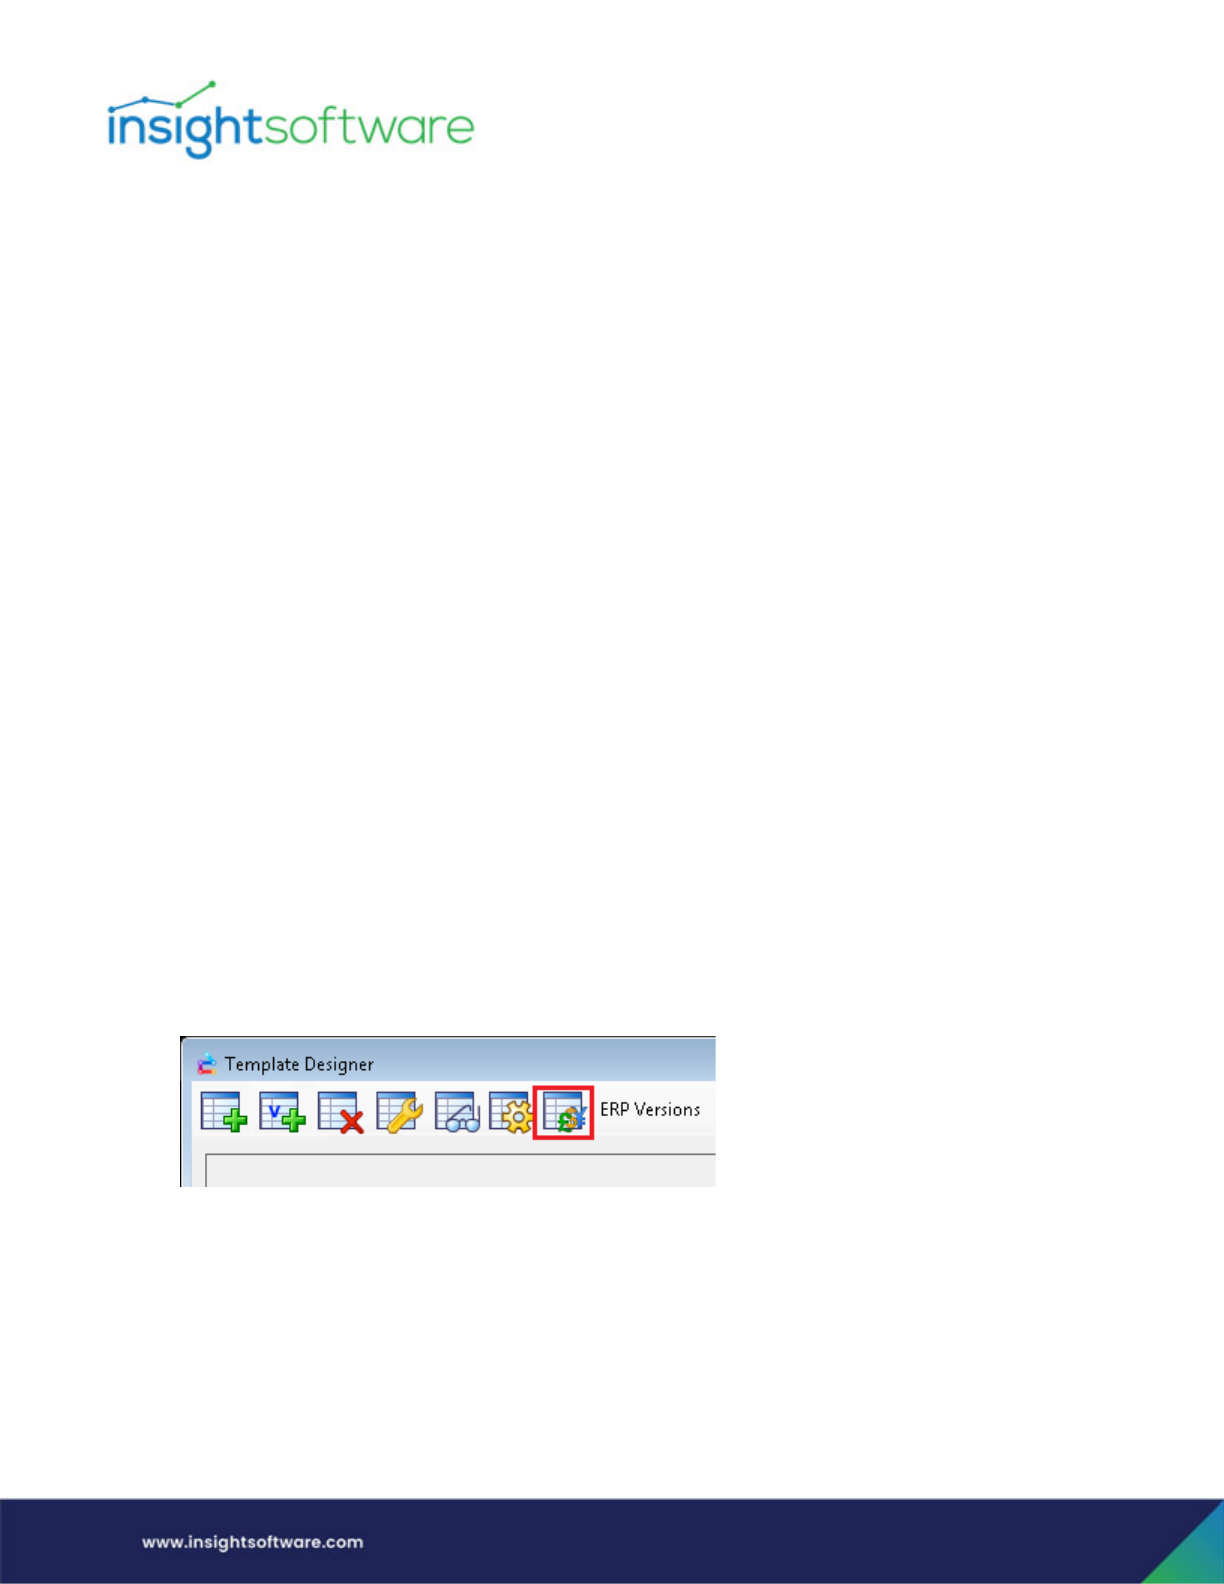
Designing a Template | Create a New Template
Page 65
3. In the Lookup column, you can optionally define a table or fixed list lookup in order to provide
filter validation, Query Assist support, and Code & Description feature support to end users:
○ Table Lookup - Define a lookup table for a column, which provides the valid codes and their
associated descriptions, as displayed in a Visual Assist and in the inquiry results. (This does
not have to be a table being used in your template/report.)
○ Fixed List - Define a fixed list of valid codes and their associated descriptions for a column.
These will display in a Visual Assist and in the inquiry results.
This section is specific to customers using a JD Edwards ERP System
Examples of columns are as follows:
● Numeric (Label) – These are columns that are numeric, but the numeric value represents a code
number rather than a real amount, e.g. Object Account or Business Unit. Unit costs are normally
treated as Numeric Labels, since although they represent real amounts, it does not make sense
to subtotal them.
● Amount (Domestic) – These are amount columns in the base company currency. e.g. F0411
(RPAG - Amount Gross). You will be prompted for which company field to use. Decimal shifting
will be based on the company base currency.
● Amount (Foreign) – These are foreign currency amounts, e.g. F0414 (RNCDSA - Amount - Foreign
Discount Taken). Decimal shifting will be based on the foreign currency specified.
● Amount (Non-currency) – These are non-currency amounts, e.g. F43121 (PRUORG - Units -
Order/Transaction Quantity)
To verify how these fields are defined or to override any of them:
1. From the Configurator menu, click Template Designer.
2. Click the Column Definitions button, which is located in the top left portion of the screen.
Each table you have defined a join to will display with its available numeric fields to define. You can sort
the list by using the QBE for any displayed column in order to narrow down your selection.
Once a field is manually defined as either an amount or amount non-currency (quantity) for a specific
table, it does not need to be defined again when creating a new template or inquiry using the same
table.
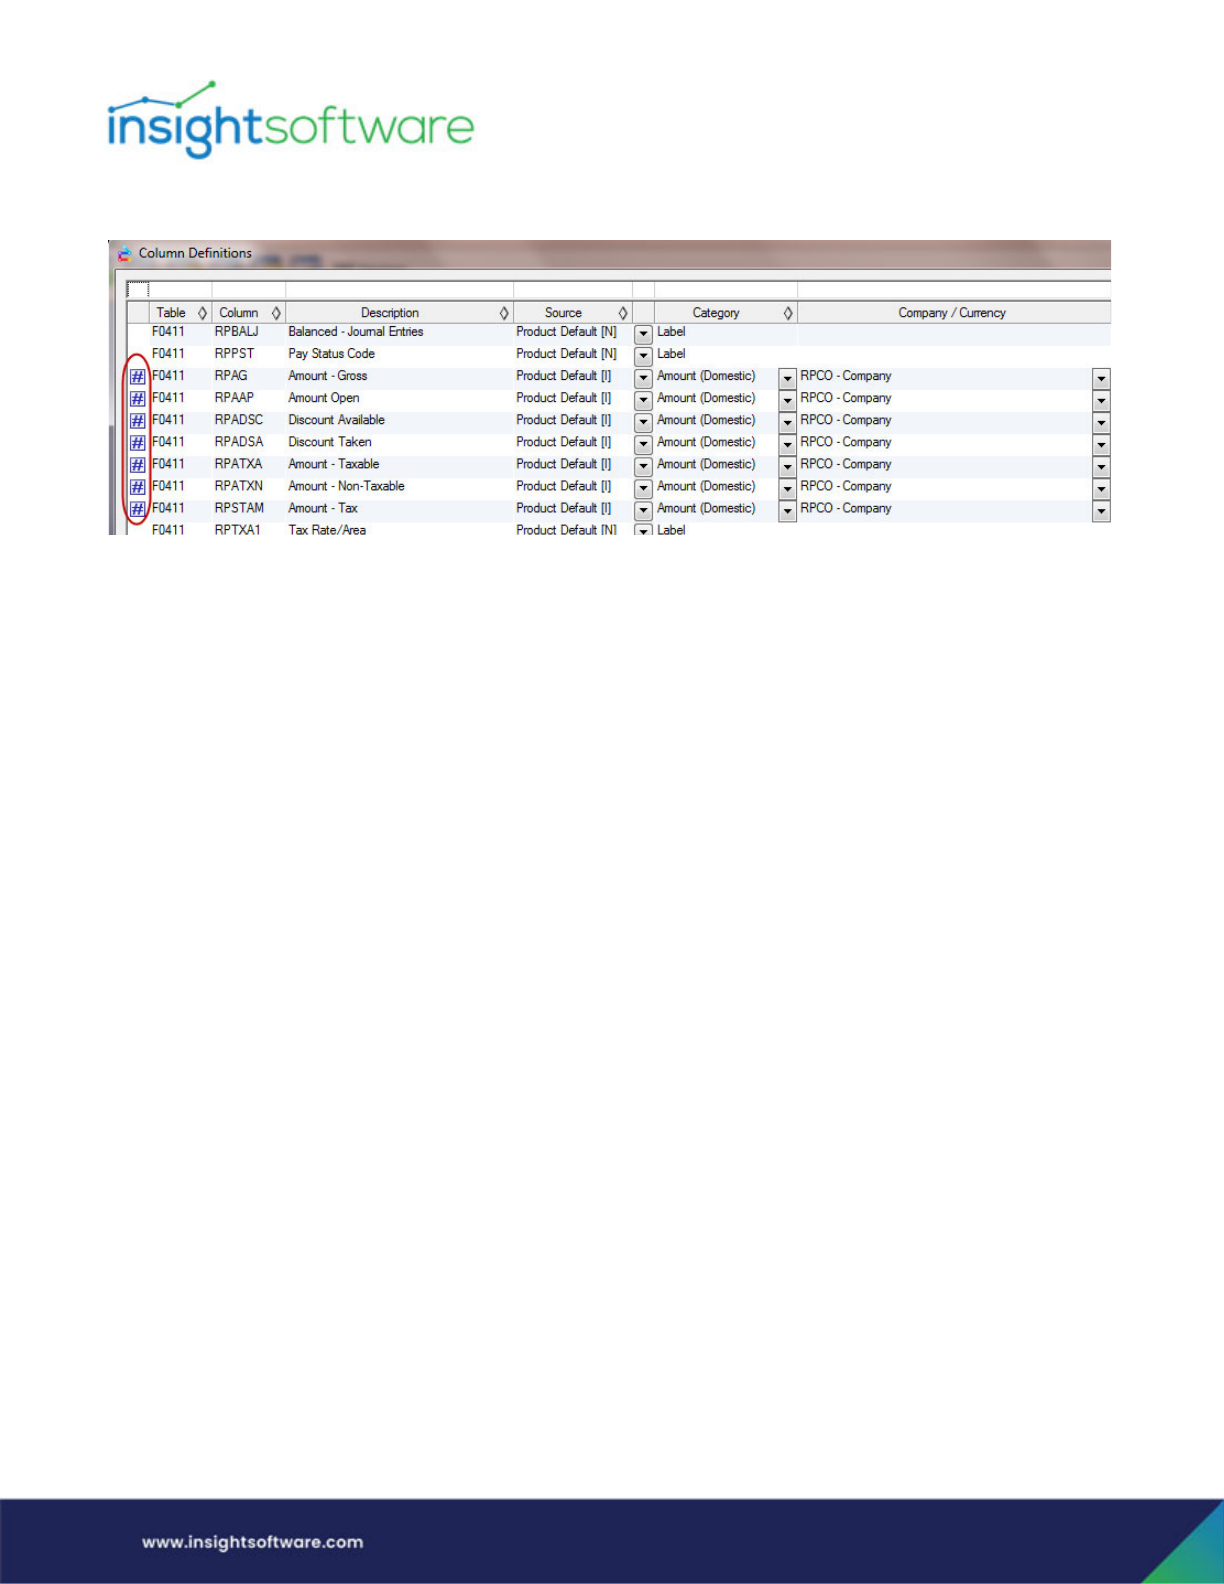
Designing a Template | Create a New Template
Page 66
All amount columns are designated as such with a # sign to the left of it as shown below.
To change an amount column setting, perform the following tasks:
1. In the Source column, set the default setting for this column:
○ Report Override (setting will only apply to the report you are currently in)
○ Customer Default (setting will apply to all your custom reports using this column)
○ Product Default (the default setting that comes from Hubble Default Metadata)
2. In the Category column, define what type of amount column it is:
○ Amount (Domestic)
○ Amount (Foreign)
○ Amount (Non-currency)
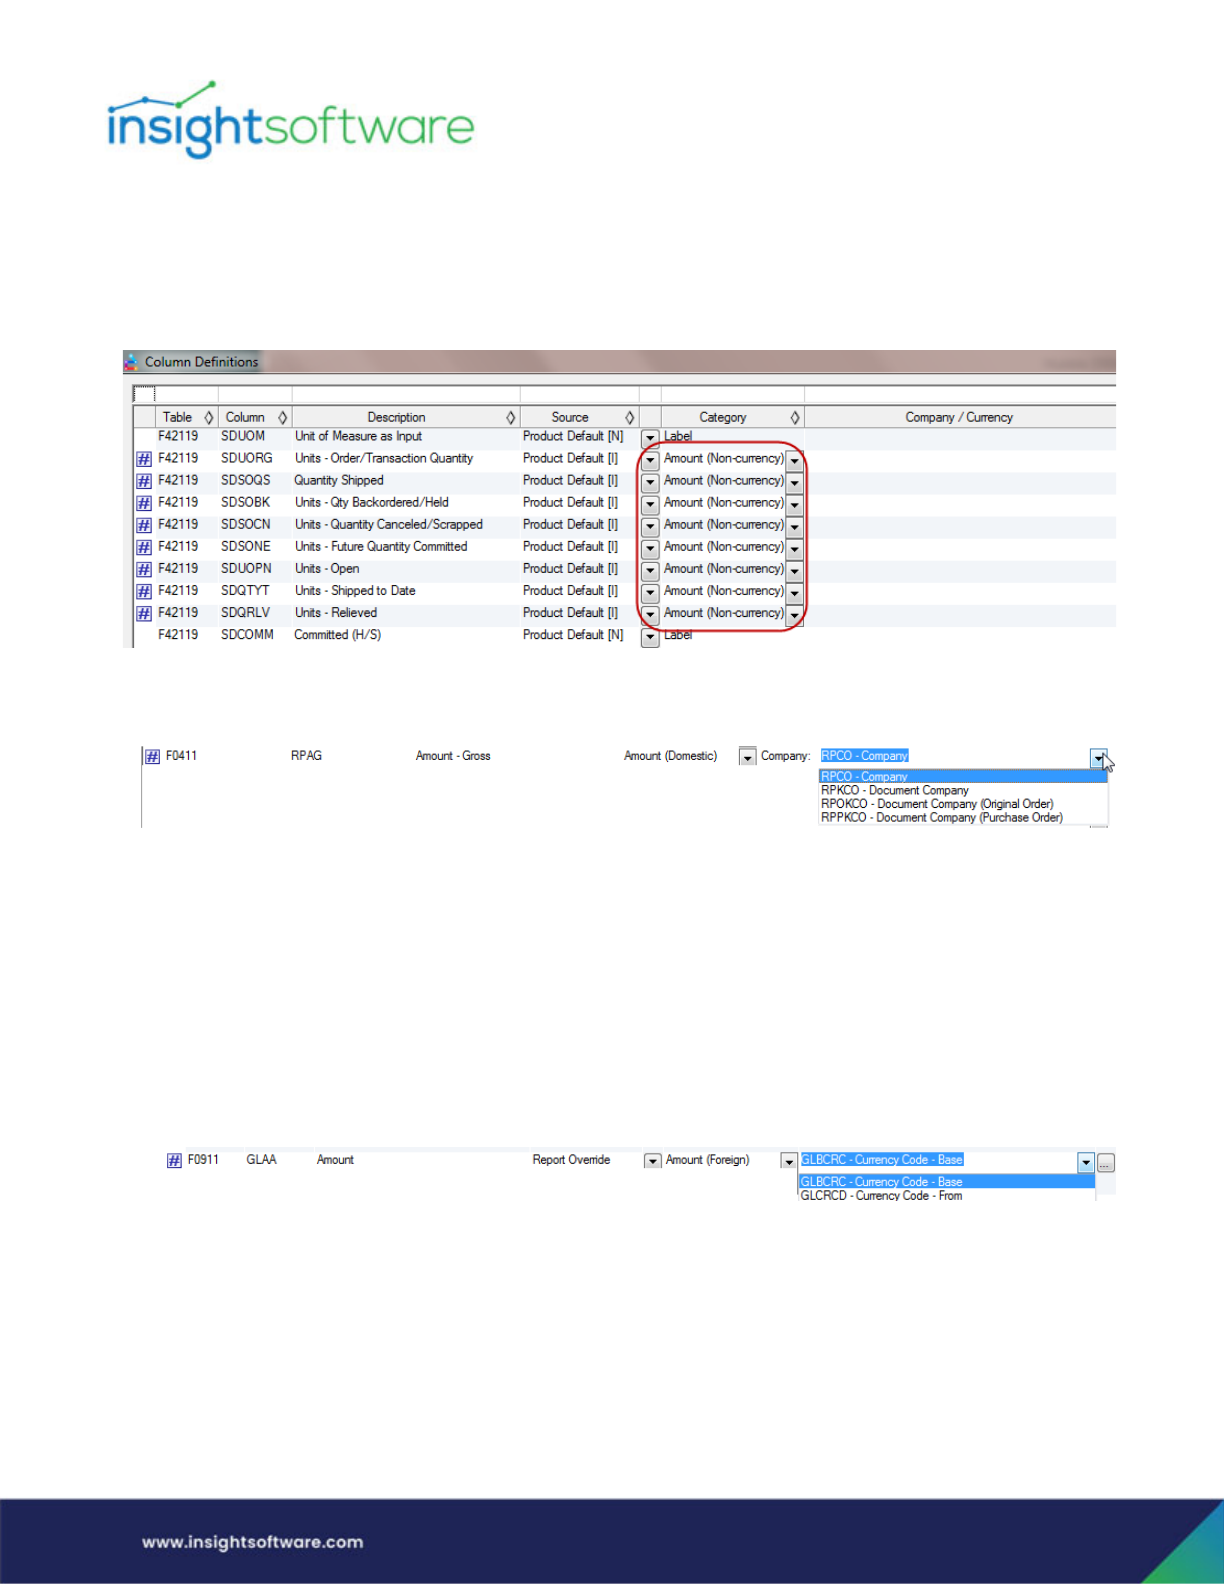
Designing a Template | Create a New Template
Page 67
3. In the Company/Currency column, select the option from the drop-down menu. If Domestic or
Foreign Amount is selected, this determines how currency decimal shifting is performed.
○ Amount (Non-currency) - As described by the name, this setting is for fields that are non-
currency amounts such as those shown below in the F42119.
○ Domestic Currency Shifting - If you define a field as an Amount (Domestic), you are
prompted to select the company on which the currency is based.
For example, if you set the RPAG field from the F03B11 as Amount (Domestic), you can
choose from the following options:
> RPCO – Company
> RPKCO – Document Company
> RPOKCO – Document Company (Original Order)
> RPPKCO – Document Company (Purchase Order)
○ Foreign Currency Shifting - If you define a field as an Amount (Foreign), you then select the
field on which to base the currency code:
For example, if you set the GLAA field from the F0911 as Amount, you can choose from the
following options:
○ GLBCRC – Currency Code Base
○ GLCRCD – Currency Code From
4. It is important to know that the selected option may or may not be used depending on the
Ledger Type Override Setting in the Foreign Currency Columns dialog, as well as various lookup
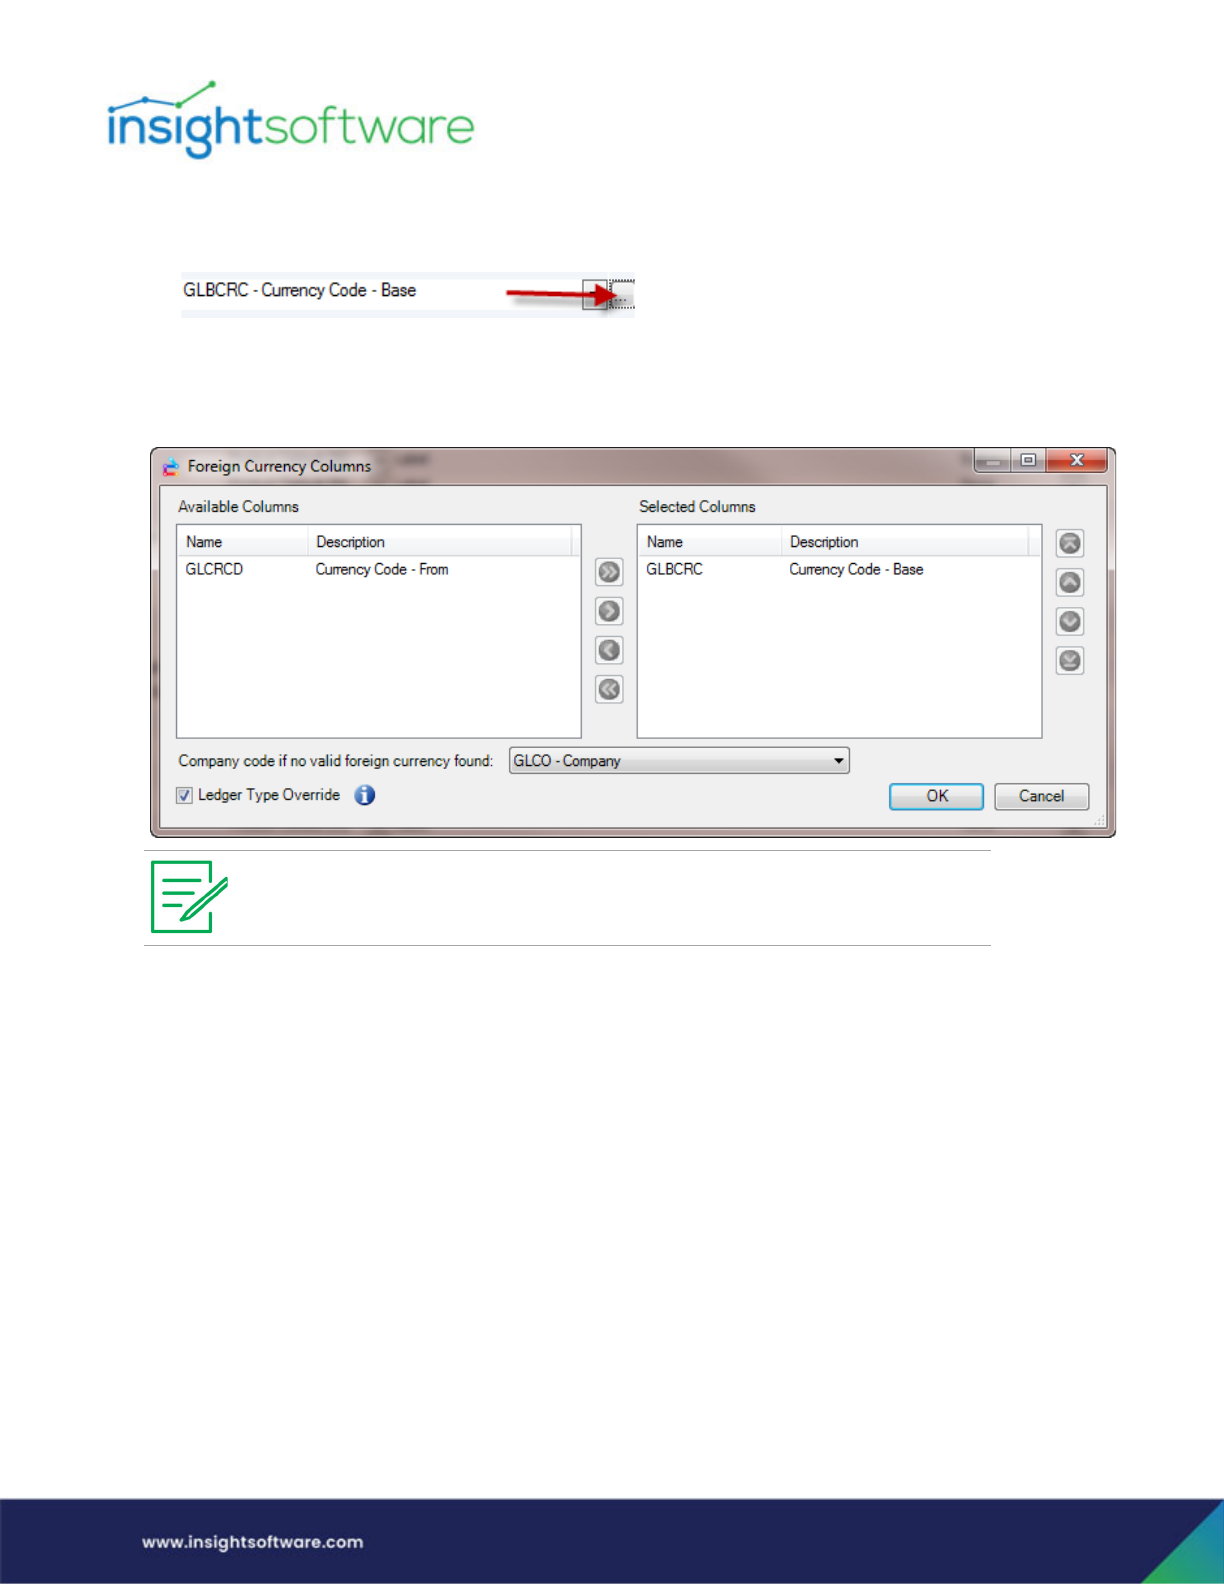
Designing a Template | Create a New Template
Page 68
tables in JD Edwards. The Foreign Currency Columns dialog is accessed by clicking on the … next
to the Currency drop-down menu.
See the Ledger Type Override setting in the lower left corner of the dialog. If this is checked,
lookup tables may be used to find the currency instead of the selected columns in the right panel
of this dialog.
5. In the Lookup column, you can optionally define a table or fixed list lookup in order to provide
filter validation, Query Assist support, and Code & Description feature support to end users:
○ Table Lookup - Define a lookup table for a column, which provides the valid codes and their
associated descriptions, as displayed in a Visual Assist and in the inquiry results. (This does
not have to be a table being used in your template/report.)
○ Fixed List - Define a fixed list of valid codes and their associated descriptions for a column.
These will display in a Visual Assist and in the inquiry results.
DX accommodates decimal shifting in JD Edwards using various rules that are described in the Appendix.
Review and Edit the Table and Join Selections
Once you have completed defining all your amount and quantity fields, you can select the Table and
Joins tab to review your table and joins selections.
The ledger type override setting is grayed out when there is no Ledger Type column in
that table.
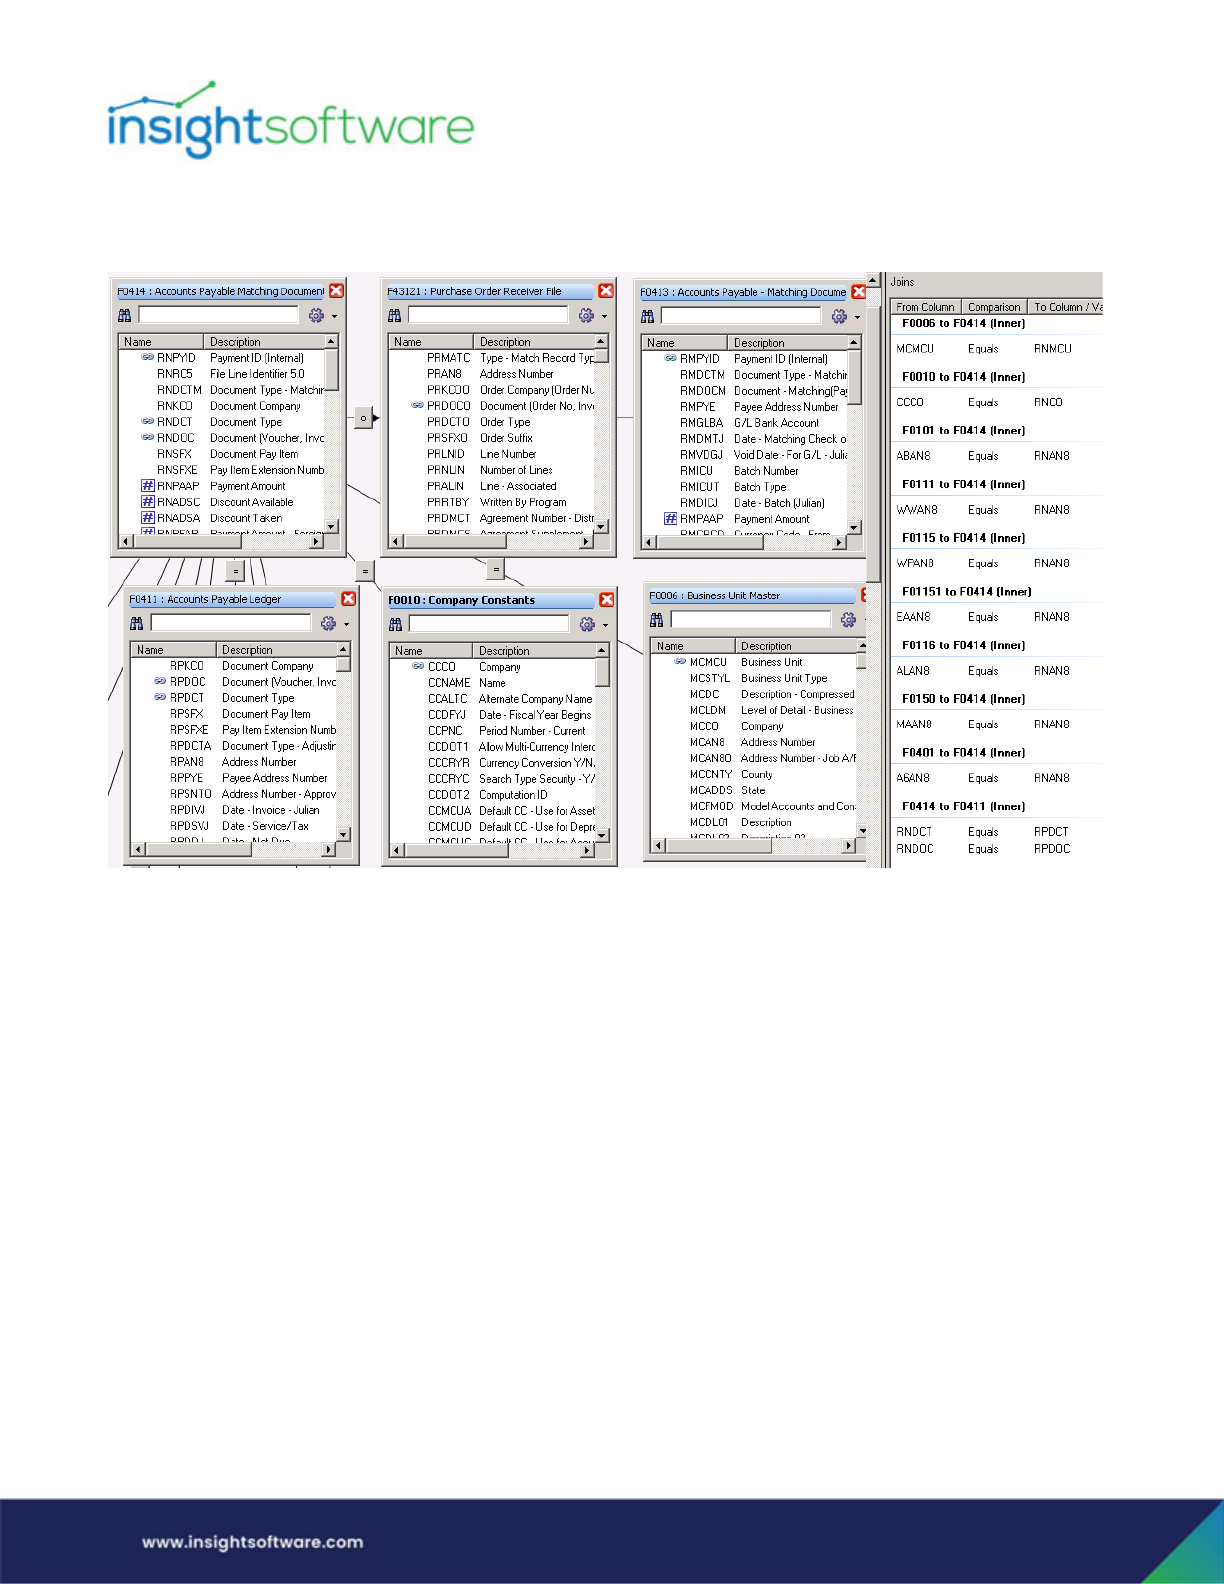
Designing a Template | Create a New Template
Page 69
If you have defined multiple tables, you may need to scroll to view all tables selected from either the
main workspace or the right join panel to review all your defined joins.
Once you are satisfied with your selections, click OK to exit Designer Express Designer (DXD) to begin
defining your filters.
Once you leave the Designer Express Designer, you can always go back to refine or review your selection
by clicking on the Configurator tab and selecting Template Designer.
View which tables have Quantity or Amount Overrides - To see which tables have these overrides, go to
Administrator. Under the Designer Objects node, you will see Designer Dictionary.
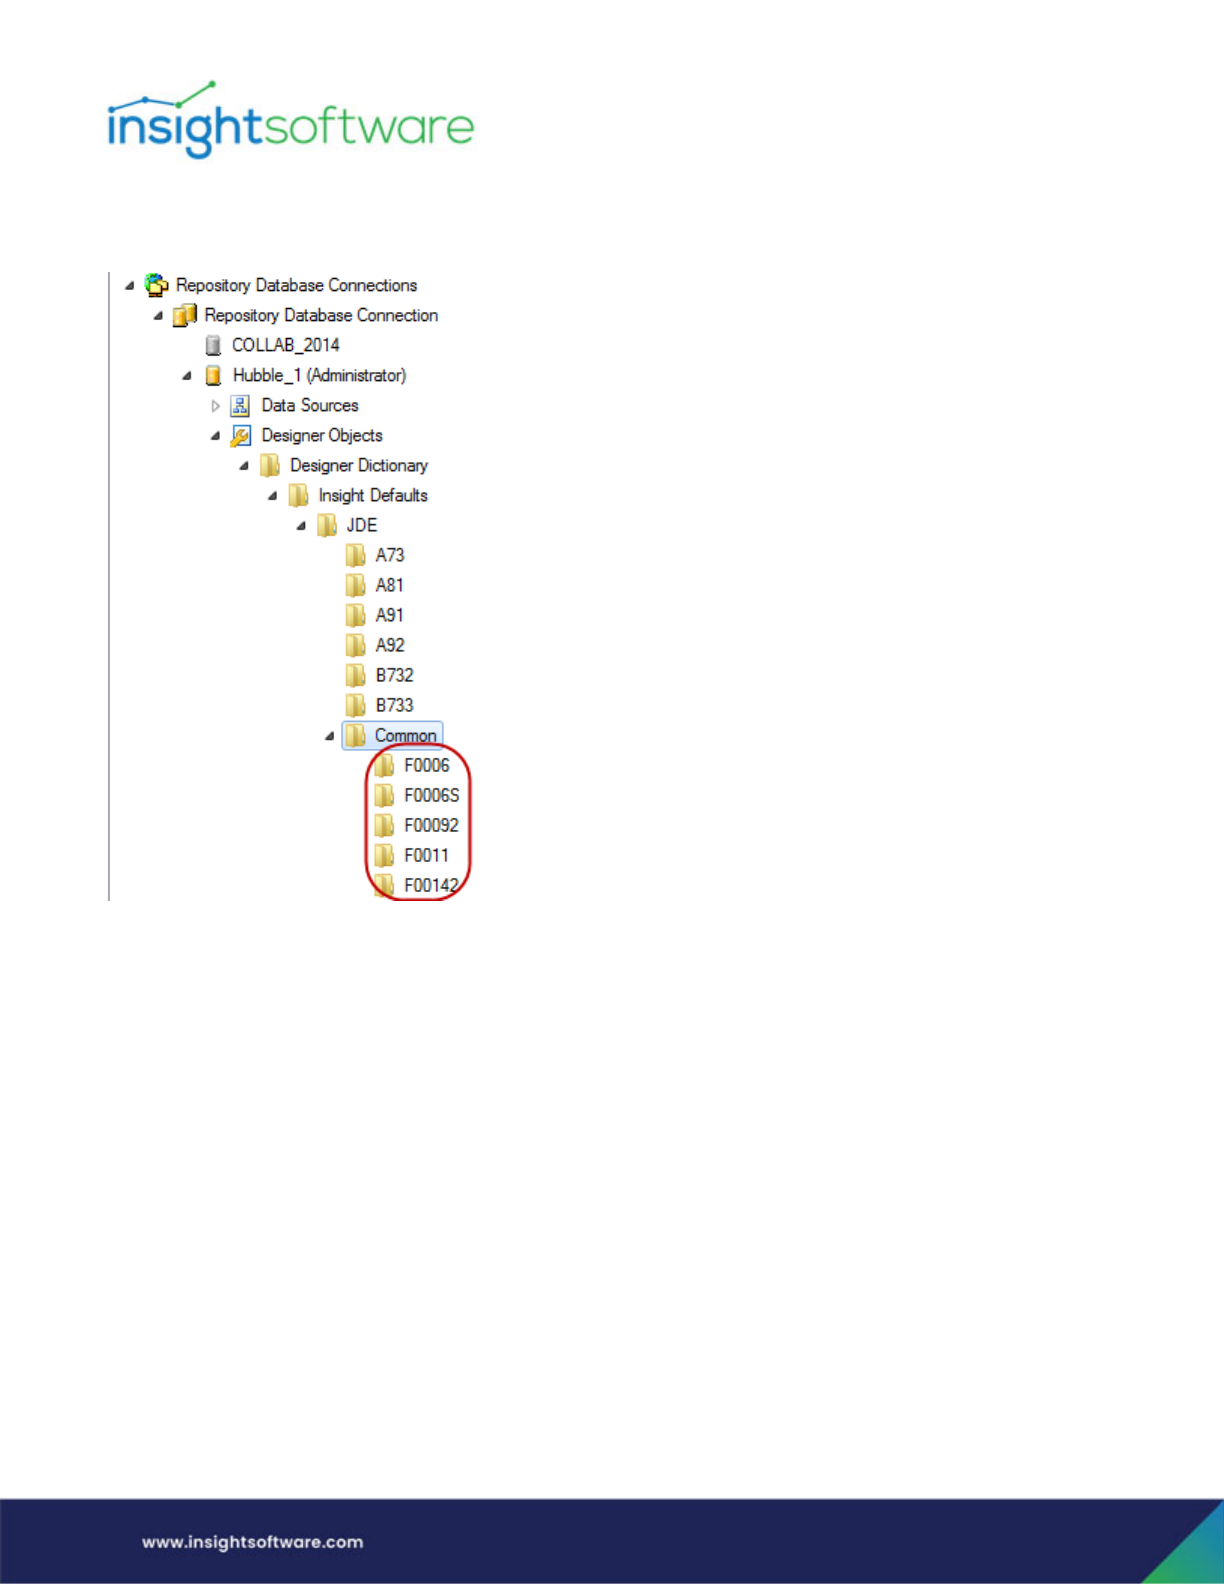
Designing a Template | Create a New Template
Page 70
Beneath that is a Common folder, and beneath that are folders for each table that have overrides. These
are definitions that are specific for a customer; they define OR override Hubble’s default settings.
To get a complete overview of measures defined for a particular table, you would need to start to define
a template on that table in Designer Express and go to Column Definitions from within Template
Designer. (It is not possible to see report-specific settings from within Administrator.)
Report Layout
Report layout options are as follows:
● Filters - Add the required label columns in the Columns, Sorting & Grouping dialog, accessed
from the Design tab. Add table names to the filter names for easy validation and reference.
● Label Columns - Add the required label columns. Add the table names to any additional label
columns that you are not using as filters for easy validation and reference.
● Amount Columns - Add the required amount columns by accessing the Filter Layout dialog from
the Configurator tab and then moving the values filter from the list of Main Filters to the
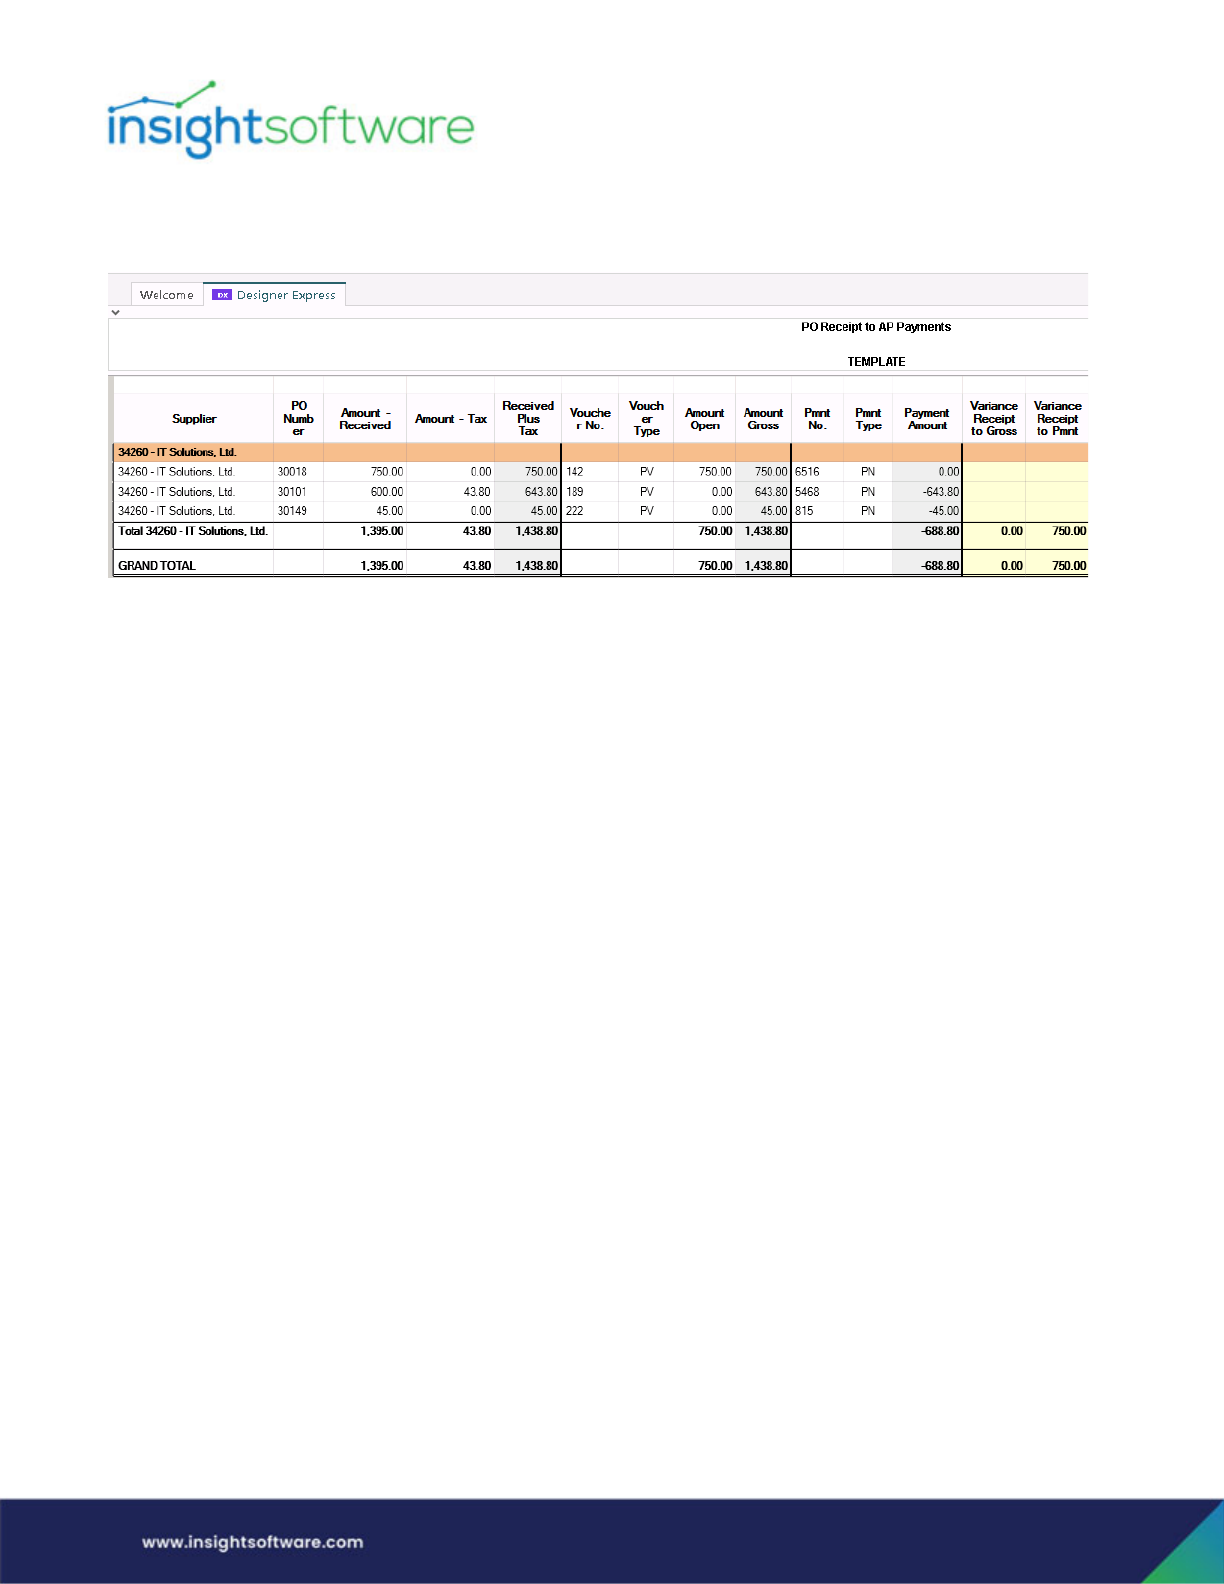
Designing a Template | Create a New Template
Page 71
workspace area. Once the values filter is added to the report, you can use the visual assist
function (the flashlight button) for the values field to add amount fields as required.
If you include any label column where the label column is not part of the join, and where you already
have label columns from the other table that are themselves not part of the join, then you may find you
have an inquiry that takes a long time to return results. If you are in this situation, consider the following:
○ Removing one or more label columns so that this is no longer the case.
○ Adding links so that the extra data is displayed by linked inquires instead (value columns can
still be included).
○ Saving the inquiry with filters preselected so that an end user is less likely to open it and run
it without thinking.
○ Hiding the inquiry so it is only accessible to end users via a drill-down from another inquiry.
● Sorting - Verify your report is sorting as required.
● Totaling - Verify your report subtotals and grand total. Numeric columns that are set up as labels
typically must have the totaling turned on manually.
● Headers - Verify your report headers on turned on and displaying in the required column.
● Formatting - Format your report for a finished look and feel.
● Viewer - Be sure to think about your Viewer users as you design your template/report. What
filters will they need? Did you incorporate selectors or drop-down lists?
● Table Names - Remove the table names from the columns and filters if you do not want your
users to see that information.
● Importing a Hierarchy and/or FSGs - You can create a hierarchy within a custom report.
However, you cannot import one from your ERP data.
● Linking - You can link from a custom report to a standard report and vice versa, as well as
between DX reports.
● Saving - Save the template/report as a report in your inquiries until you have it completed. Once
complete, save it as a template and delete the report.
● Repeated or Duplicated Rows - In Designer-created templates, rows (or parts of rows) can be
repeated. This happens when the report contains multiple fact tables joined on a one-to-many or
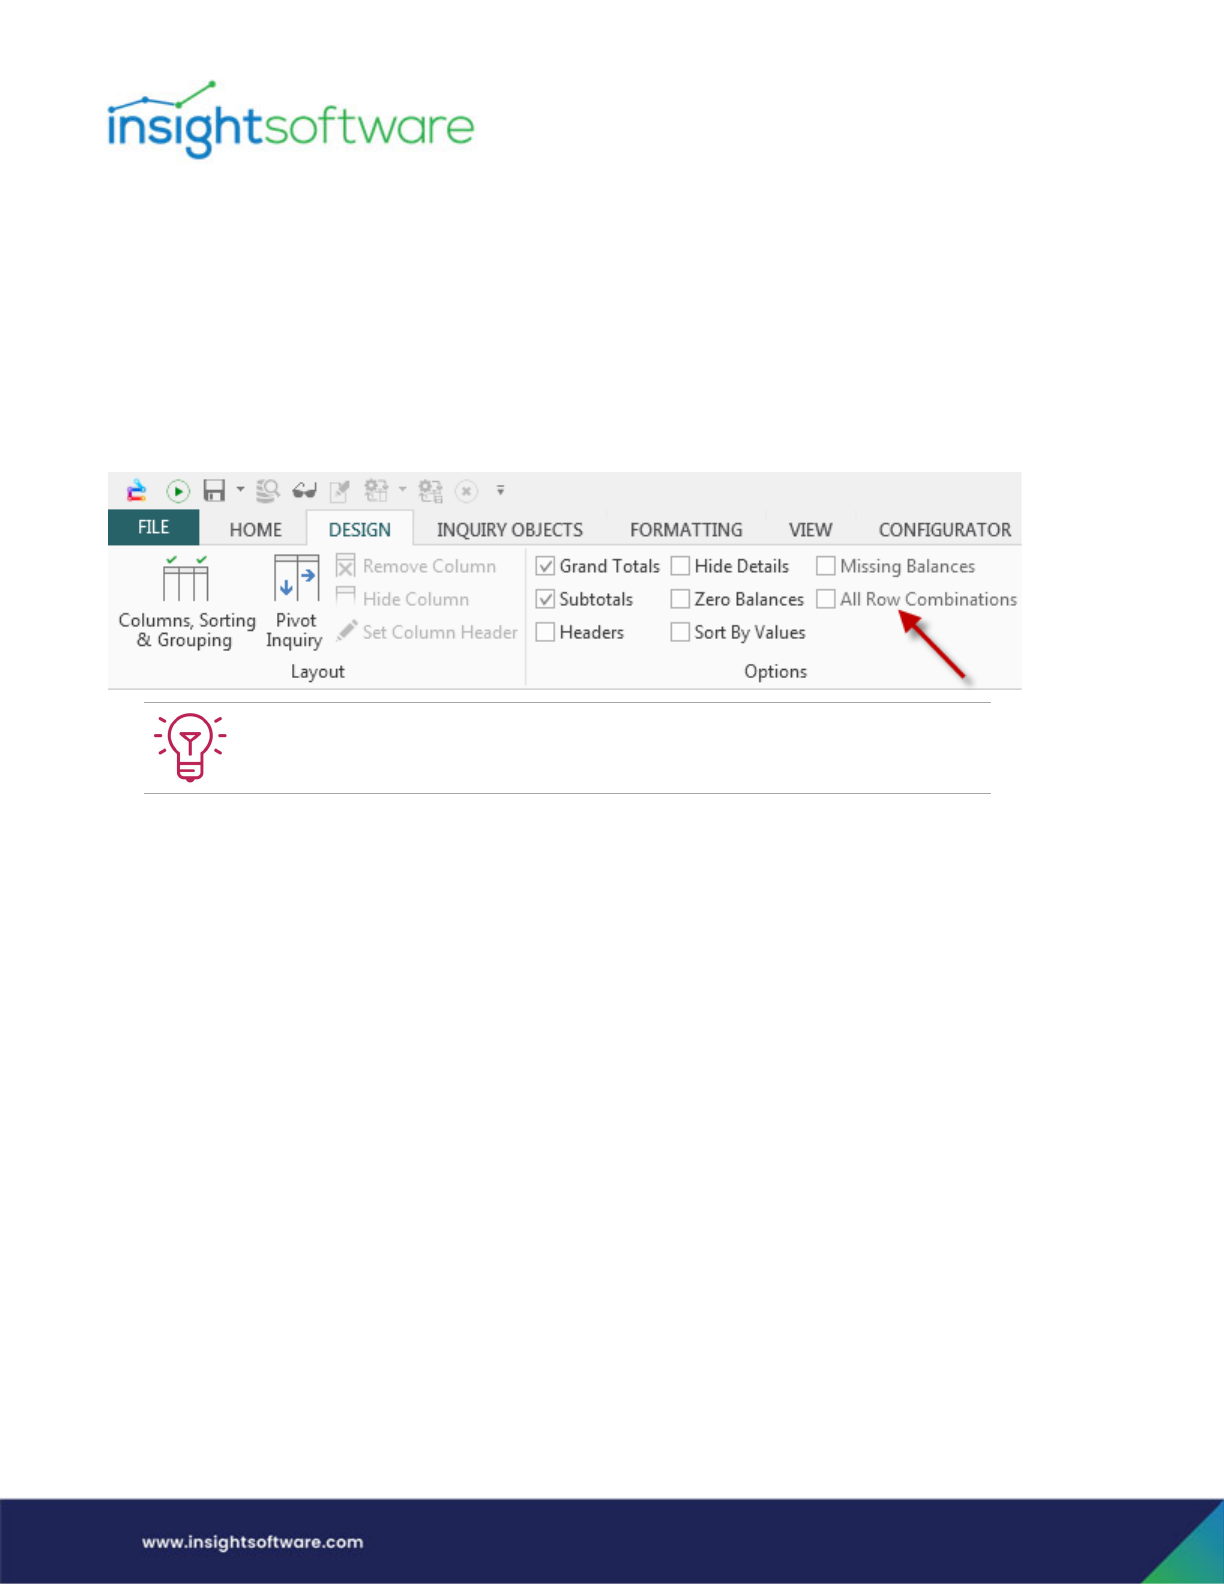
Designing a Template | Create a New Template
Page 72
many-to-many relationship. Hubble detects the multiple rows, and by default formats them
differently to differentiate them from the other rows. Repeated rows are not included in the
Grand Total amounts.
● There is a design option used to designate whether to display all row combinations or not; this
option is called All Row Combinations and is found in the Design menu in the Options group.
Selecting this option means that all rows will be displayed, even if they are being repeated.
This option is off by default, however because it can be difficult to understand the results when only a
selected set of rows displays, you may want to leave this on.
EBS Example
AP_INVOICES_ALL, AP_INVOICE_LINES_ALL, AP_PAYMENT_SCHEDULES and AP_HOLDS_ALL are all used
to create the report and create a many to many relationship. Multiple related rows occur on both sides
of the join, resulting in an exponential multiplying of rows in the display when All Row Combinations is
turned on. In the example below, invoice number 012879 has 2 holds and 2 invoice lines.
While developing your report, we recommend turning on All Row Combinations so all
rows are displayed. Toggle this functionality on and off to determine how you want to
display the data for end users.
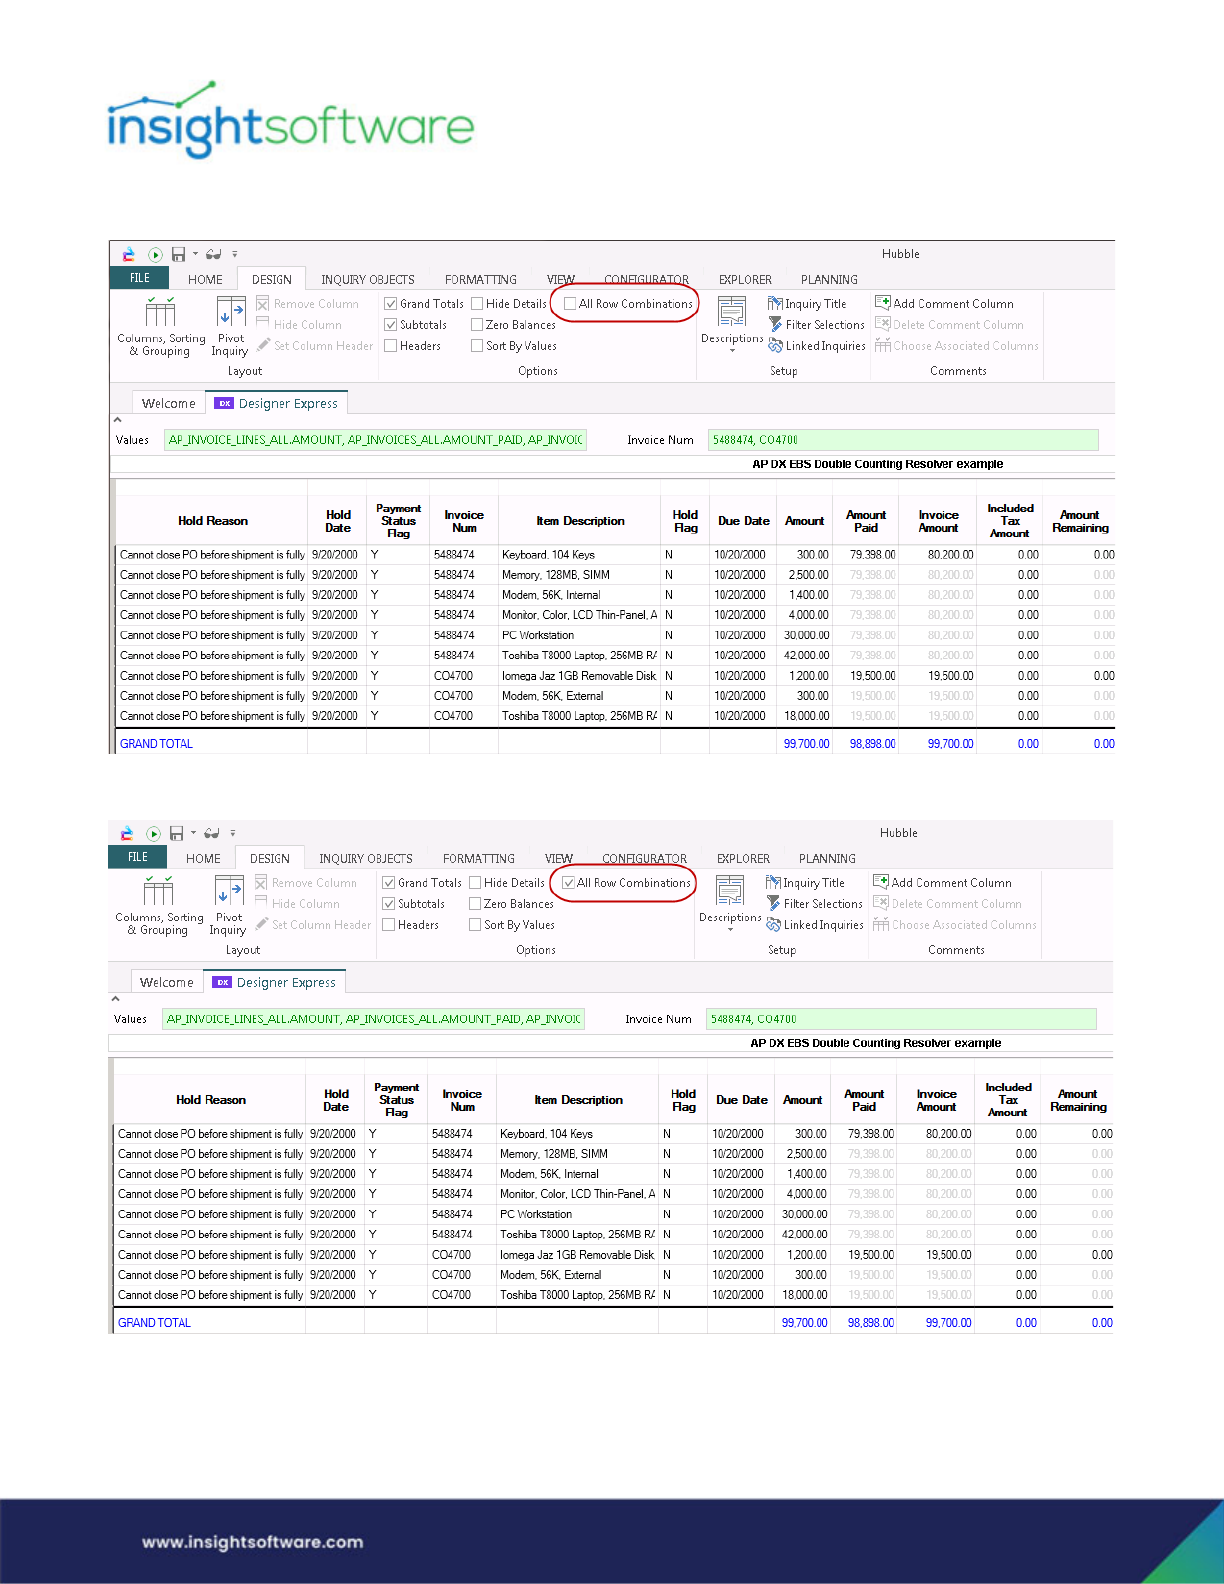
Designing a Template | Create a New Template
Page 73
All Row Combinations turned off:
All Row Combinations turned on:
JD Edwards Example
GL Transaction (F0911) is joined to AP Transactions (F0411) and forms a many-to-many relationship.
Multiple related rows occur on both sides of the join, resulting in an exponential multiplying of rows in

Designing a Template | Create a New Template
Page 74
the display when All Row Combinations is turned on. In the example below, there are three records in
the F0911 and three records in the F0411 where DOC = 1577.
F0411 records for Document 1577
F0911 records for Document 1577
All Row Combinations turned on (9 rows display for only 3 records in each table)
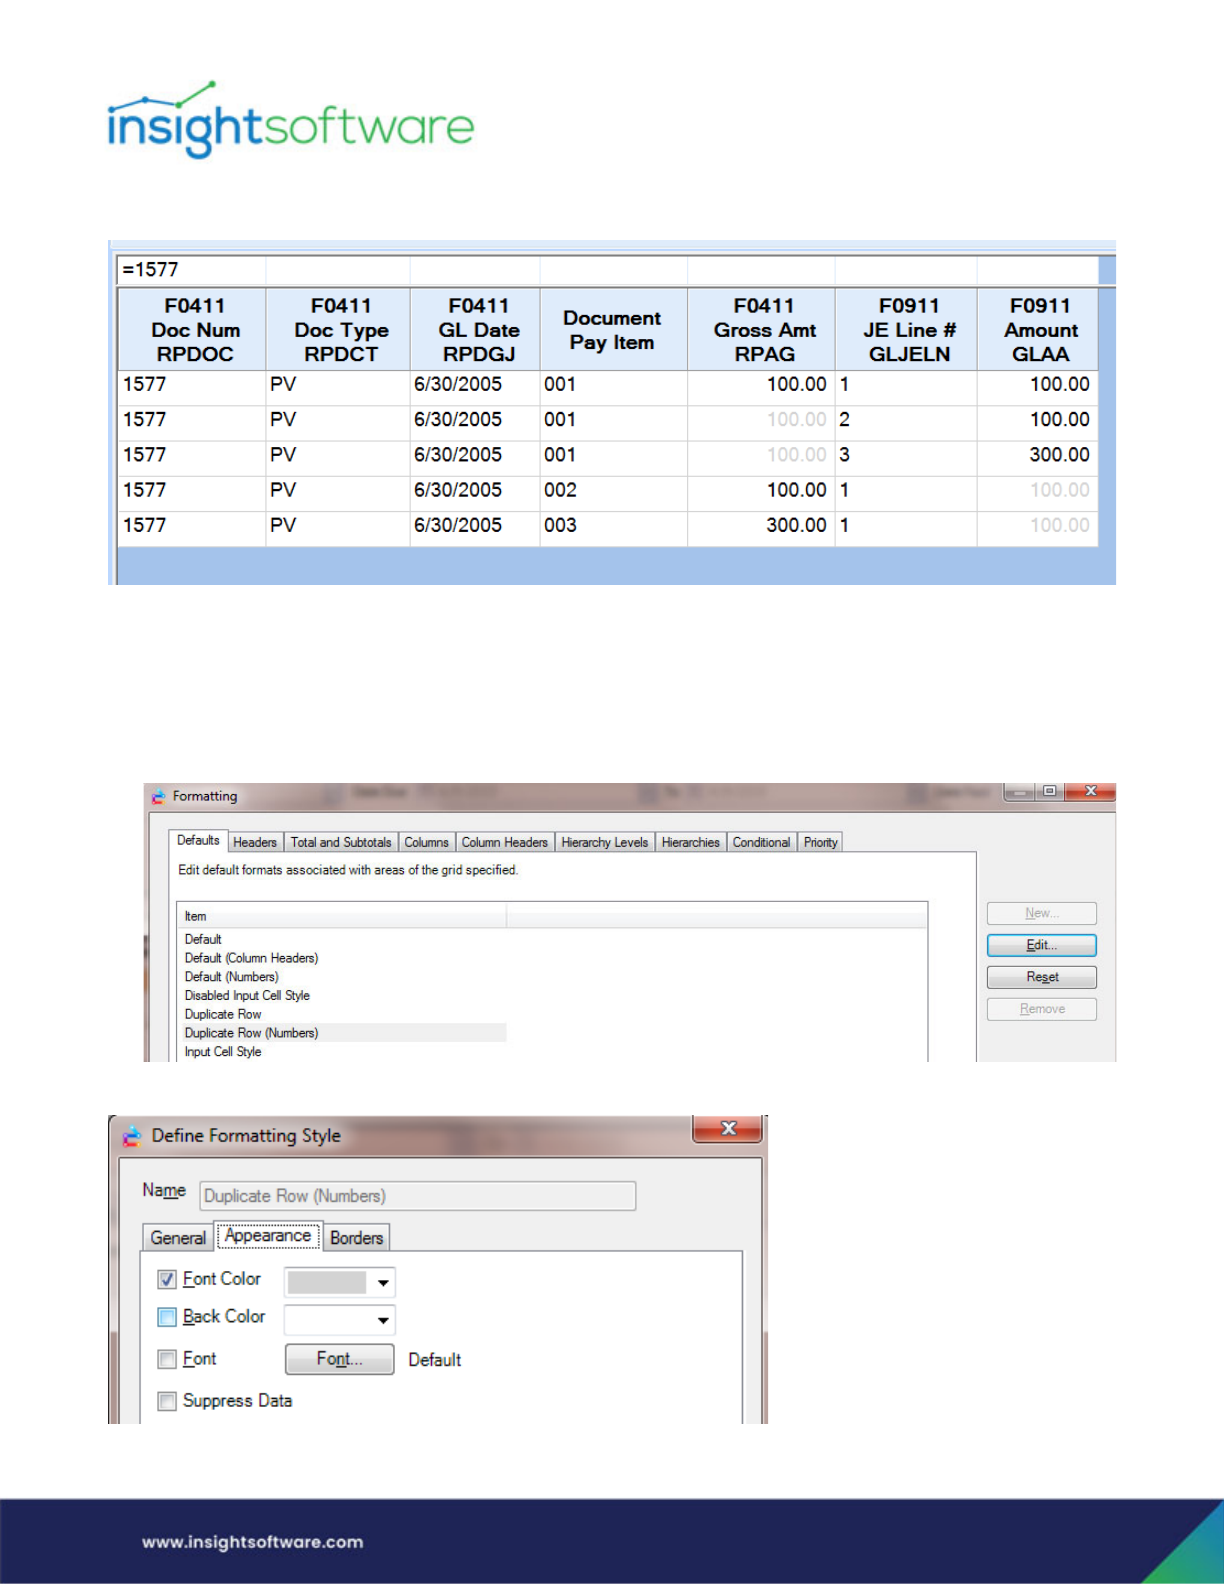
Designing a Template | Create a New Template
Page 75
All Row Combinations turned off.
Formatting of Duplicate Rows
In Formatting Defaults, there are two items related to duplicate rows:
● Duplicate Row – Formatting for the label columns in duplicate rows.
● Duplicate Row (Numbers) – Formatting for the values in duplicate rows.
When you edit the Duplicate Row (Numbers) item, you see that the font color is gray.
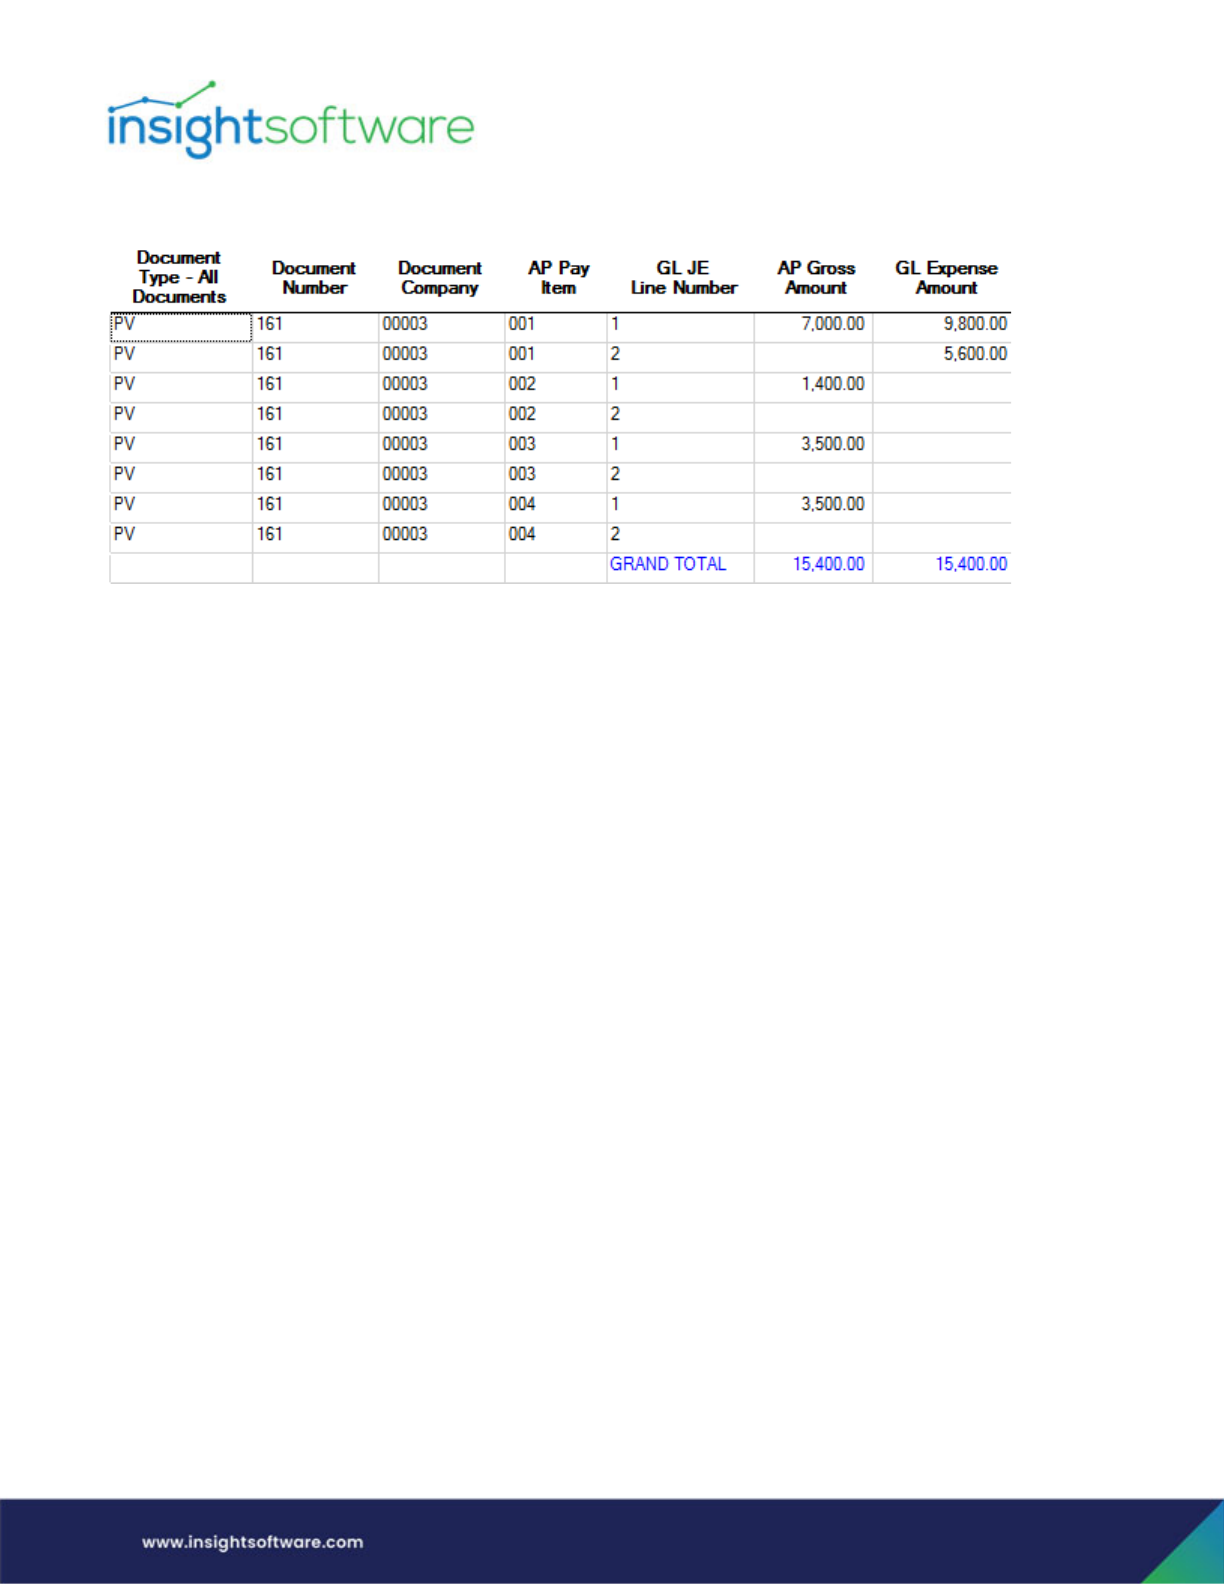
Designing a Template | Create a New Template
Page 76
If you changed this to Suppress Data, the result would look like the following image.
Publish
Once you have completed the template/report, you will need to assign permissions and licenses as
needed. Permissions work exactly the same for Designer-created templates/reports as they do for any
other template/report within the software. Licenses can only be assigned through Administrator.
Security
Preventing Browsing of Tables - There may be circumstances where you want to prevent Designer users
from browsing tables when creating an inquiry/template. This would be particularly useful when
working with sensitive data such as employee salaries.
By default, the Show Browse Table icon displays in Designer Express. To turn this icon off by default, an
Administrator can change this in Administrator within Advanced Capabilities (IS Inquiry Settings >
Feature Control > Show Browse Table).
If you maintain Human Resources and/or Payroll information with EBS, we recommend that you deny
Show Browse Table access to Everyone and grant back access on an as needed basis (Inclusive Security
approach).
For JD Edwards users, anyone who has access to Template Designer has the ability to change fields to
labels from values, e.g. Amount (Domestic). This affects every single inquiry that uses those fields, so the
user who is changing these fields needs the expertise to know how these should be set and must
understand the implication of changing these values.
There is an Advanced Capability that controls the ability to change information in the Column
Definitions dialog (accessed via Template Designer ). In Administrator, this Advanced Capability is found
in IS Inquiry Settings > Advanced > Feature Control > Designer Express (DX) Column Properties. When
the option is set to Yes, the value next to it has to be checked in order to allow the selected user to
change the column definitions.

Appendix | Amount Columns and Decimal Shifting Rules
Page 77
Appendix
Amount Columns and Decimal Shifting Rules
Currency Decimal Shifting
Within JD Edwards databases, every number is stored as an integer with a corresponding value that
represents the number of decimal places by which to shift it. This means that 100.10 is stored as 10010.
In Hubble, when we define the type of Amount Column, we also determine the currency decimal
shifting.
When defining amount columns in a custom template or inquiry, choosing the settings of Amount
(Domestic) or Amount (Foreign) determine how the currency-based decimal shifting is performed.
For Domestic Currency Decimal Shifting, we select the company field on which the currency will be
based. The number of decimal places is determined by the company currency code defined in the
Company Constants table (F0010) and the number of decimal places for that currency code defined in
the Currency Codes table (F0013). If no other option is selected, the default currency decimal setting of
2 will be used.
For Foreign Currency Decimal Shifting, we select the Currency Code - Base or the Currency Code - From
field on which the currency will be based. However, if there is a ledger type override specified (Table
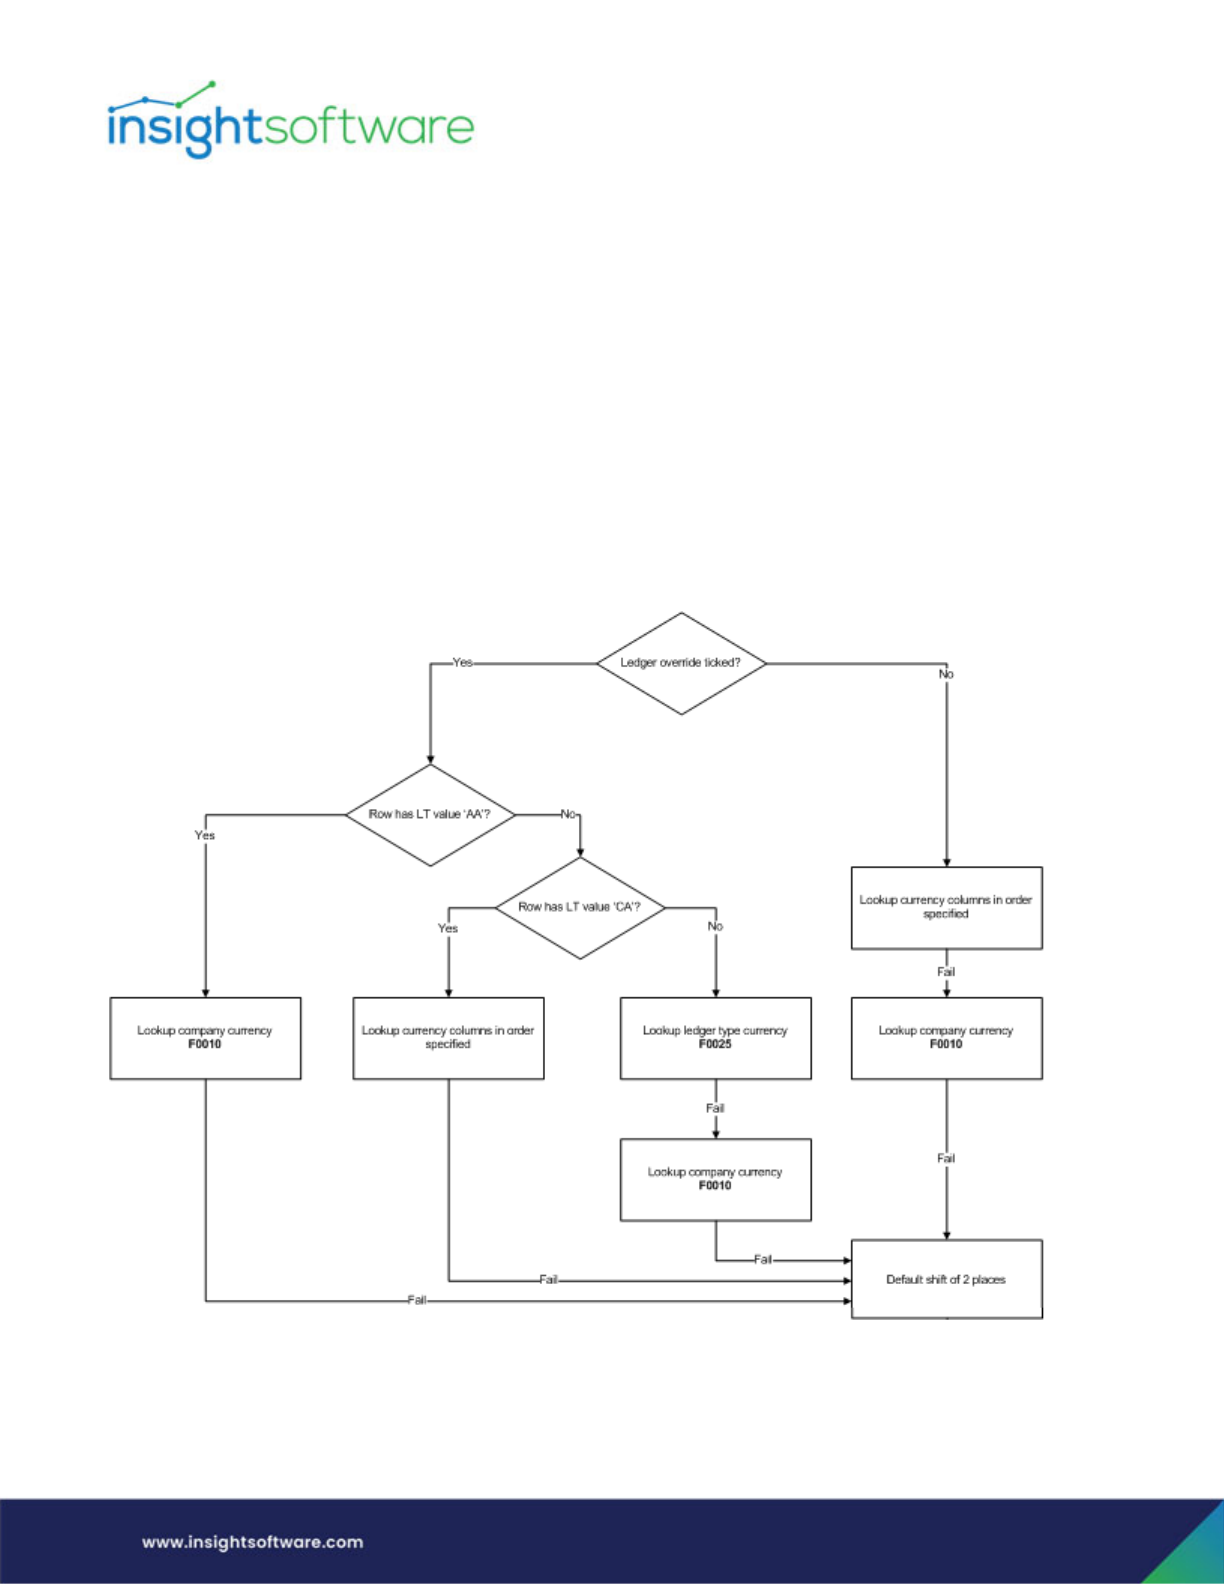
Appendix | Amount Columns and Decimal Shifting Rules
Page 78
F0025 for E1 and F0005 World); the decimal shift will be determined by the Ledger Type (LT/ F0025 or
F0005), Currency Code (CRCX/F0025 or F0005) and the Display Decimals (CDEC/F0013) combination.
Non-Currency Amount Decimal Shifting will use the Data Dictionary to determine how the quantities or
hours display.
Default Number of Decimals Rules
The default number of decimals rules for F0911 GLAA field vs other amount fields are described below:
For the F0911 GLAA Field
First, you must see if the Ledger Type Override is checked. From there, follow the Yes/No paths as to
when the lookup tables and the selected currency columns in the Foreign Currency Columns dialog are
used.
● Lookup currency columns in order specified - The columns selected in the right panel of the
Foreign Currency Columns dialog.
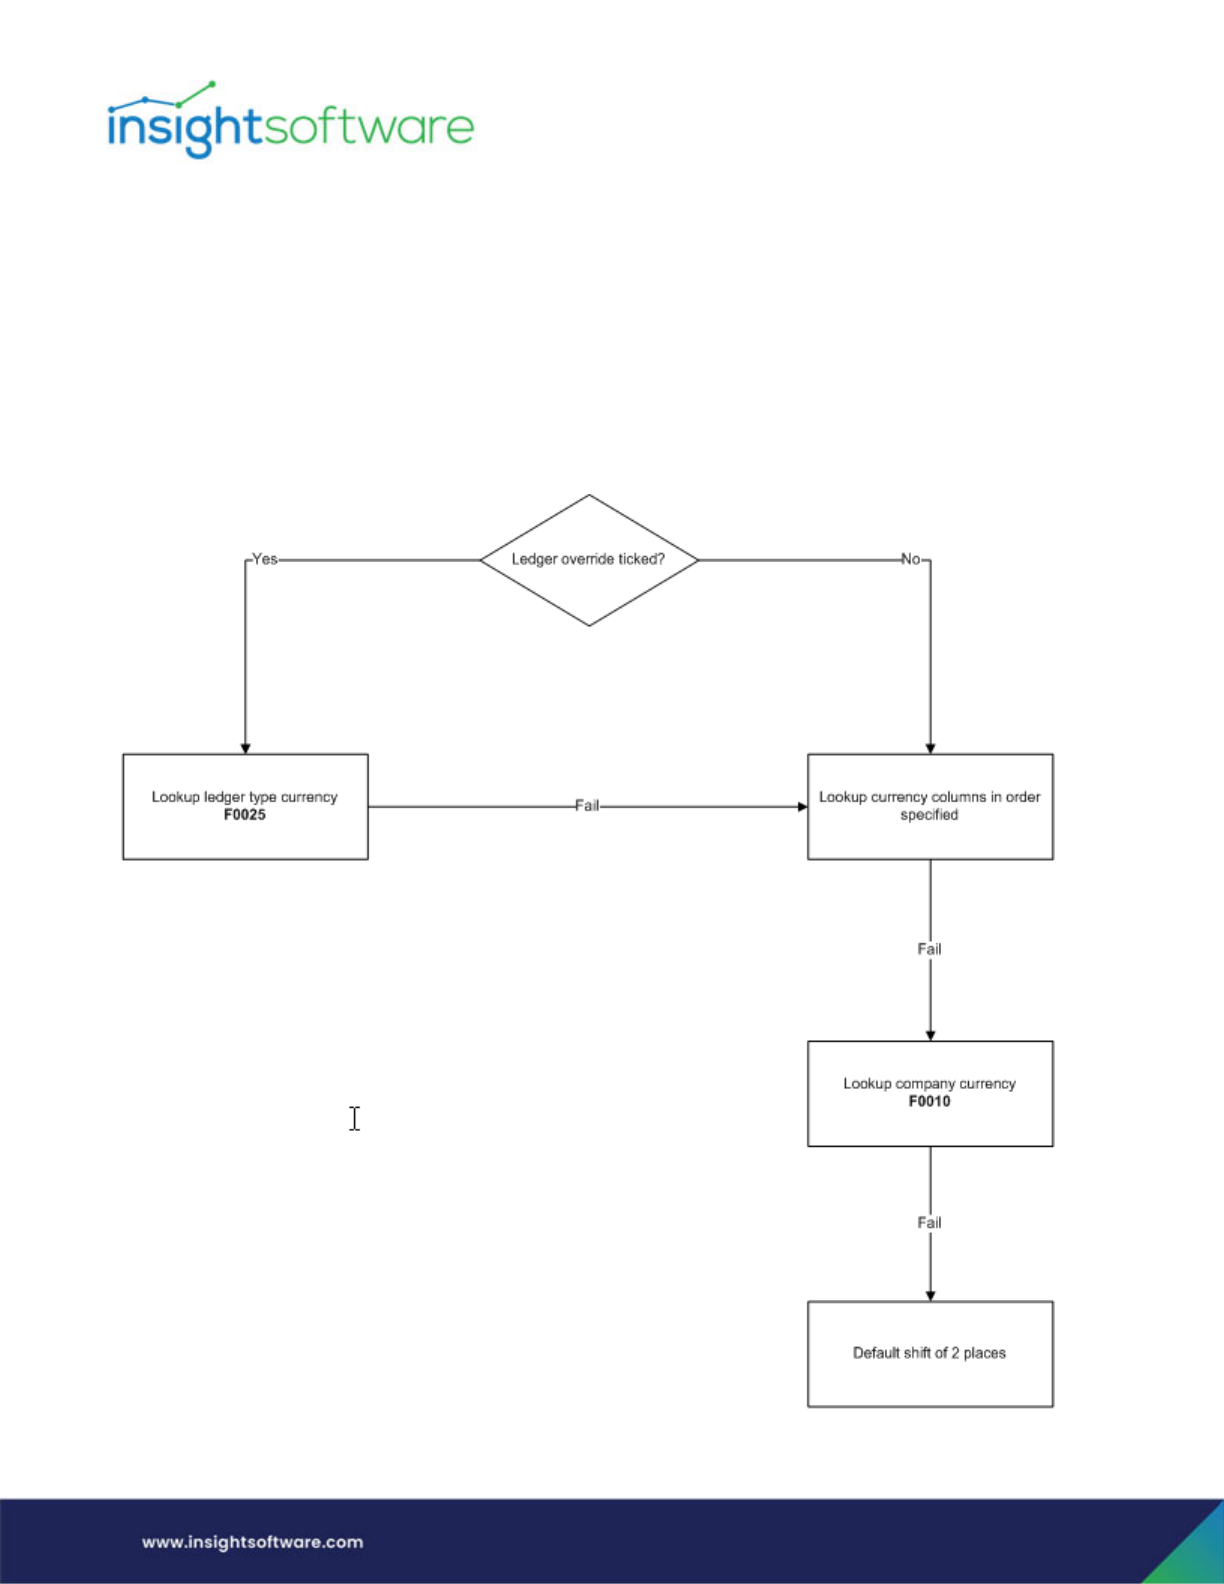
Appendix | Amount Columns and Decimal Shifting Rules
Page 79
● Lookup company currency - The F0010 table provides a relationship between company (CCCO
column) and currency (CCCRCD).
● Lookup ledger type - The F0025 table provides a relationship between ledger type (LHLT column)
and currency (LHCRCX).
Measures other than the F0911 GLAA field
For all measures other than the GLAA field in the F0911, different rules are followed. First, you must see
if the Ledger Type Override is checked. From there, follow the Yes/No paths shown in the following flow.

Appendix | Amount Columns and Decimal Shifting Rules
Page 80
● Lookup currency columns in order specified - The columns selected in the right panel of the
Foreign Currency Columns dialog.
● Lookup company currency - The F0010 table provides a relationship between company (CCCO
column) and currency (CCCRCD).
● Lookup ledger type - The F0025 table provides a relationship between ledger type (LHLT column)
and currency (LHCRCX).
