
Advanced Application Manual
Database Server
This manual walks through the steps to set up MS SQL Server
V1.00

Table of Contents
1. Overview ................................................................................................................. 1
2. Installing MS SQL .................................................................................................... 1
3. Building Database ................................................................................................... 8
4. Designing Project File ........................................................................................... 13
5. SQL Query ............................................................................................................. 15
6. References ............................................................................................................ 21
Database Server
1
1. Overview
MS SQL is supported in EasyBuilder Pro V6.01.01 and later versions.
This user manual explains step by step on how to create and configure MS SQL server,
and how to design an EasyBuilder Pro project.
2. Installing MS SQL
The SQL server used in the following demonstration is MS SQL.
1. Download MS SQL Express from the link provided in Chapter 6.
Recommended version for
Windows® 10: MS SQL Express 2017
Windows® 7: MS SQL Express 2014
2. Open the downloaded installation file.
3. MS SQL Express 2017: Install online
MS SQL Express 2014: Install the following files.
a. Express 32/64 BIT\SQLEXPR_x86/x64_ENU.exe
b. MgmtStudio 32/ 64 BIT\SQLManagementStudio_x86/x64_ENU.exe
MS SQL Express 2014 is used in the following demonstration. MS SQL Express 2017
can be configured in the same way.
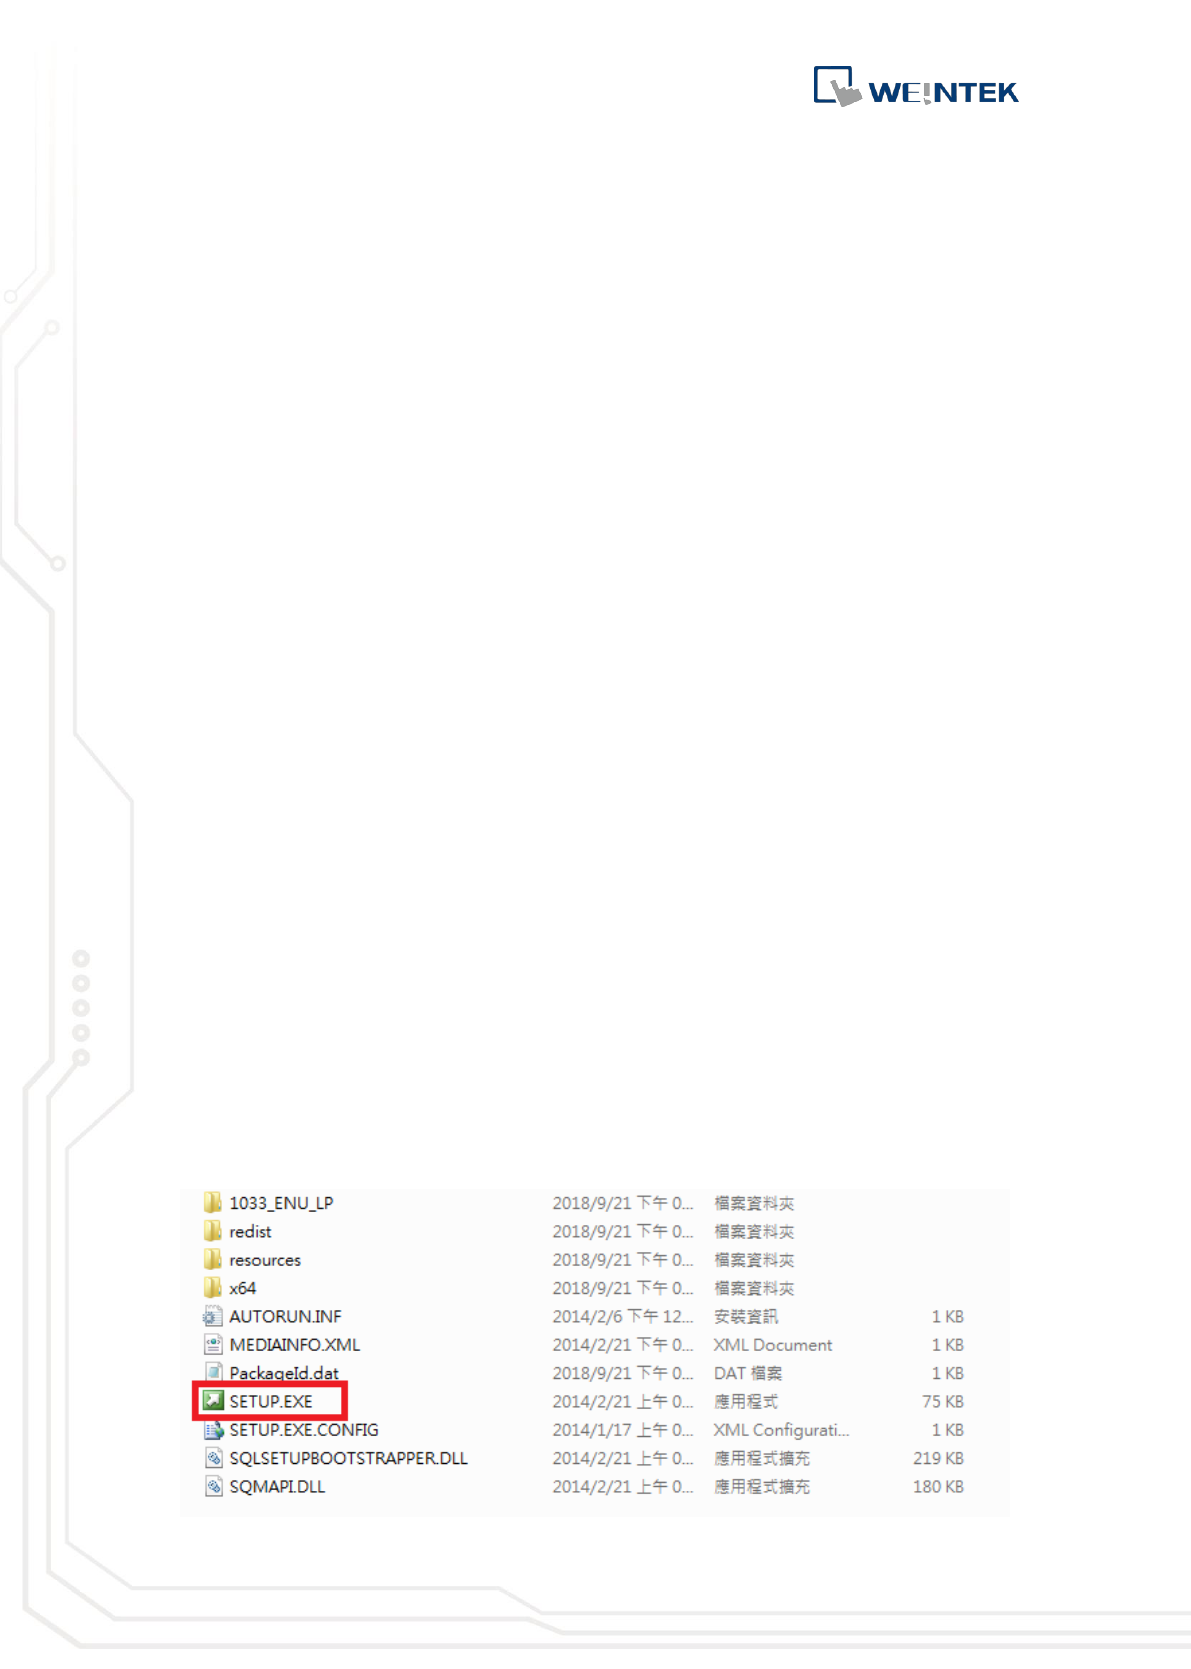
4. After running Express 64 BIT\SQLEXPR_x64_ENU.exe, a
“SQLEXPR_x64_ENU” folder will be generated. Run “SETUP.EXE” file in this
folder to start installing.
If the OS of your PC is Windows® 7 32BIT x86, please install Express 32
BIT\SQLEXPR_x86_ENU.exe.
Database Server
2
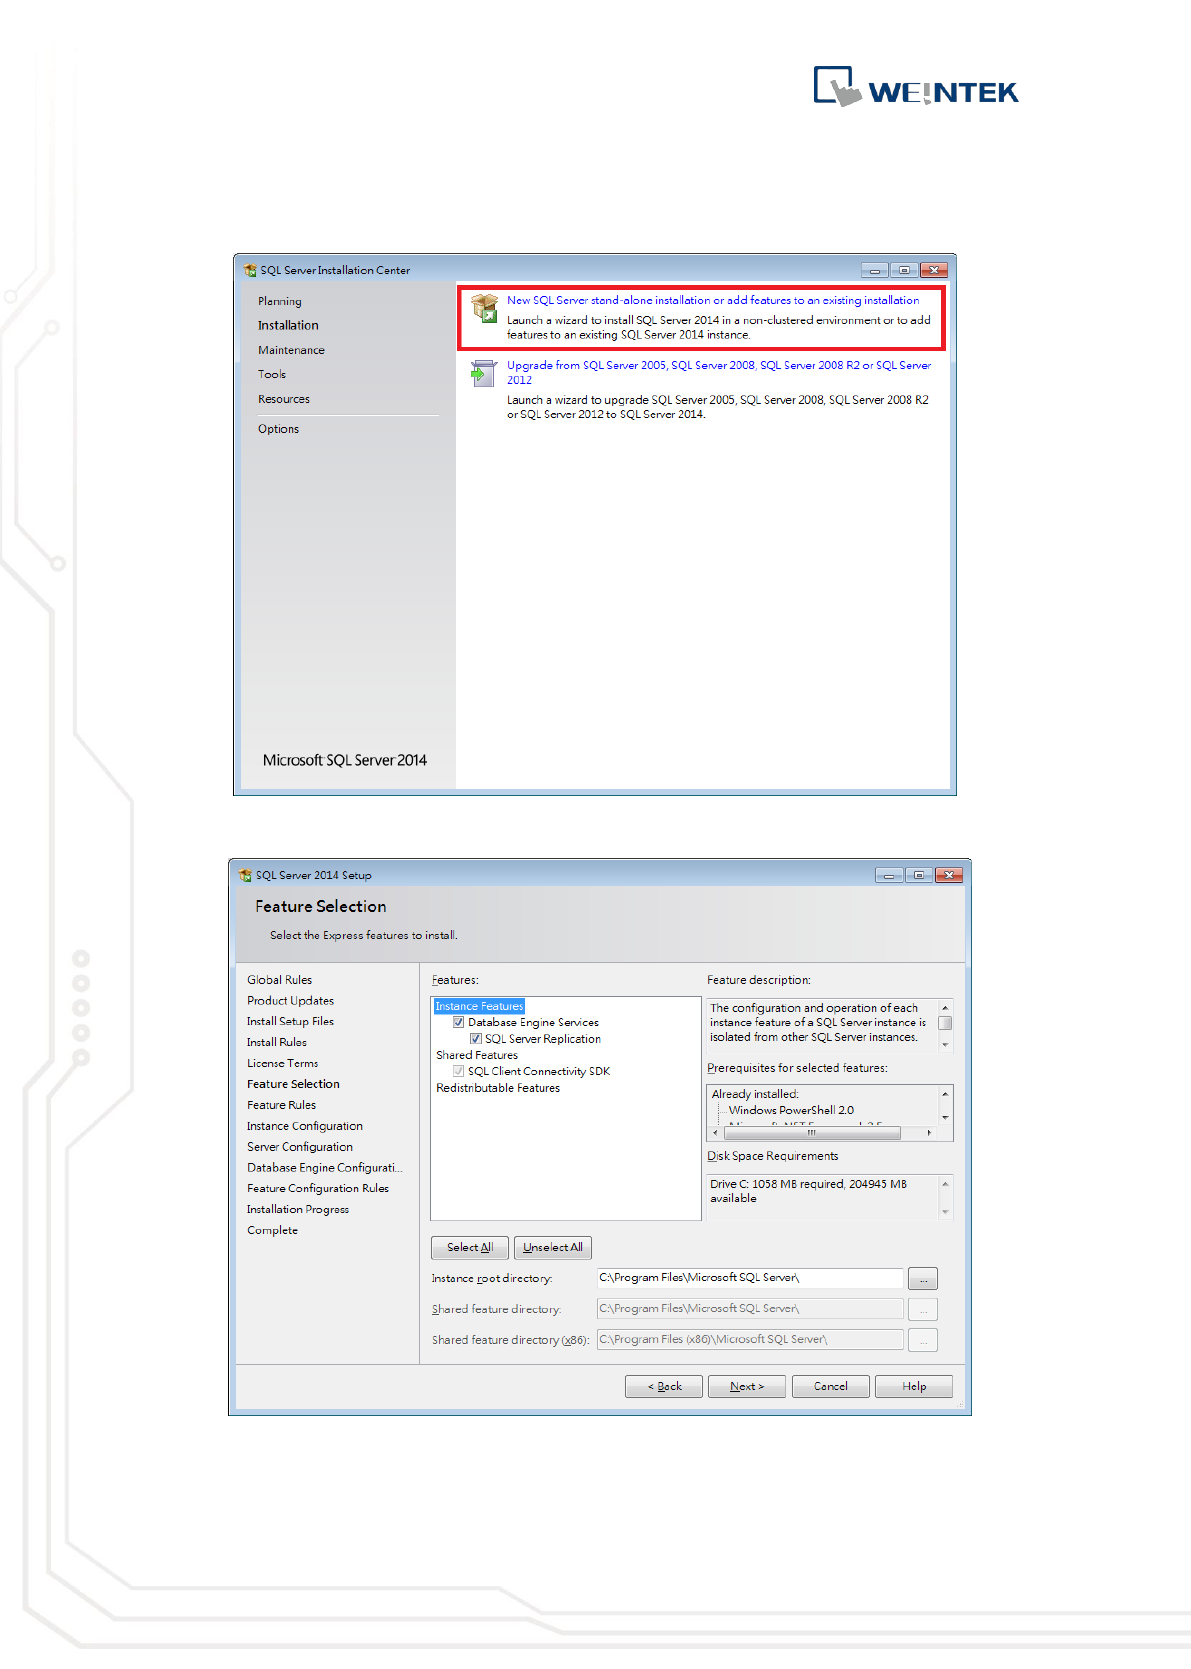
5. Click [New SQL Server stand-alone installation or add features to an
existing installation].
6. Use default settings in Feature Selection window.
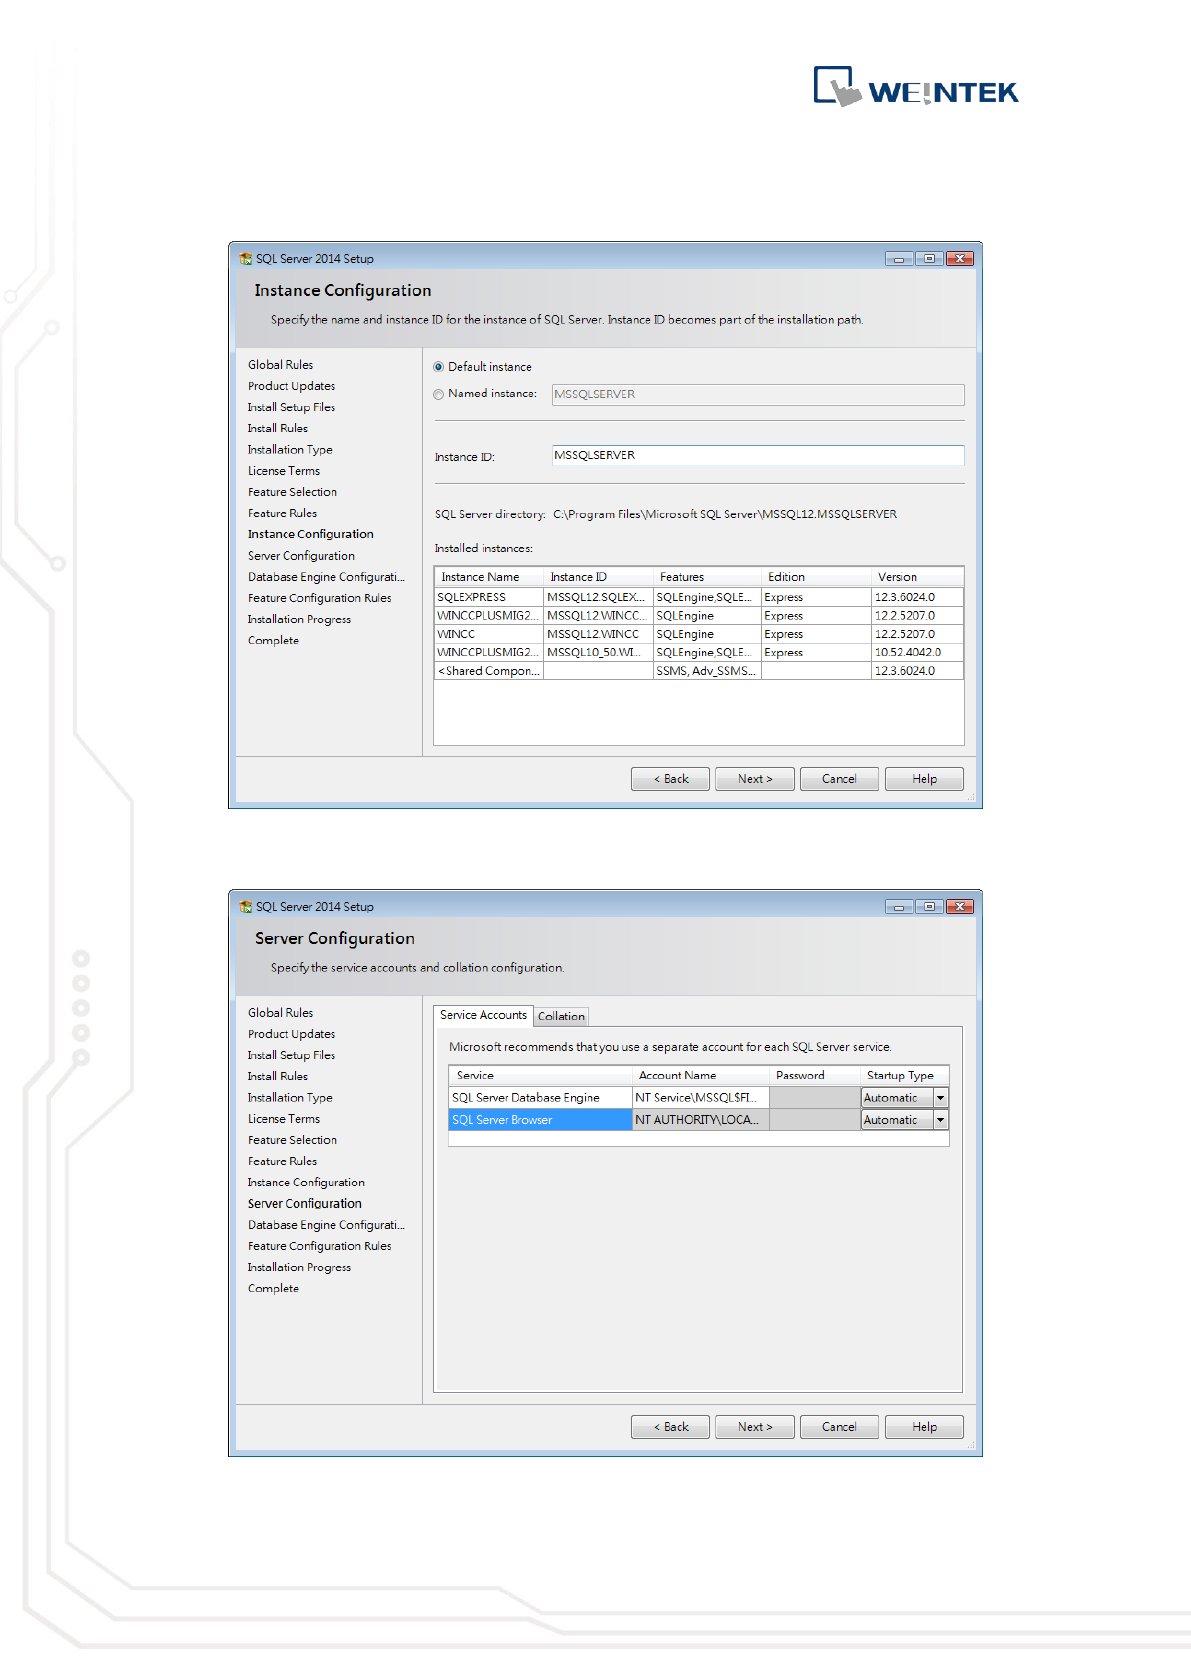
7. In Instance Configuration window, new instances can be installed. Running
multiple SQL Servers on the same computer needs multiple instances.
Database Server
3
Every new instance should start from executing SETUP.EXE. The default
name of the instance is MSSQLSERVER.
8. In Server Configuration window select [Automatic] for both SQL Server
Database Engine and SQL Server Browser.
9. Select [Mixed Mode] in Database Engine Configuration window and enter
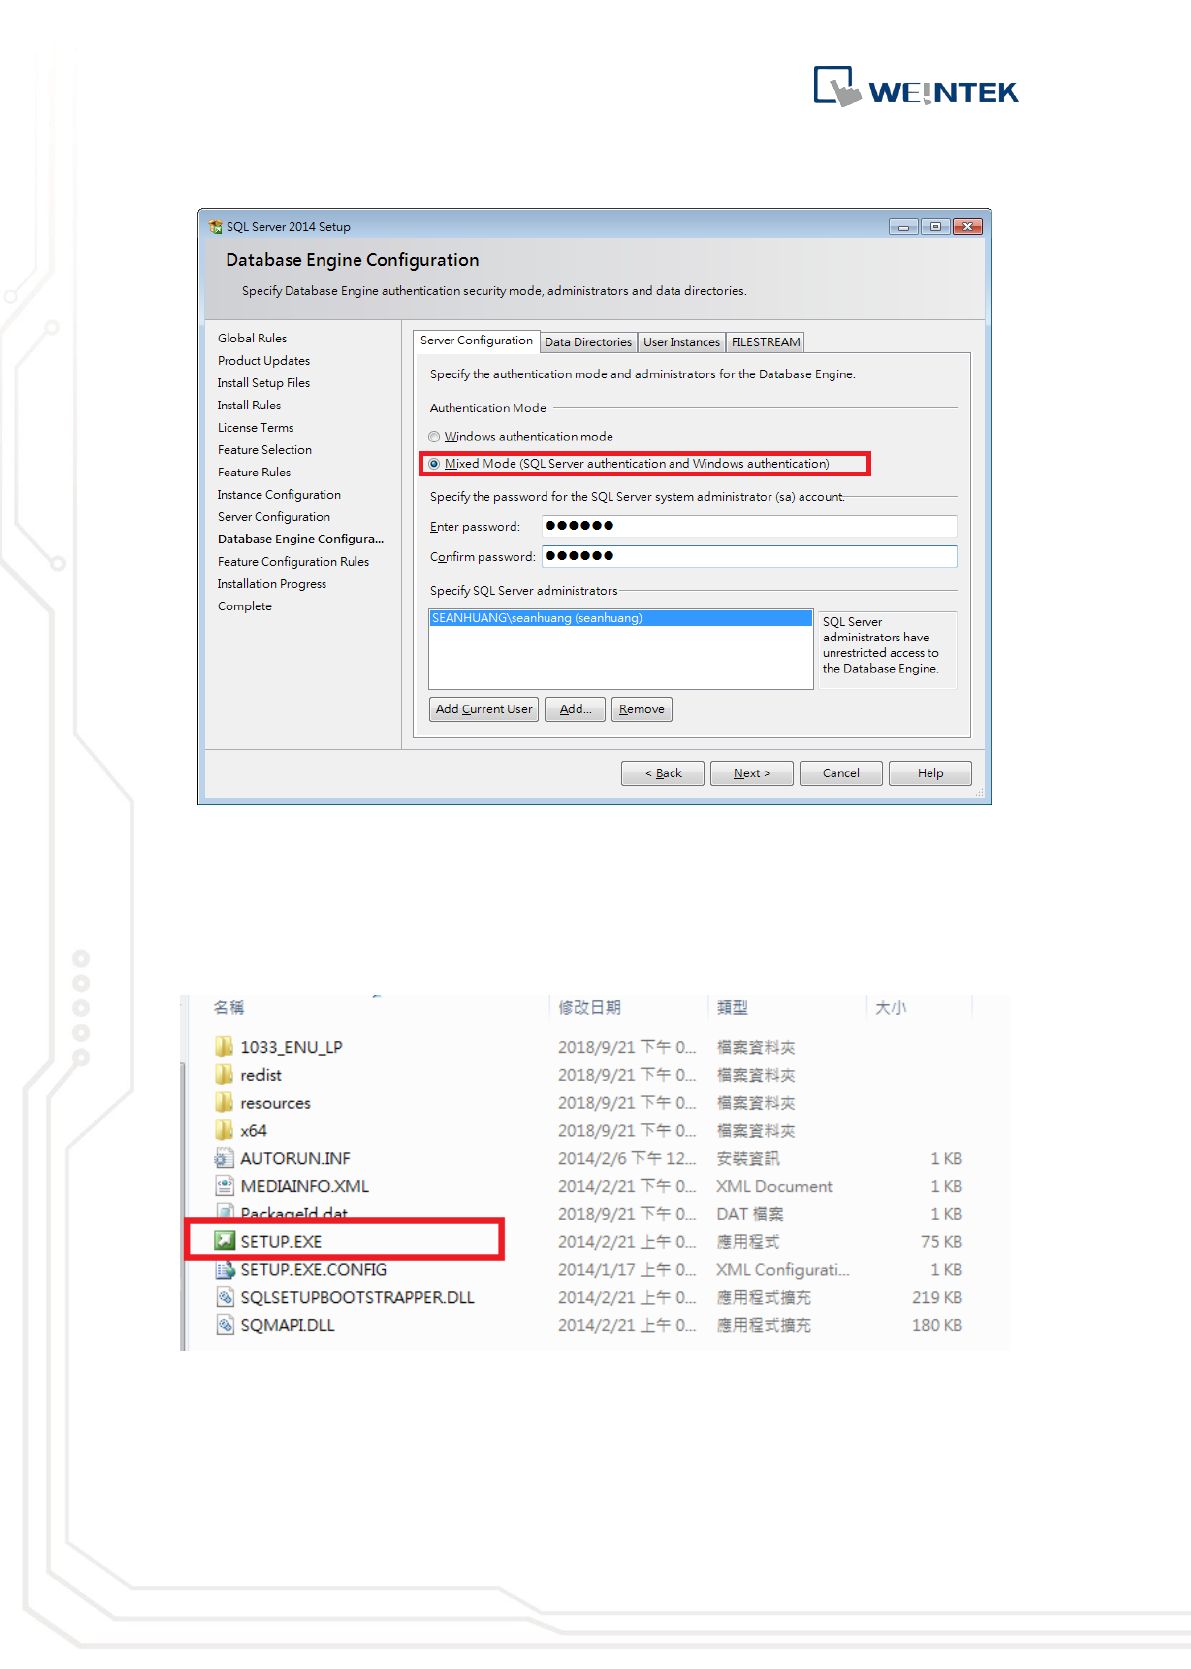
Database Server
4
password.
10. Install and run “MgmtStudio 64 BIT\SQLManagementStudio_x64_ENU.exe”
file, a “SQLManagementStudio_x64_ENU” folder will be generated. Run
“SETUP.EXE” file in this folder to start installing.
If the OS of your PC is Windows 7 32BIT x86, please install “MgmtStudio 32
BIT\SQLManagementStudio_x86_ENU.exe”.
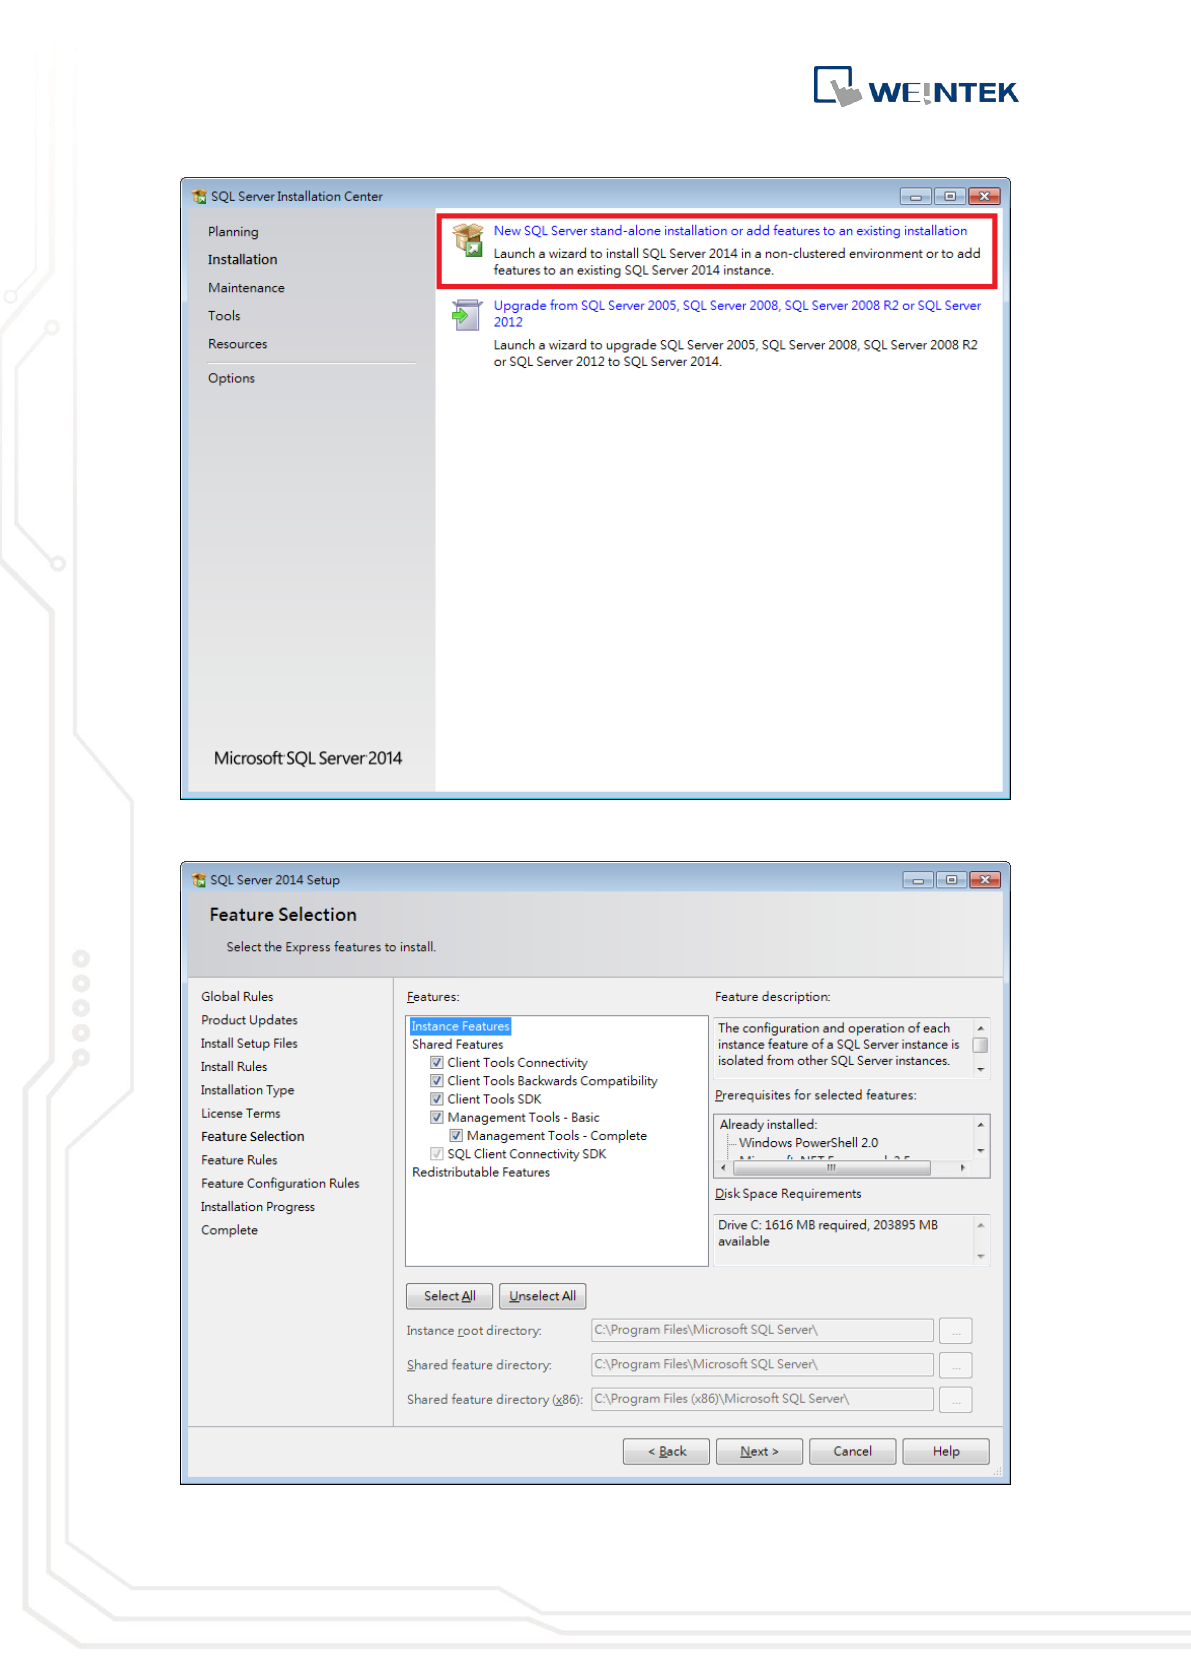
11. Click [New SQL Server stand-alone installation or add features to an
existing installation].
Database Server
5
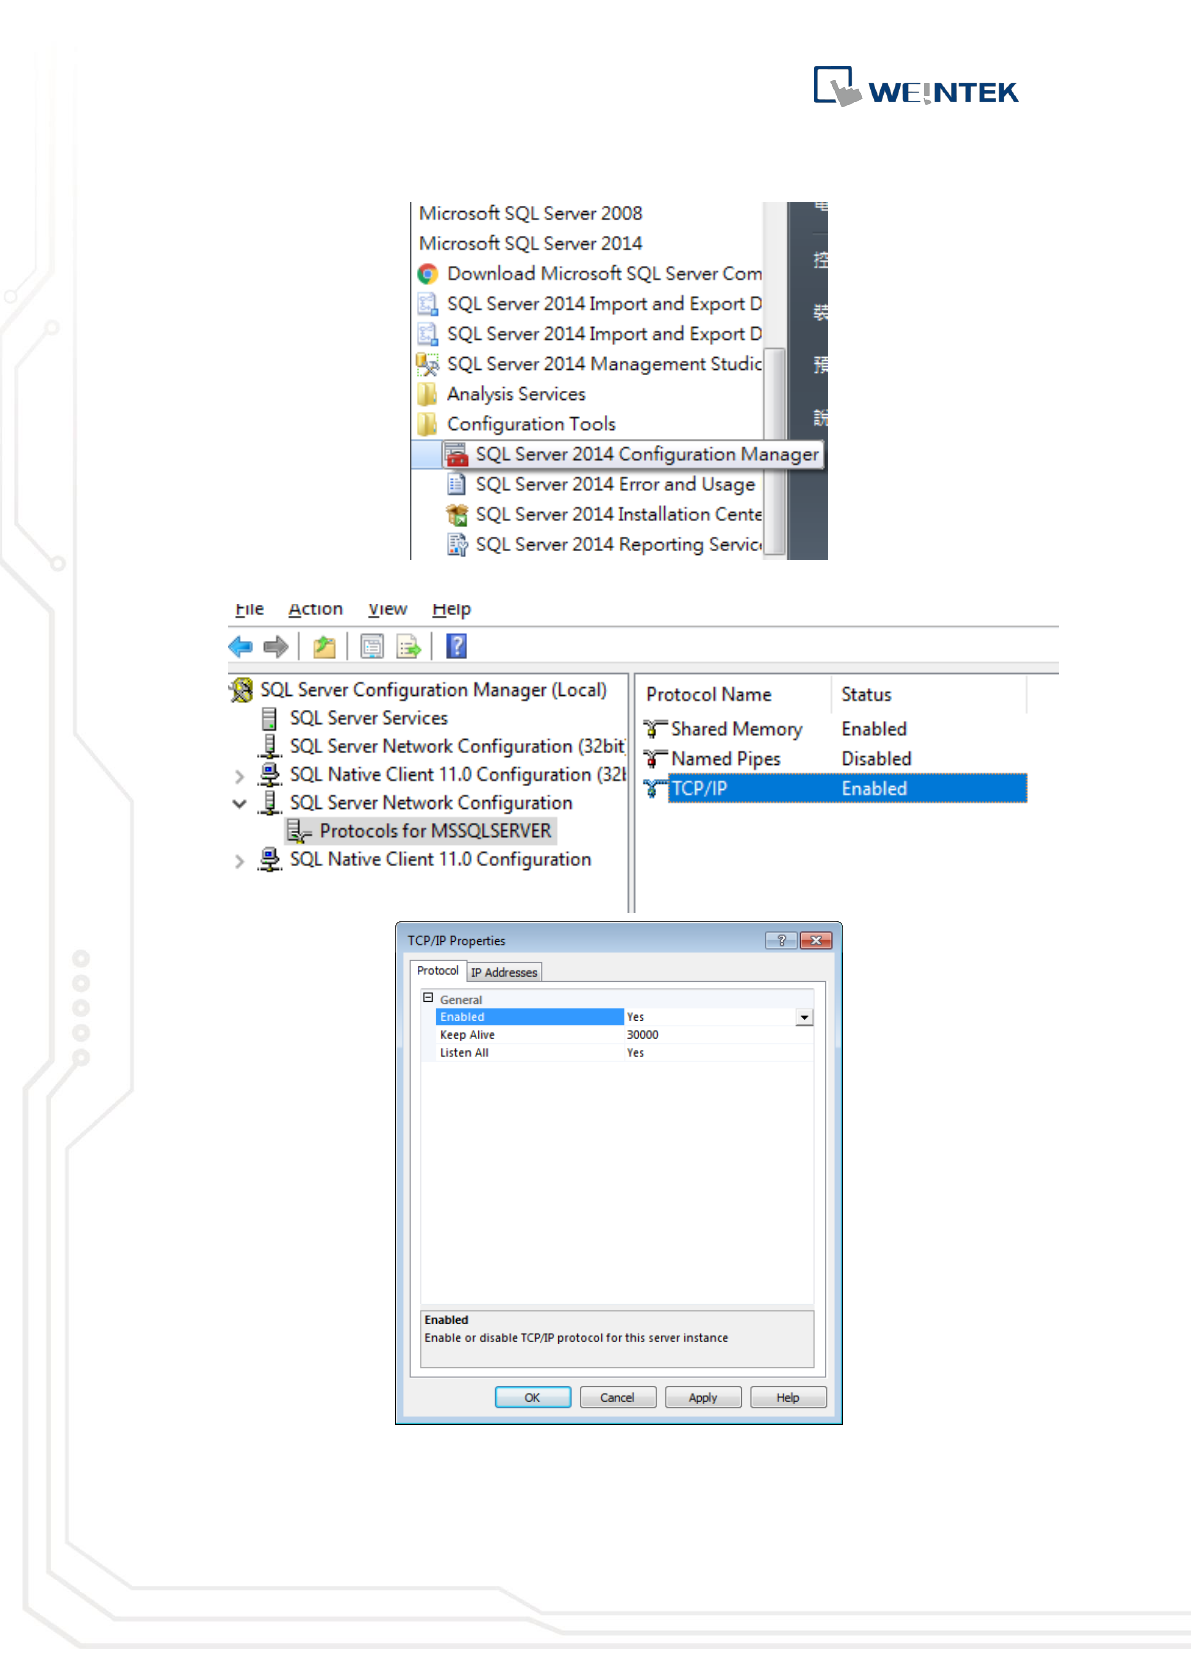
12. Use default settings in Feature Selection window.
Database Server
6
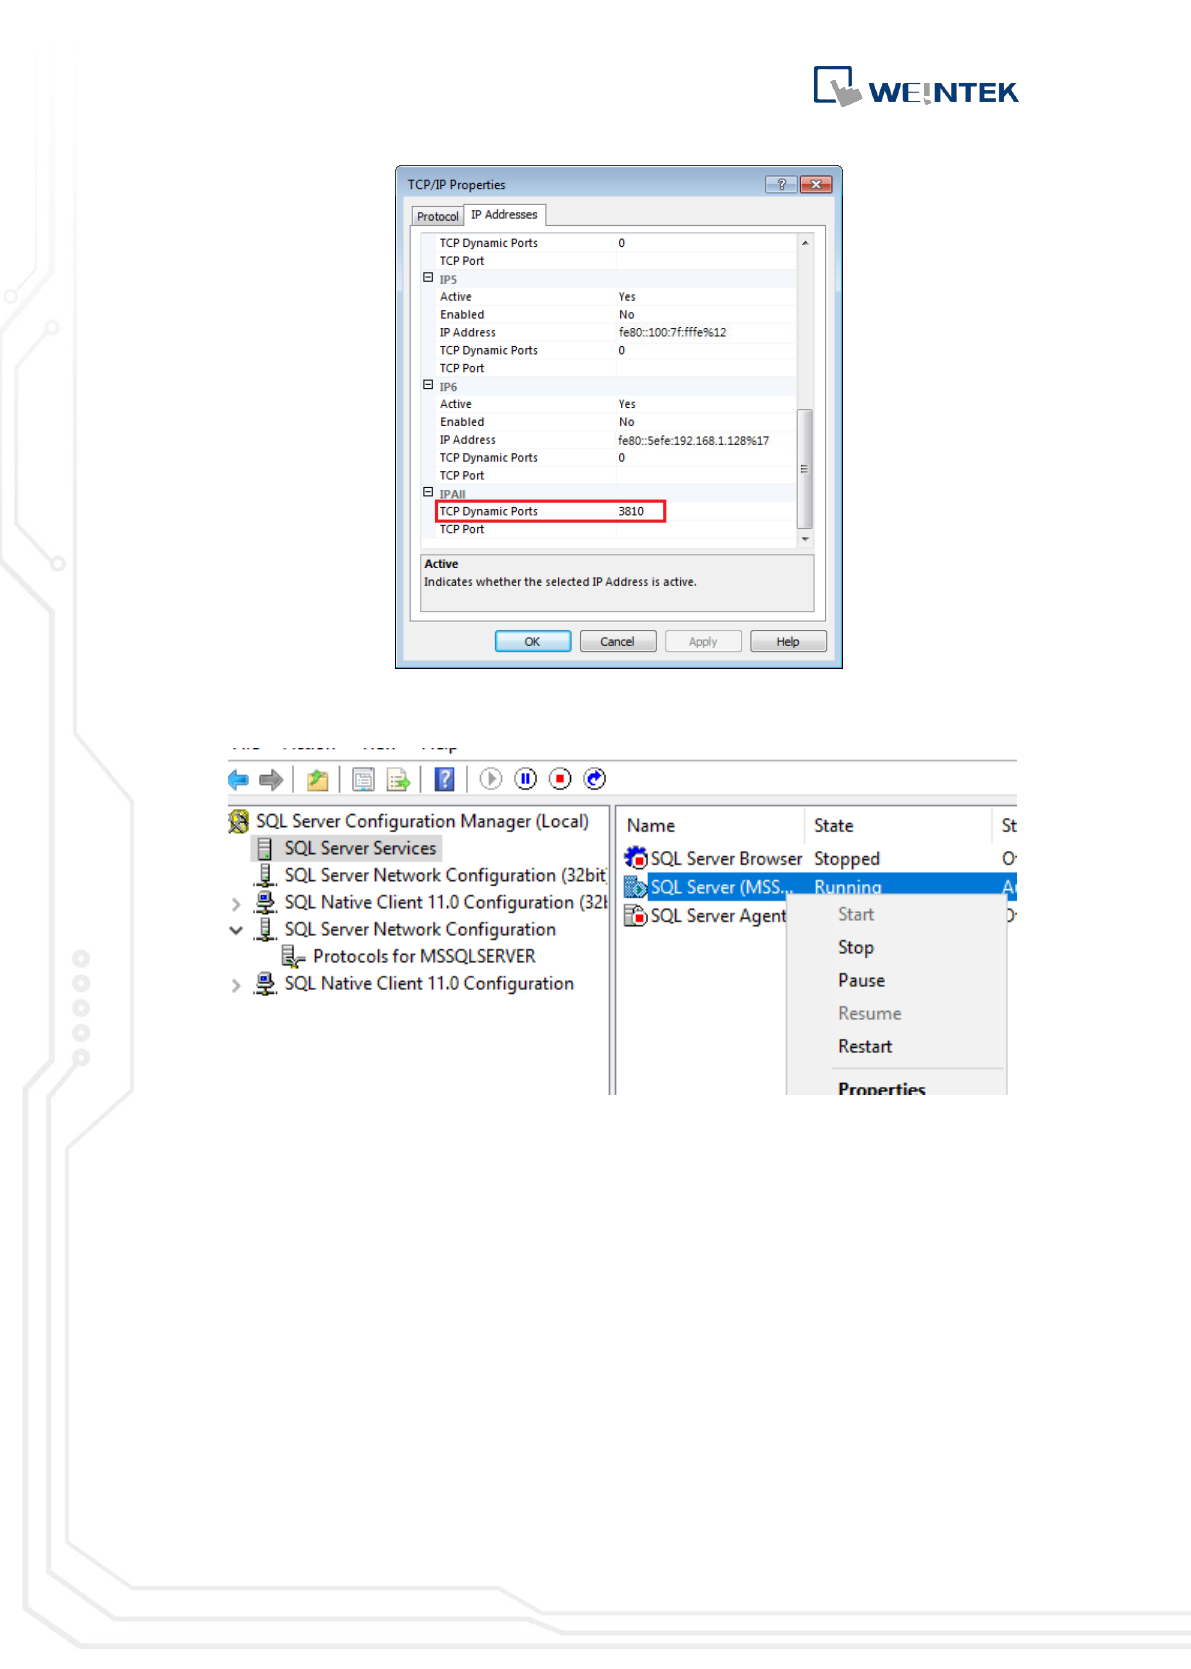
13. When finish installing, open “SQL Server Configuration Manager”.
14. Under “SQL Server Network Configuration”, enable TCP/IP.
15. SQL Server port number can be found in IP Addresses tab.
Database Server
7
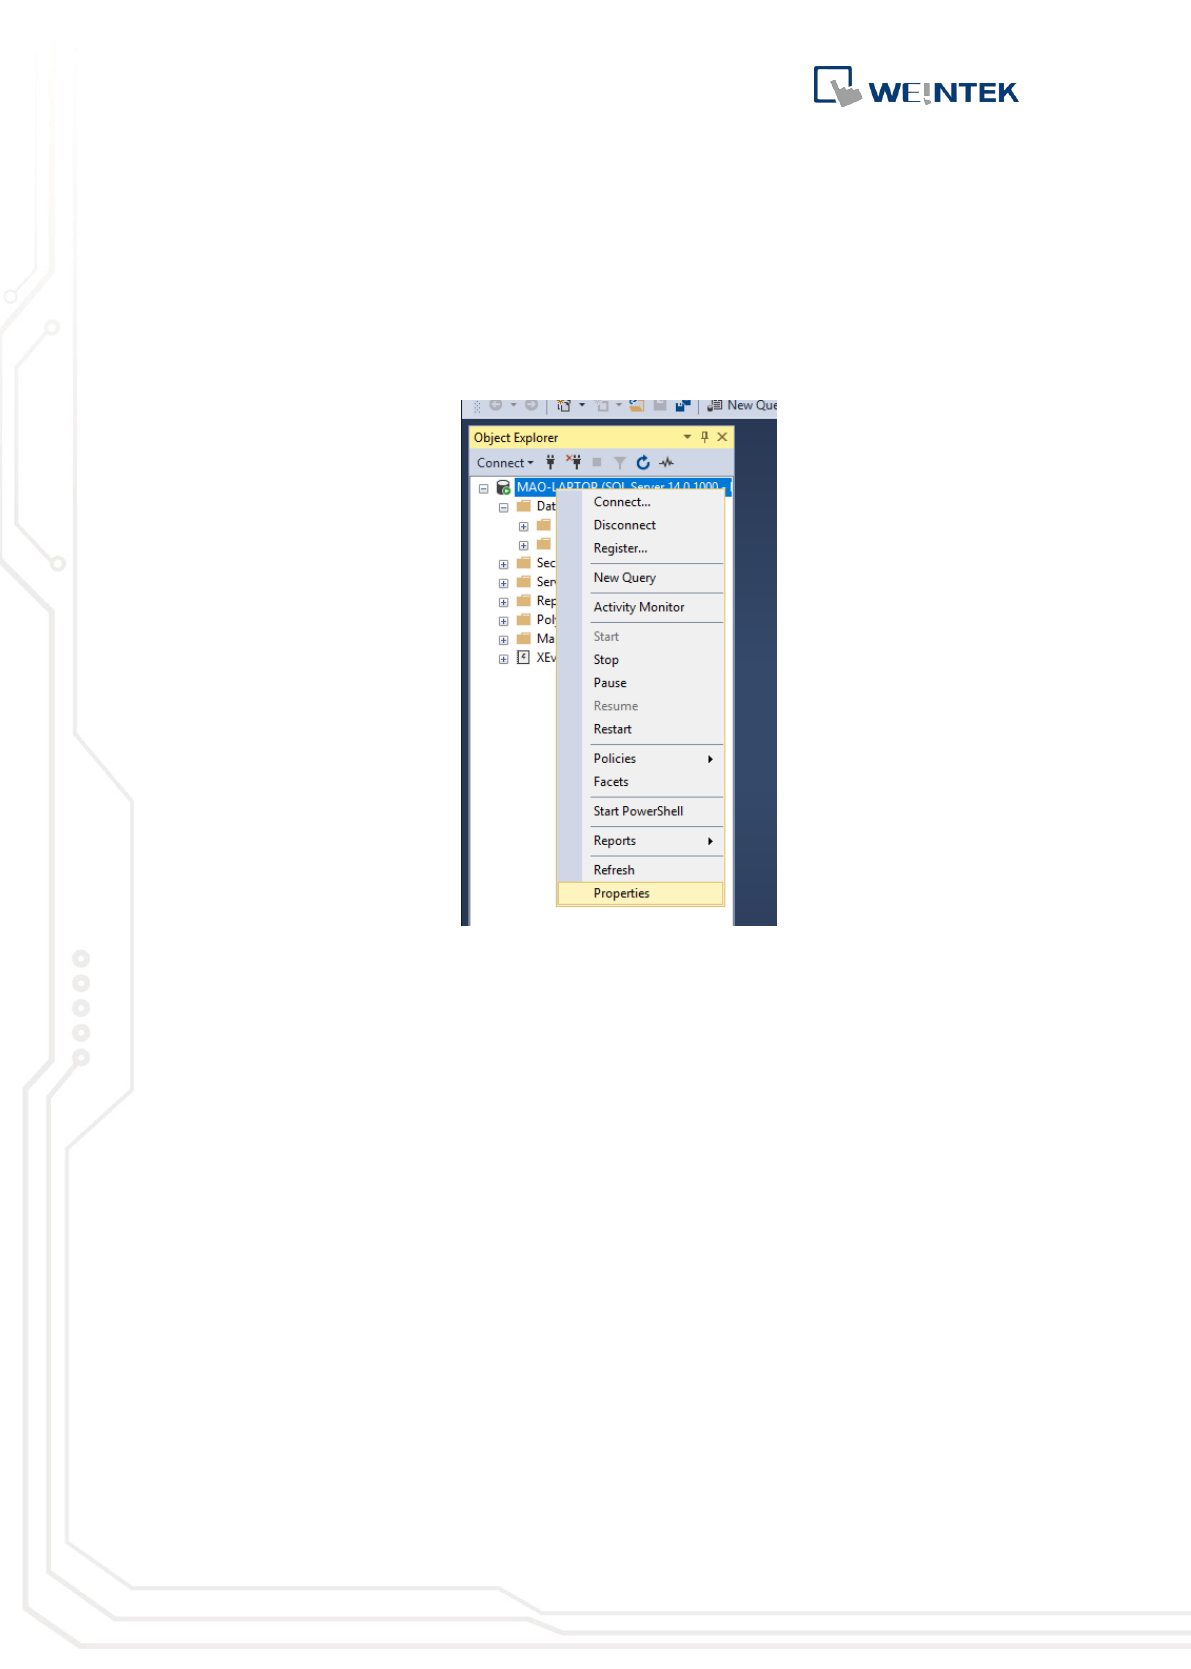
16. Under “SQL Server Services”, right-click on “SQL Server” and then click
[Restart].
Database Server
8
3. Building Database
After installing MS SQL, a Database must be created in MS SQL for synchronizing HMI
historical data to the database with the same name.
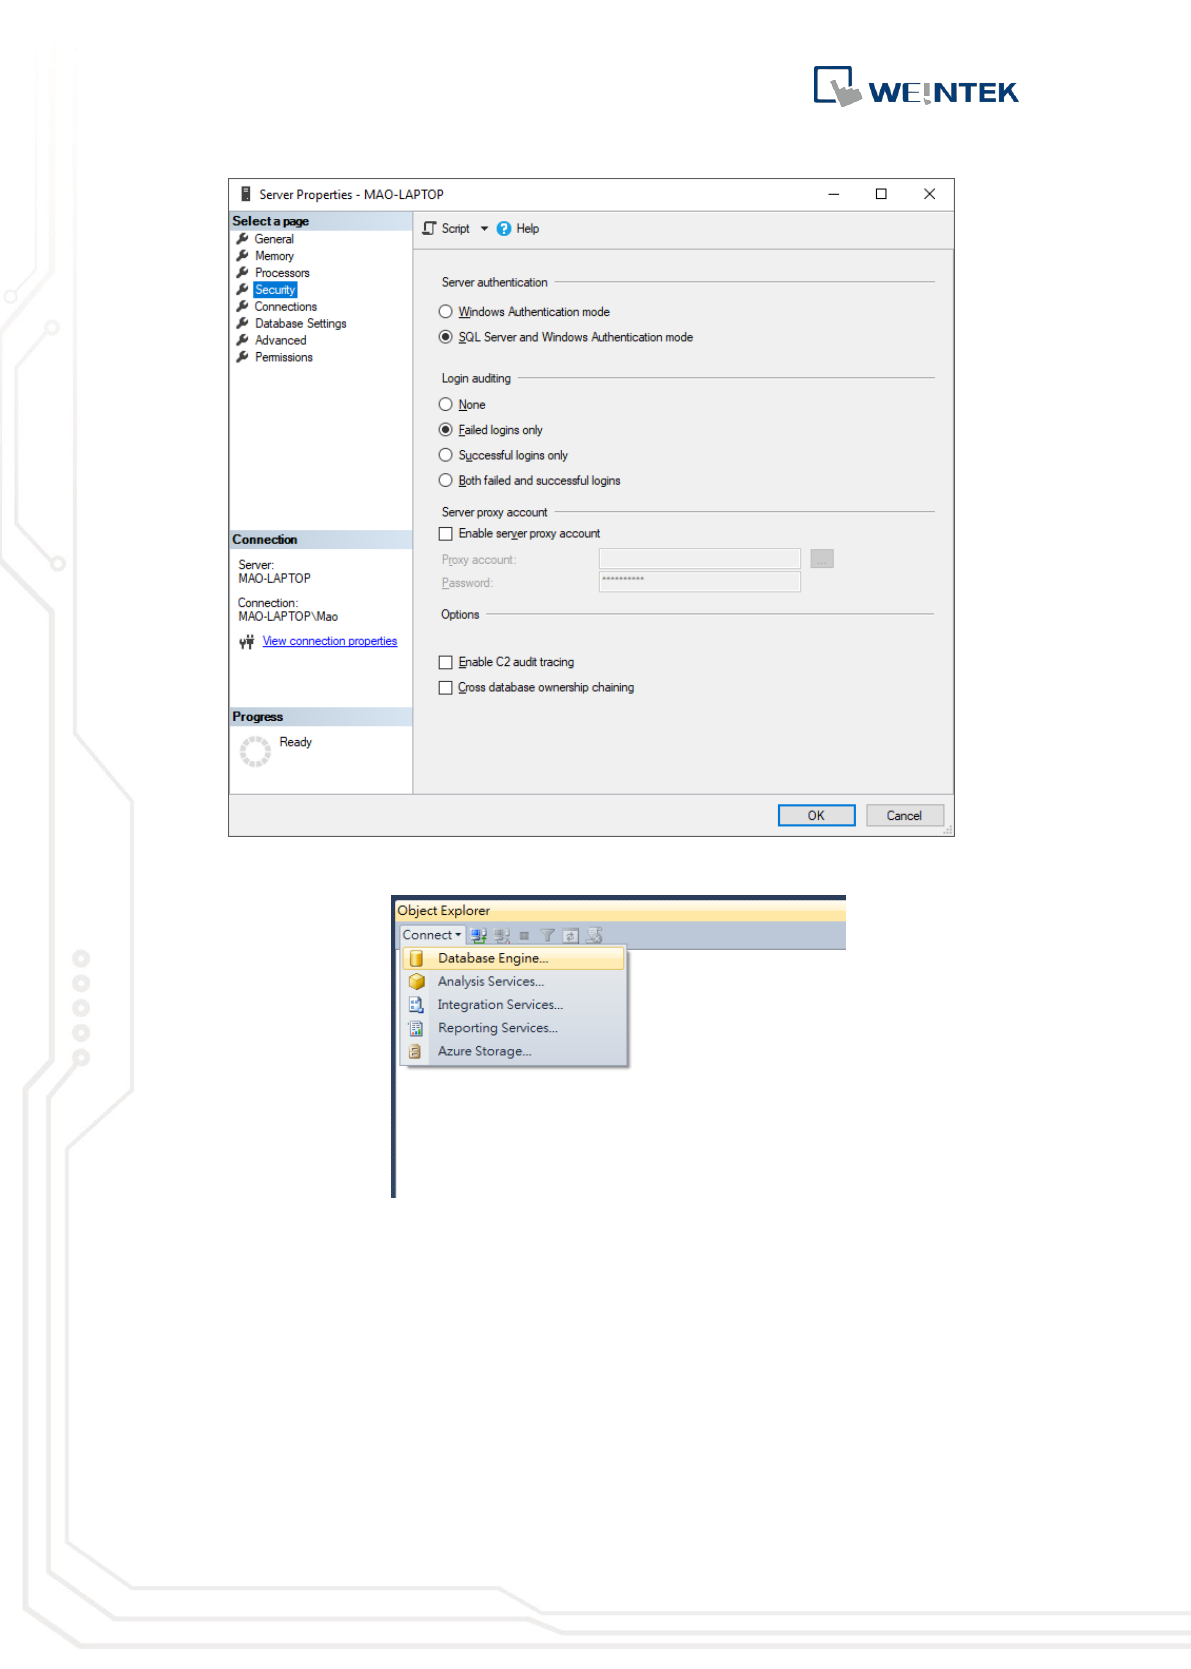
1. Launch Microsoft SQL Server Manage Studio (SSMS). Right-click on the
server and select [Properties].
2. Under Security select [SQL Server and Windows Authentication mode] for
Server Authentication.
Database Server
9
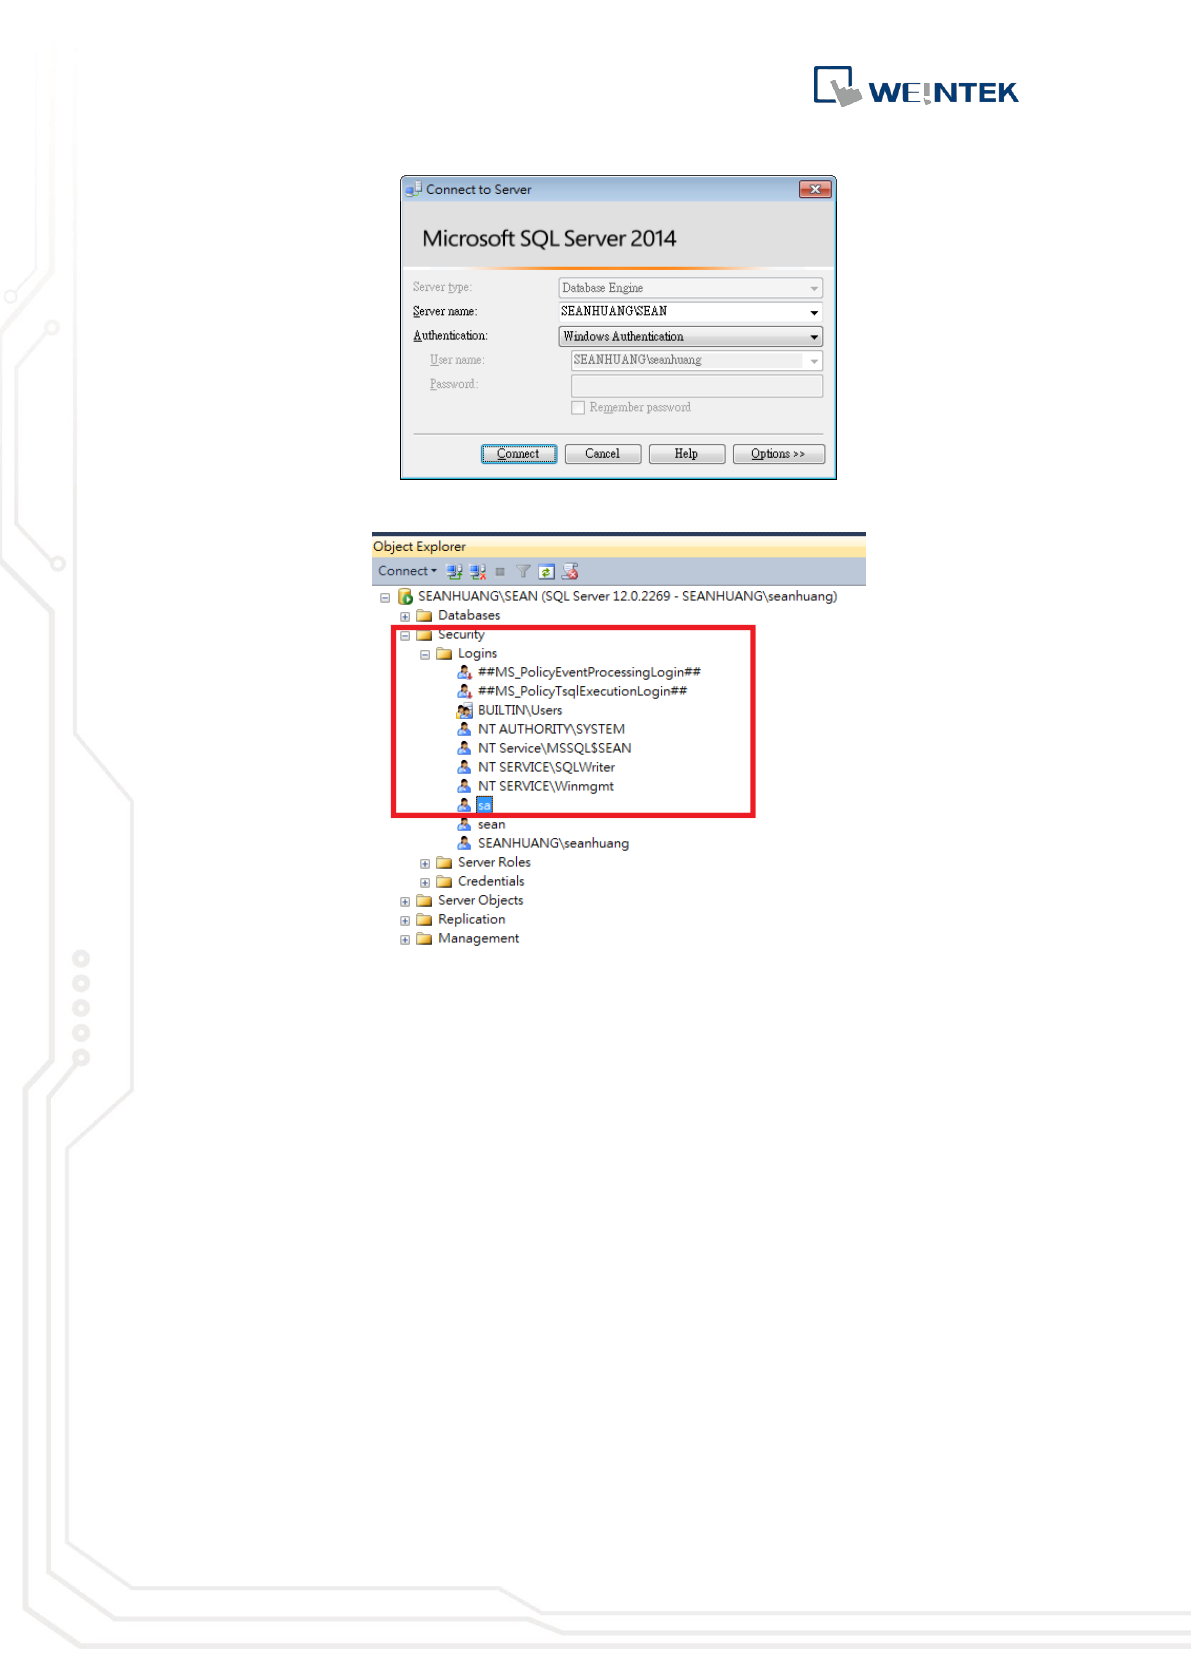
3. Select [Connect] and then select [Database Engine].
4. Select a server name. For the first login, select [Windows Authentication]
and then click [Connect].
Database Server
10
5. Double click the left mouse button to select [Security] » [Logins] » [sa].
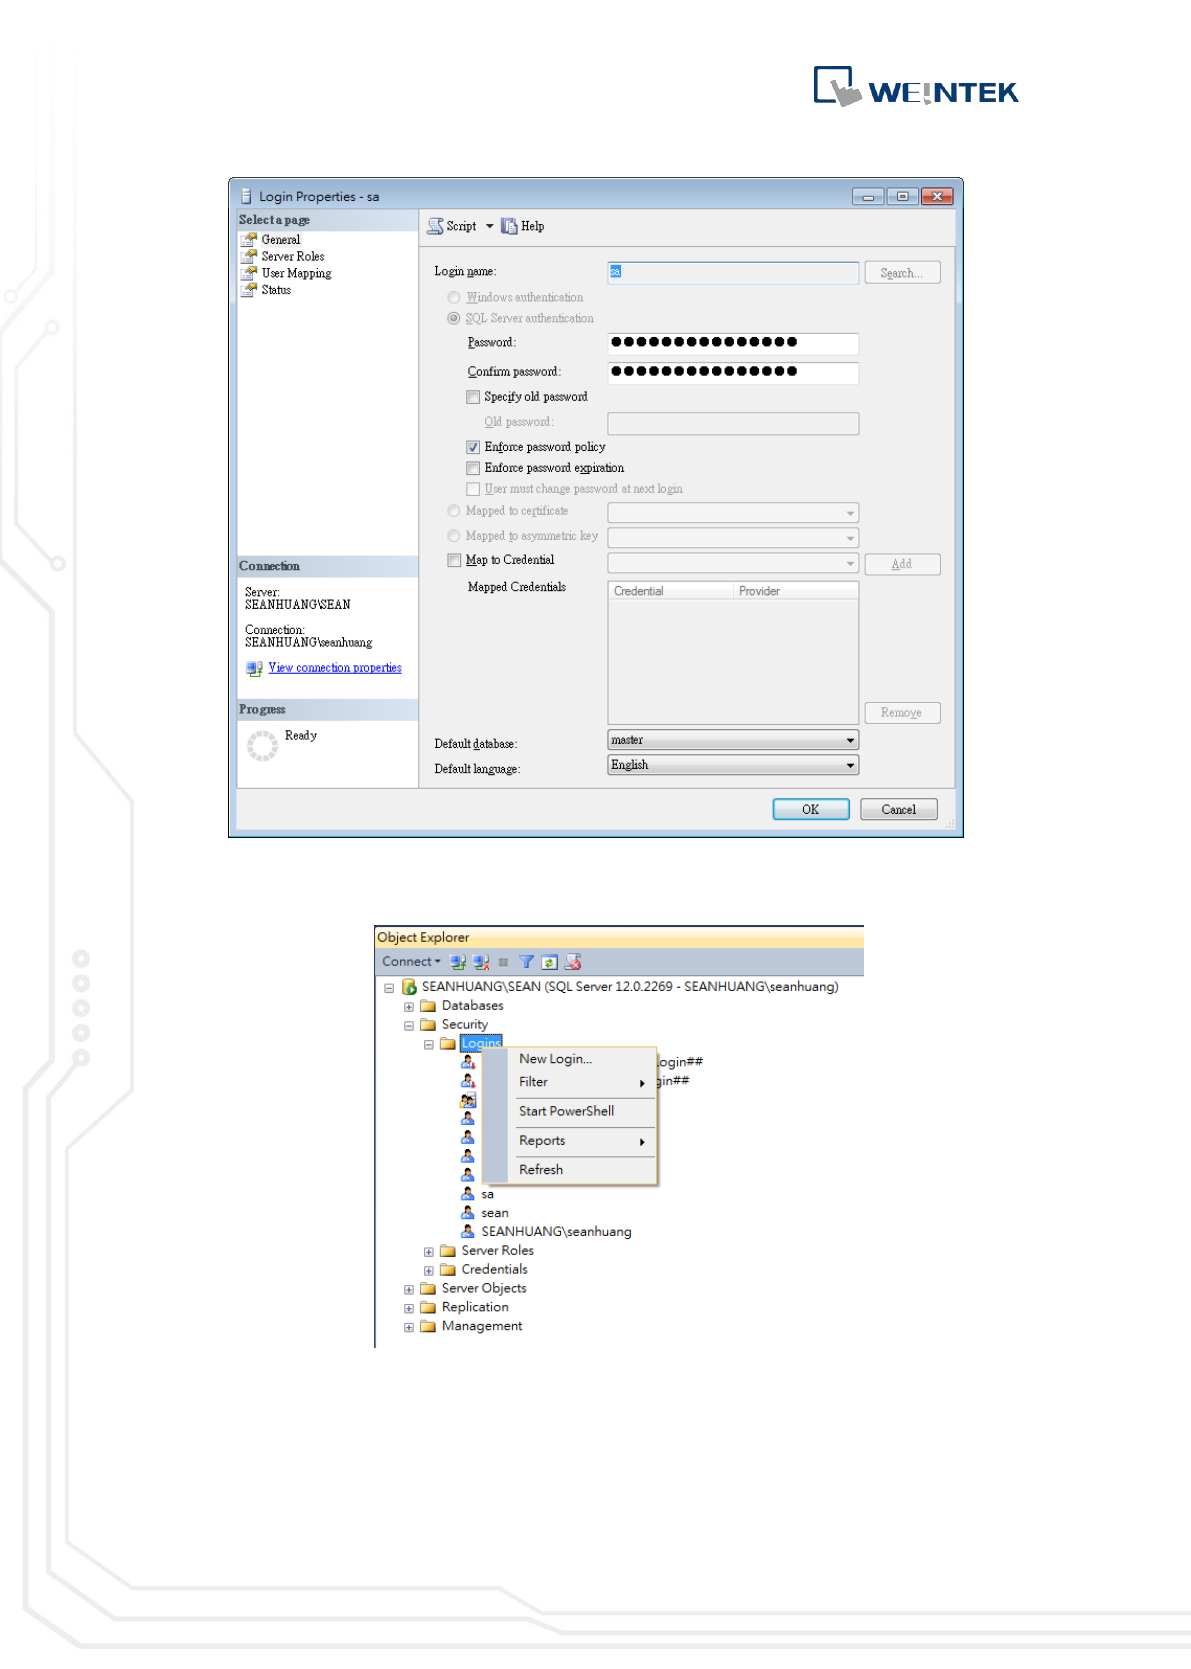
6. Enter password and then click OK. When setting Database Server in
EasyBuilder Pro, the username will be “sa” and the password will be the
password entered here.
Database Server
11
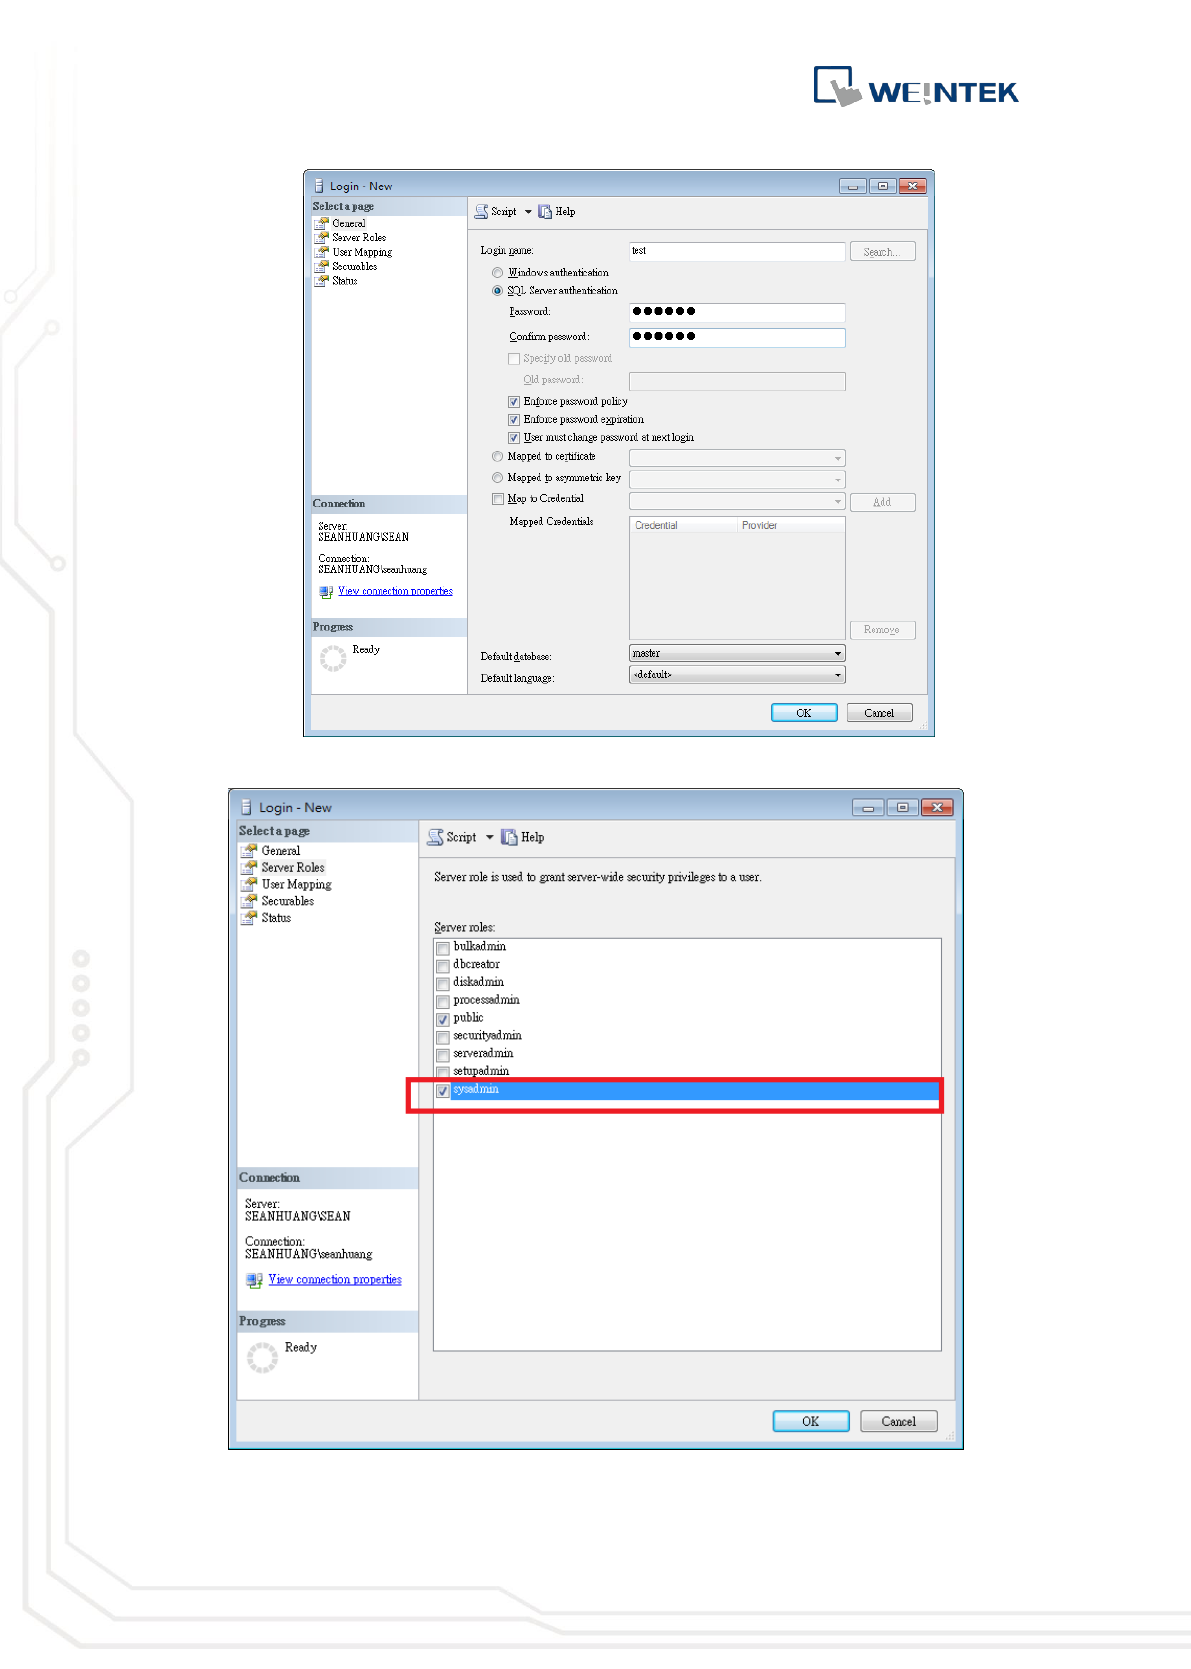
7. To add new login, open [Security], right-click on [Logins], and then select
[New Login].
8. Enter [Login name], select [SQL Server authentication] and then enter the
password.
Database Server
12
9. Select [sysadmin] in [Server roles].
10. Click [OK] when finish setting.
Database Server
13
4. Designing Project File
This chapter goes through the configuration in EasyBuilder Pro.
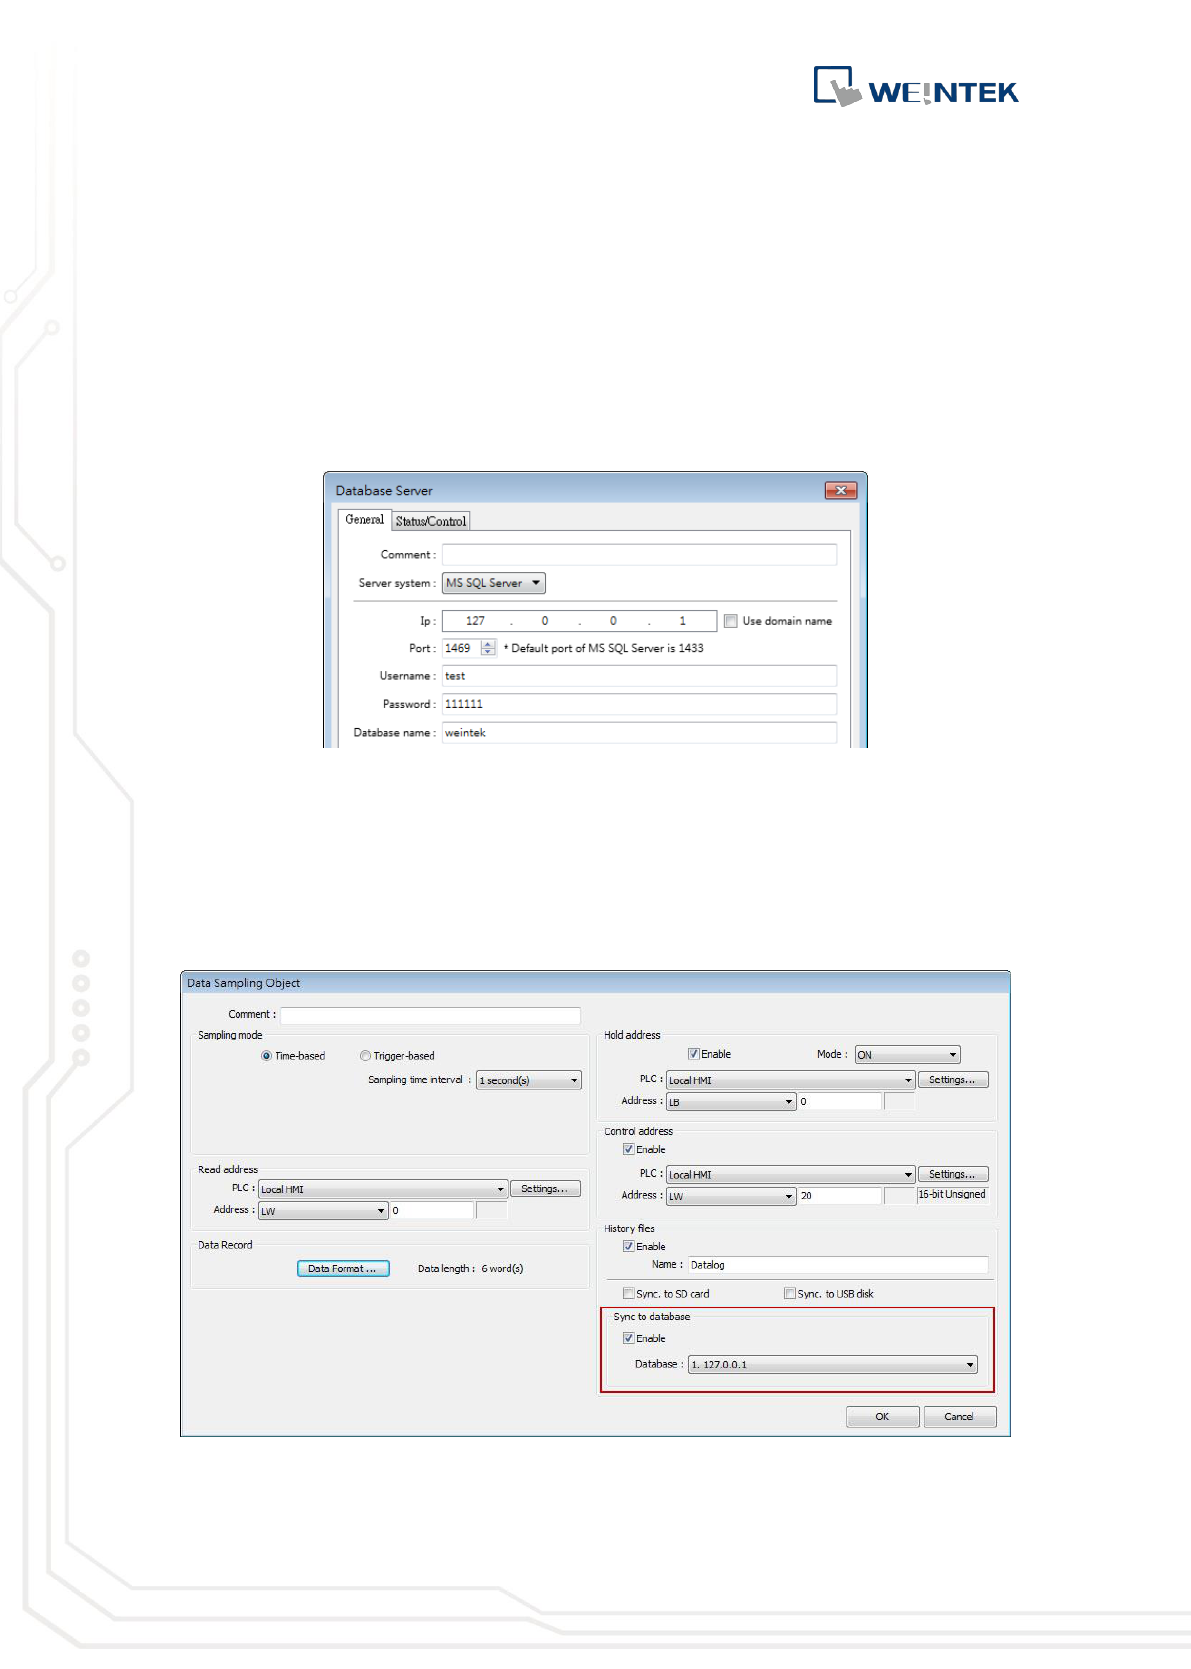
1. In EasyBuilder Pro main menu click [Objects] » [Database Server].
2. In General tab set the Database Server parameters. The default port
number for MS SQL is 1433. If connecting with this port number is not
possible, please find the correct port number by referring to the steps in
Chapter 2 in this manual.
3. In Address tab set Status Address and Control Address. The status
addresses can display the connection status with MS SQL server on HMI,
and the control addresses can be used to change connection parameters
dynamically on HMI.
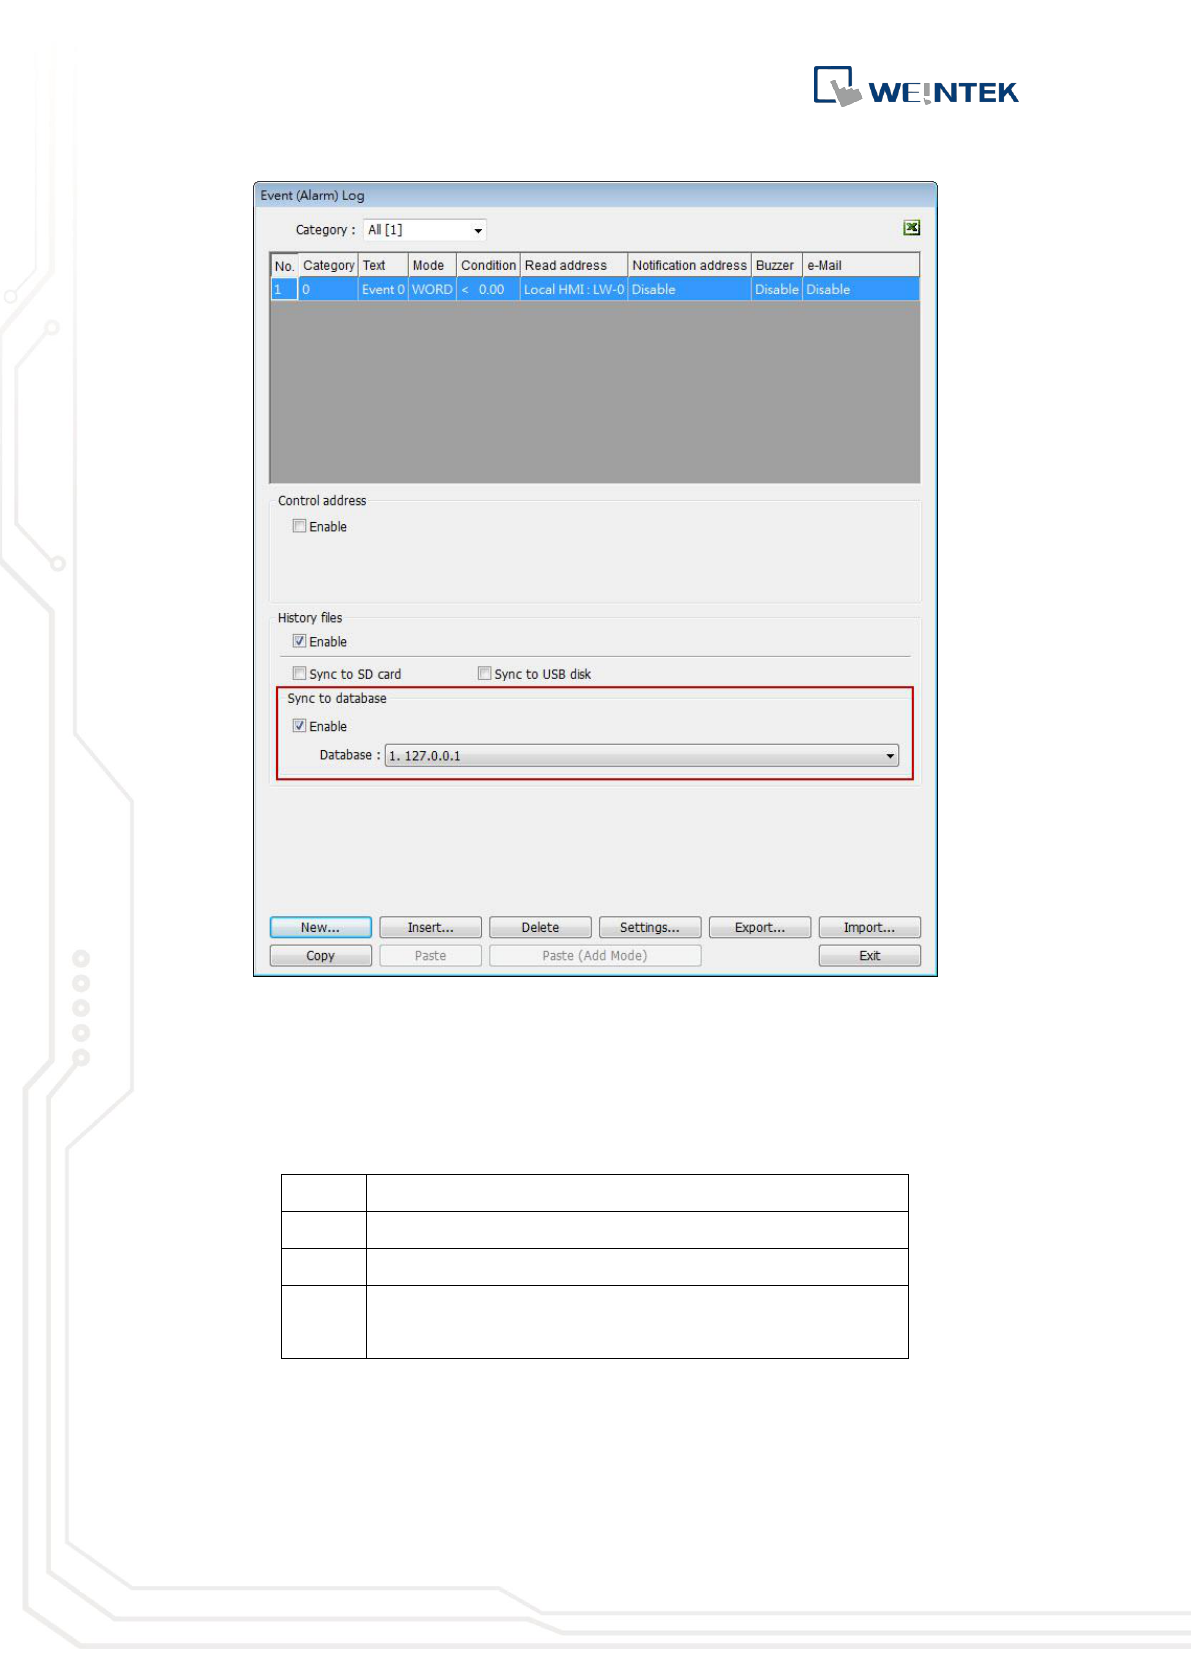
4. Select [Sync to database] for both Data Sampling object and Event Log
object, to synchronize the historical data to the Database Server.
Database Server
14
Note: The data will be synchronized to MS SQL server only when the number of data
log / event log records reaches 10000. To start synchronization manually, please
select [Enable] check box in the Control Address group box in the settings window of
Data Sampling / Event Log object, and then give command by entering the
corresponding value in the designated address.
Value
Command
1
Clear data in cMT HMI.
2
Synchronize data to the external device.
3
Synchronize data to the external device and then
clear data in cMT HMI.
Please see EasyBuilder Pro User Manual Chapter 7 Event Log and Chapter 8 Data
Sampling for more details on the synchronization rules of historical data.
Database Server
15
5. SQL Query
This chapter explains how to use SQL Query.
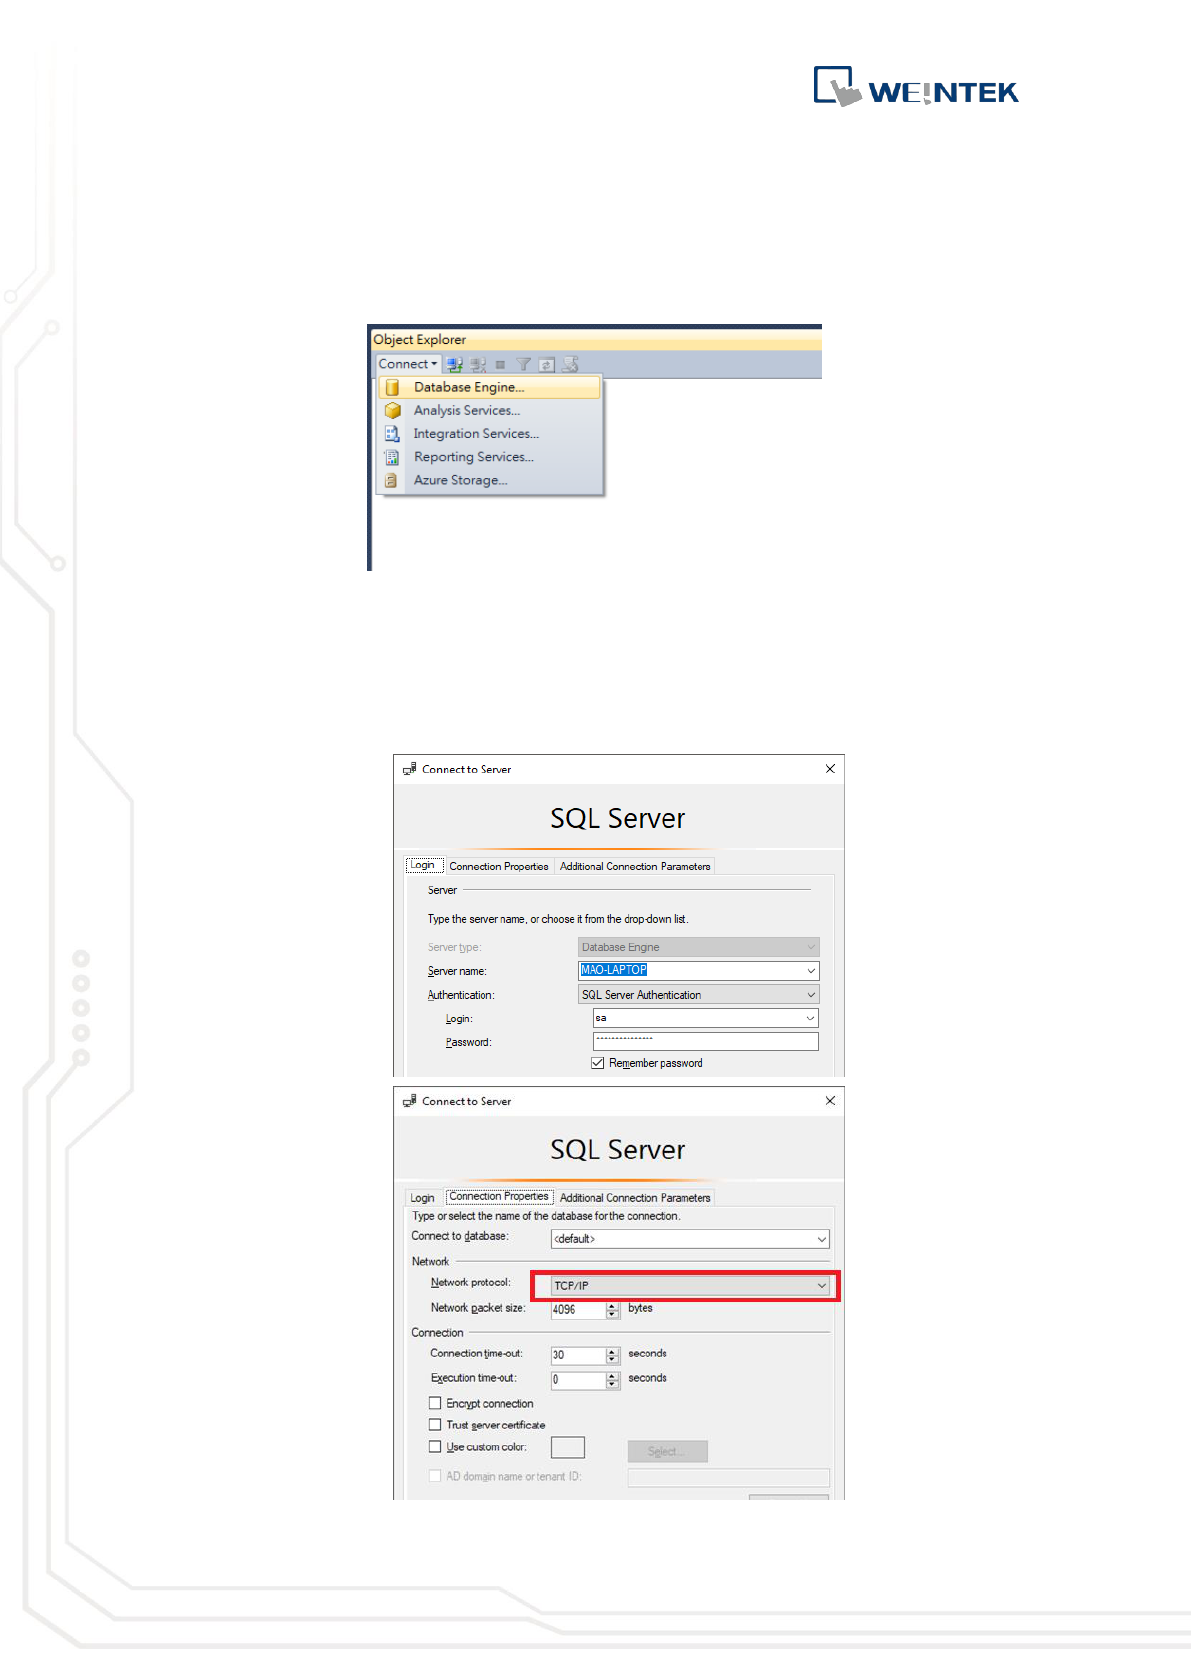
1. Launch Microsoft SQL Server Manage Studio(SSMS). Select [Connect] »
[Database Engine].
2. Select a Server Name, and select [SQL Server Authentication]. Enter Login
Name and Password. (Login name can be “sa” as configured in the
preceding chapter: 3: Building Database, or any user-defined name.) In
Connection Properties tag select TCP/IP for [Network protocol], and then
click [Connect].
Database Server
16
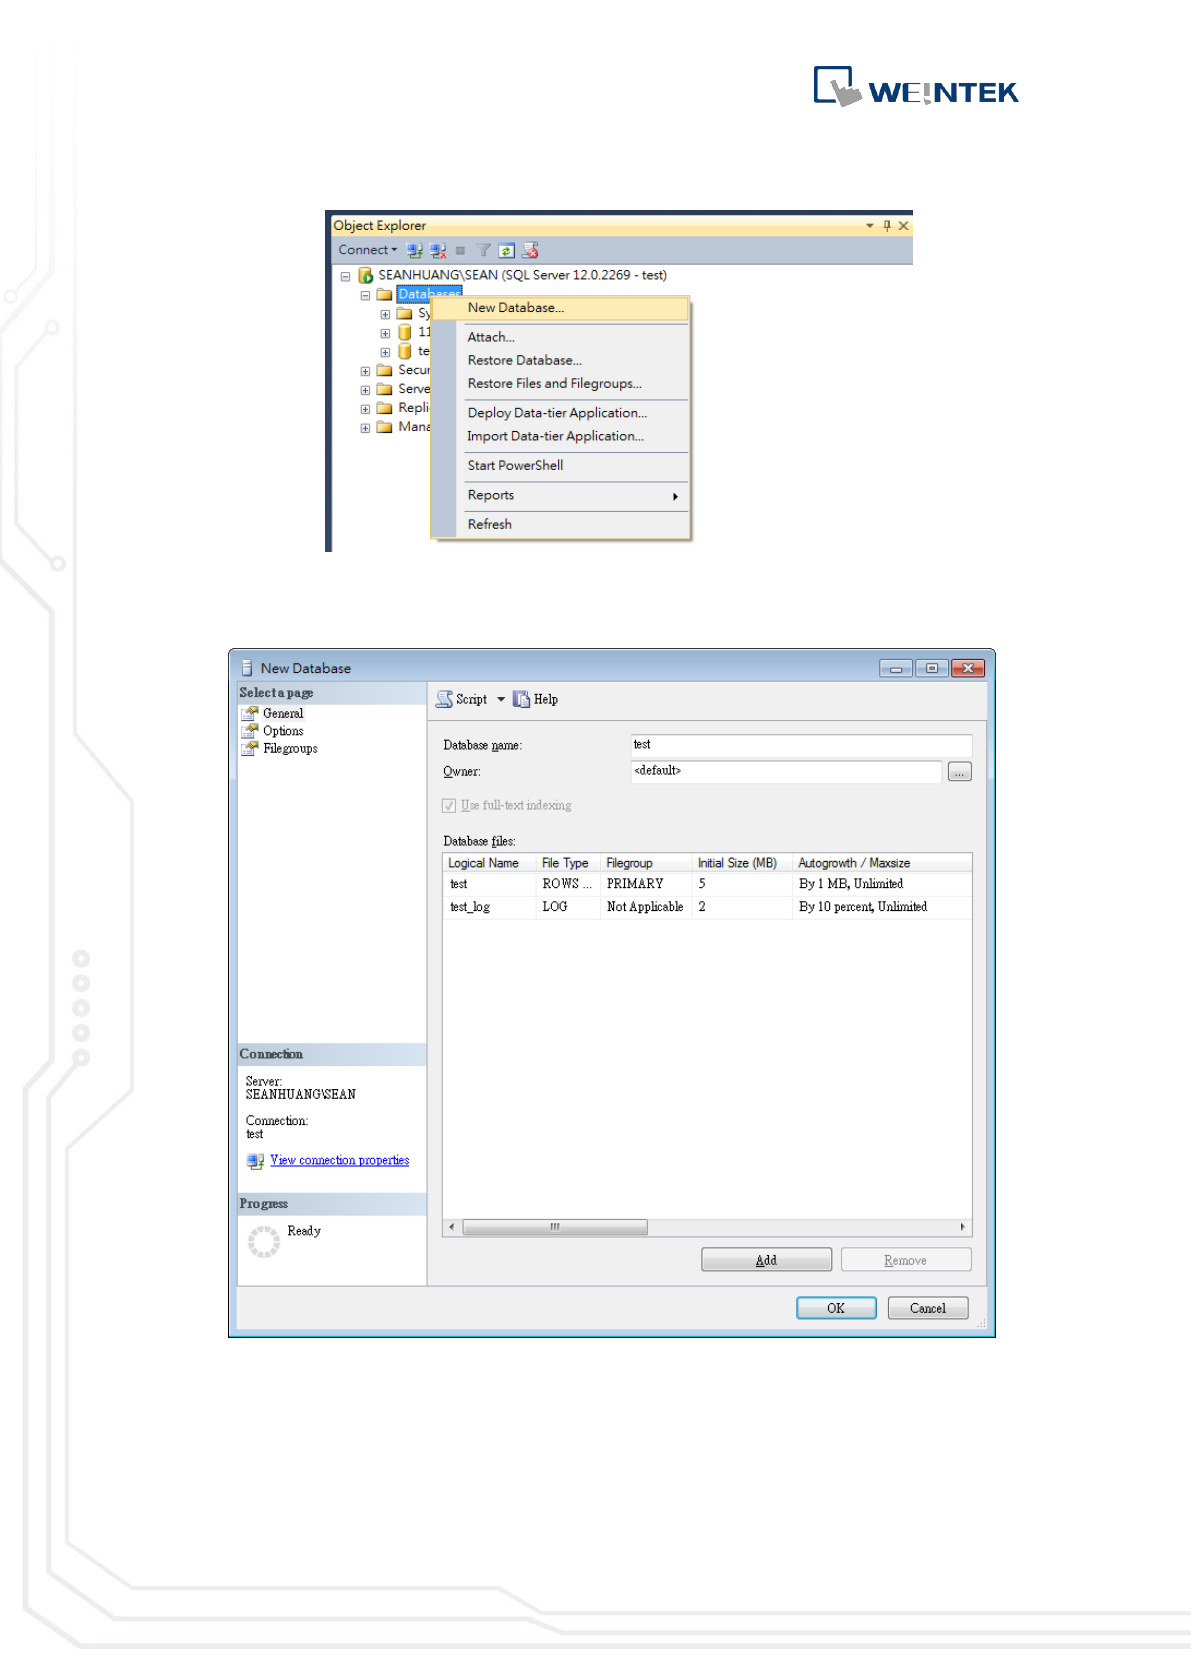
3. Right-click on [Database] and then select [New Database].
4. Enter a [Database name], click [OK]. The Database Name is defined in
[Database Server] » [Database name] in EasyBuilder Pro.
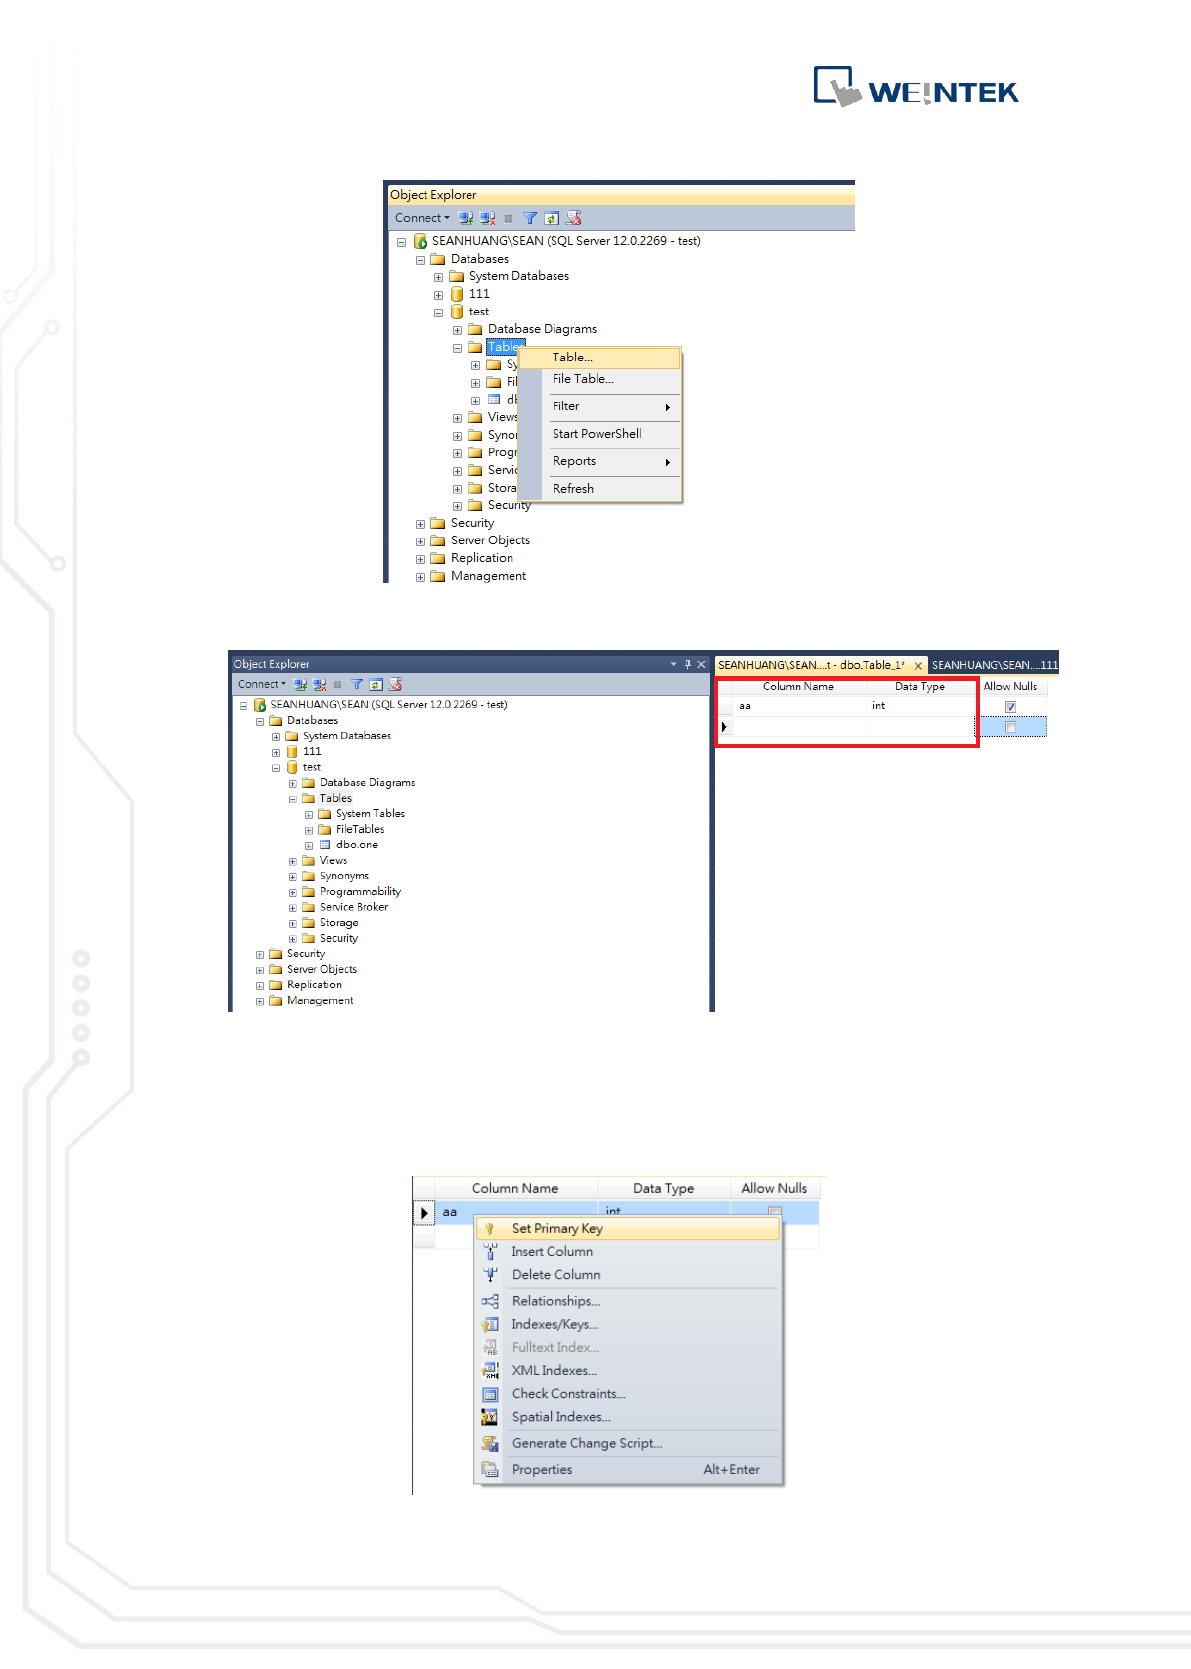
5. Right-click on [Tables] under the new database, and then click [Table…] or
[Add Table].
Database Server
17
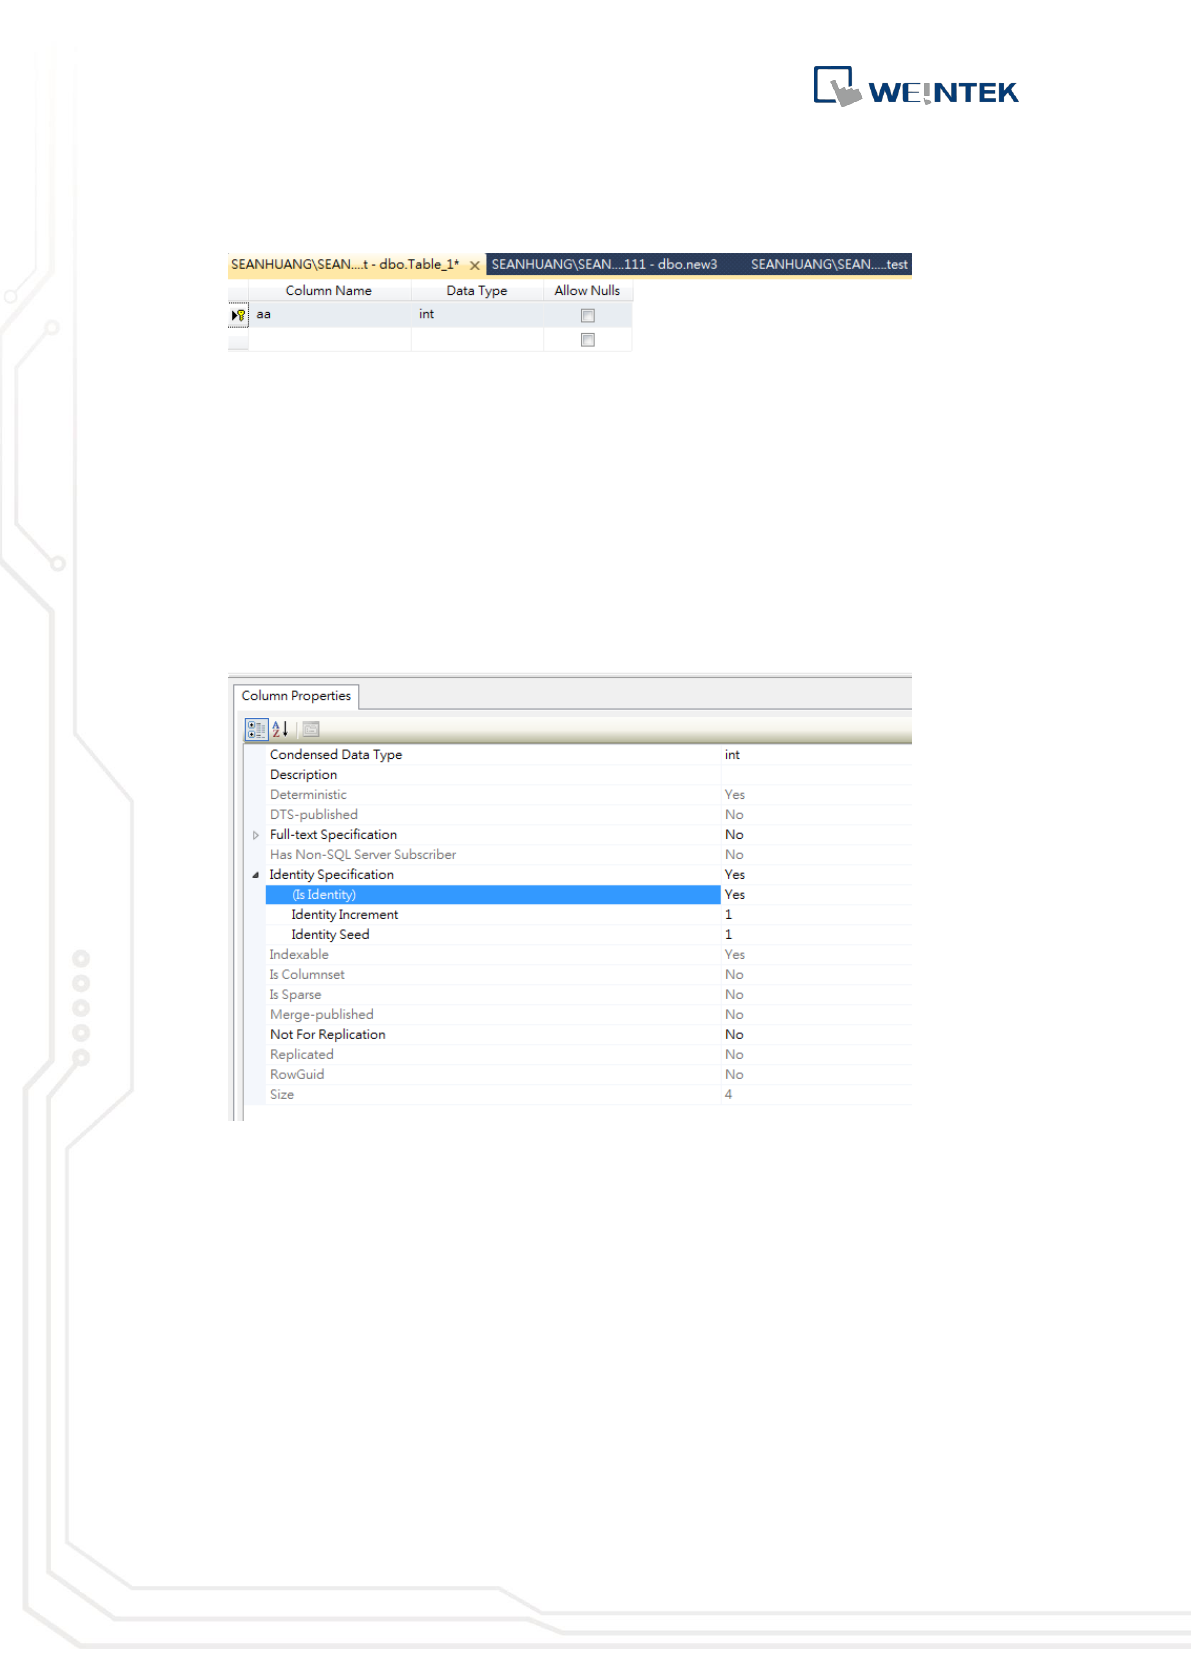
6. Create [Column Name] and [Data Type].
7. Right-click on the column name to be set as Primary Key and then select
[Set Primary Key]. Setting Primary Key is necessary for the SQL Query
General Setting in EasyBuilder Pro. For Advanced Mode, this step can be
skipped.
Database Server
18
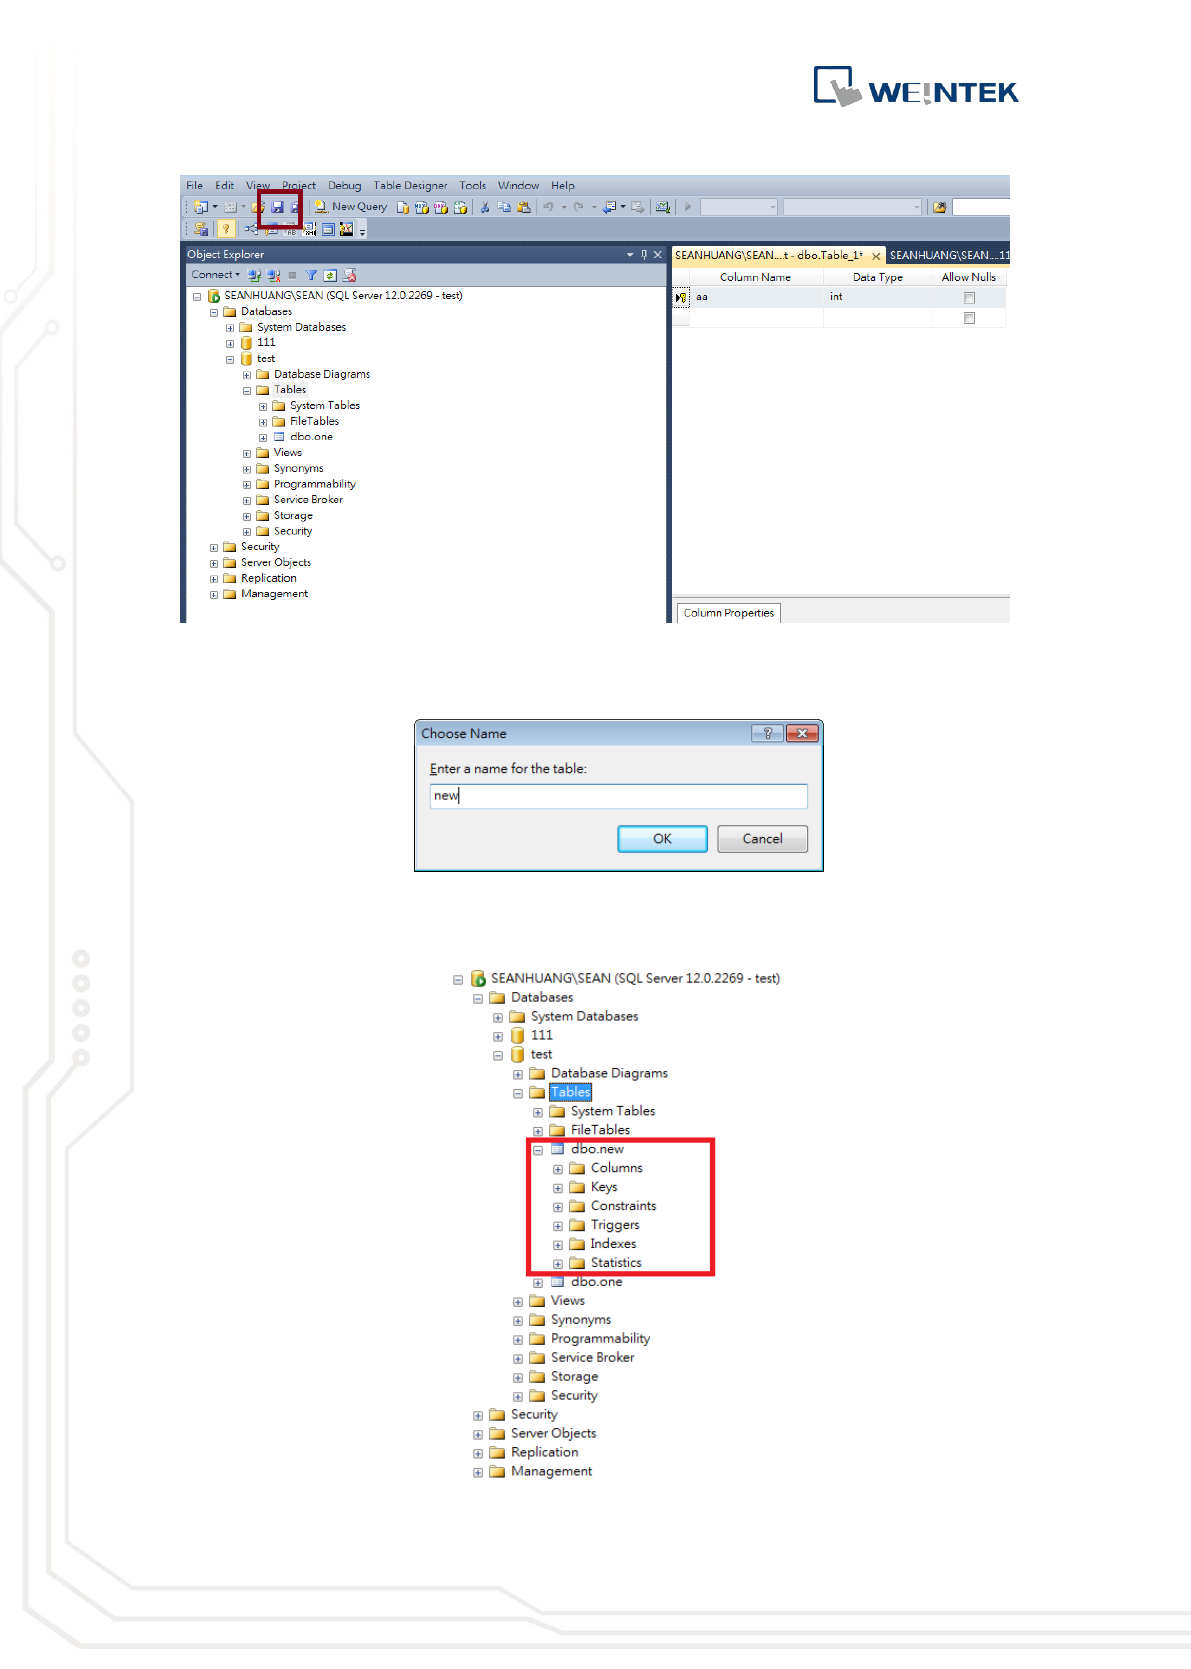
8. Set Yes for [Column Properties] » [Identity Specification] » [Is Identity].
(This step can be skipped for Advanced Mode)
9. Click [Save].
Database Server
19
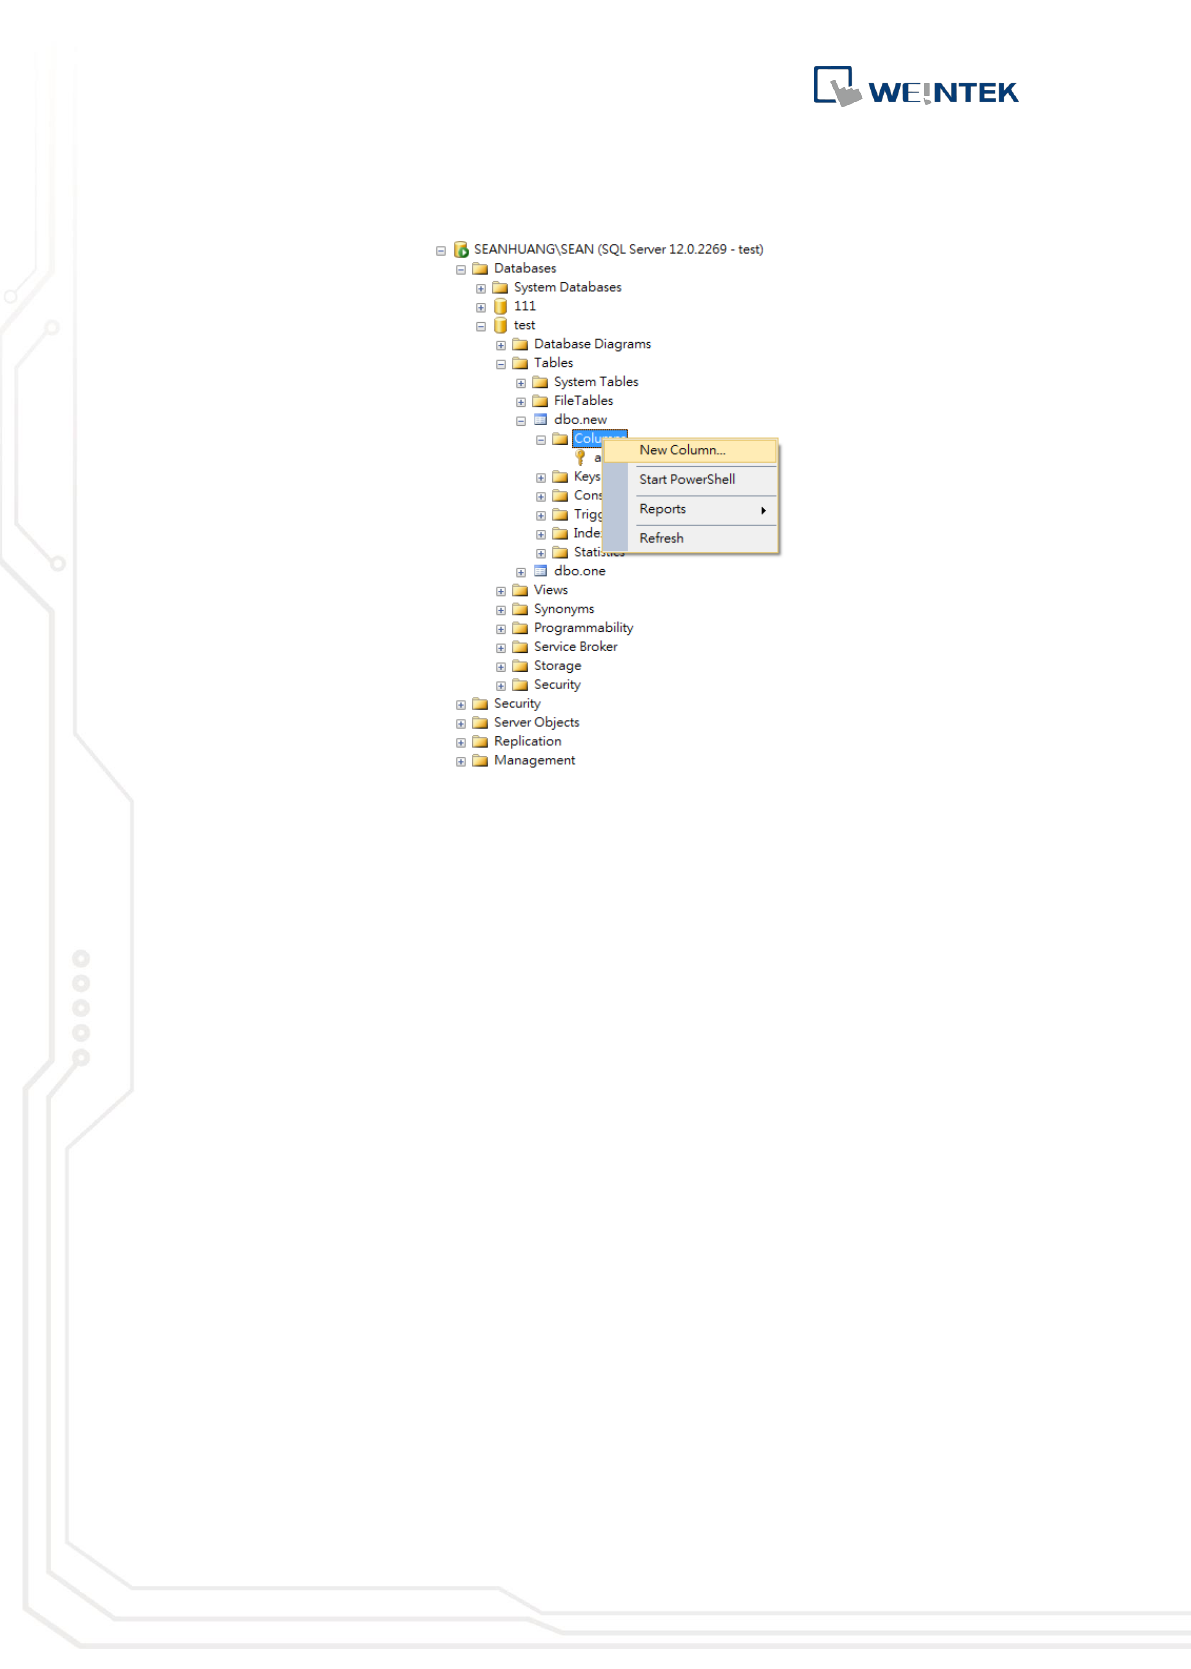
10. A dialog box for naming the table will pop up. Enter the same name as in
EasyBuilder Pro » [SQL Query] » [Table name].
11. Select [Table] and then press the F5 key on the keyboard to see the added
tables.
Database Server
20
12. To change the data in the table, right-click on [Columns] and then select
[New Column].
For more information on SQL Query in EasyBuilder Pro, see EasyBuilder Pro User
Manual Chapter 13.44.2 SQL Query.

